
Make your First Smoke on a Weber Smokey Mountain a Success With These 8 Tips
SmokedBBQSource is supported by its readers. We may earn an affiliate commission at no extra cost to you if you buy through a link on this page. Learn more.
So you have picked up a new Weber Smokey Mountain. It’s all unpacked and ready to go. Or is it?
With a bit of practice you’ll be churning out delicious rib, butt and brisket.
To get you there faster we’ve pulled together 8 tips from seasoned pitmasters to help you get the most out of your new smoker as you learn how to use it.
From what to do before you cook, to how to light your
1) Get to know your new smoker with a dry run
You won’t have to look for very long to find articles online that insist that there is no need to fiddle around with dry runs. But let’s have a look at a couple of reasons why we think it is a good idea.
Meathead Goldwyn of Amazing Ribs has this to say:

Meathead Goldwyn, The Best Setup And Accessories For A
“The first thing to do after you assemble your new grill or smoker is to season it and calibrate it by doing a few dry runs without food.
This will burn off any manufacturer’s grease, and give you a sense for how to set it up to hit the two important target temps that almost all my recipes use: 225°F and 325°F.”
Seasoning refers to creating and leaving a layer of grease and soot on the inside of the smoker. This is achieved by conducting a dry run.
Seasoning your smoker has a couple of benefits:
- It ensures there is an airtight seal around the lid of the barbecue, meaning the temperature is much easier to control.
- It also rectifies a common problem with new smokers. New units are nice and shiny, which might look impressive, but in reality, it means that the temperatures inside the unit run high due to the heat bouncing around off this reflective surface.
- A layer of grease and soot makes the surface less reflective. Once this initial shine is taken off the inside of the unit, you will find it much easier to maintain consistent temperatures.
According to Harry Soo of Slap Yo Daddy BBQ, a successful team from California who are a regular feature of the barbecue competition circuit, seasoning your
Phase 1:
- Cover the water pan with foil.
- Fully load your
Weber Smokey Mountain with charcoal briquettes, and without any water in the pan, let your smoker run as hot as possible. This will get rid of any grease left over from the manufacturing process. - Clean out the ashes, and you’re ready for the next phase.
Phase 2:
- Half fill the charcoal basket with unlit briquettes. Add ½ a chimney of lit briquettes to a well in the center. Your goal is to get the smoker to about 275oF, and run it for about 3-5 hours.
- Throw some fatty scraps of meat that you don’t plan on eating onto the grill plate. Add a couple of lumps of wood to create some smoke.
- Repeat this process a couple of times before you cook the meat you actually plan to eat. This will ensure there is a nice layer of grease seasoning on the inside of your cooker.
A layer of grease should not be confused with a dirty cooker. Your aim is not to create a buildup of creosote and rancid fats. They will adversely affect the quality of your cook. Clean these off the inside of the dome with a grill brush, leaving only the layer of grease.
A couple of dry runs will also give you the opportunity to become familiar with controlling the temperature inside your smoker.
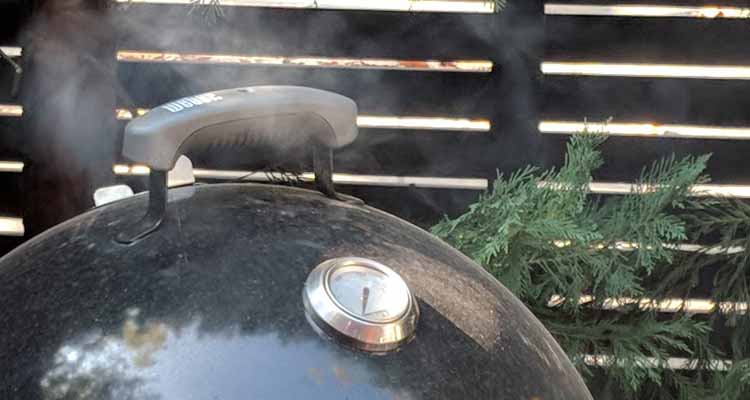
It is a good idea to purchase a digital thermometer.
The standard issue thermometer that will come installed in your
A couple of dry runs give you the chance to fiddle with the vents, take note of the temperature changes, and practice starting up your smoker, without the worry of ruining any meat. This will ensure future barbecuing success!
2) What to smoke the first time using your Weber Smokey Mountain
Your new smoker is all seasoned, and you have a handle on how to control the temperature. Time to cook.
But what?
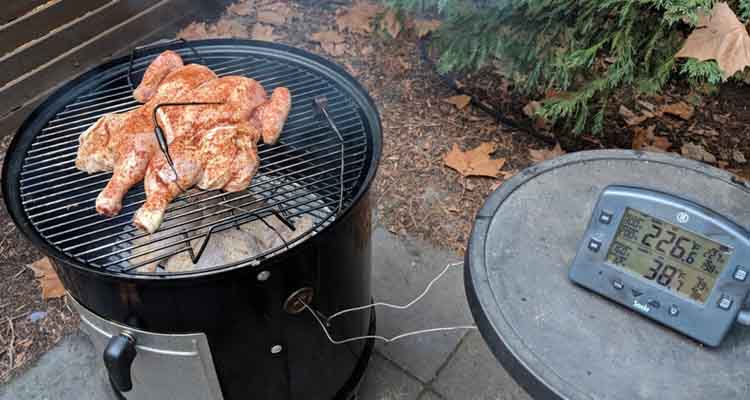
If you want to get results, and fast, then chicken is a good option. You will get to taste the fruits of your labor in under two hours.
Our Smoked Spatchcock Chicken recipe is cooked hot and fast and has some tips on how to get delicious barbecue chicken skin.
I smoke a lot of chickens this way, and always use my trusty Smoke to keep an eye on temperatures.
If patience is one of your many virtues, and you’re are feeling confident in your ability to handle the temperature of your new cooker, then pork butt is a great choice for your first cook.
Taking roughly 8-12 hours, it will give you an authentic introduction to the low and slow experience.
The fatty cut is also hard to mess up, and can withstand temperature spikes much better than brisket or ribs.
You can find a beginners recipe here.
Check out this list of our best barbecue recipes for more ideas.
3) Get everything ready before you fire your smoker up
Before you fire up your smoker, there is a little bit more preparation you need to do to make your first cook a success.
First of all, your unit needs to be clean. If this is your first cook after seasoning, then this isn’t a concern. If you have managed to snag a second hand barbecue, this is something you will have to attend to.
Cleaning doesn’t have to be difficult:
- Tip out any ashes
- Empty and clean the water pan
- Brush off any loose material from the lid and cooking area
- Clean the cooking grates. Often, simply cleaning them off with a grill brush will do the trick. If they are quite dirty you might need to wash them with warm soapy water.
Prepare your meat before you even think about firing up your barbecue. You will be busy checking and adjusting the temperature once you have fired up the unit, especially if this is one of your first cooks.
You can apply the rub just before starting up your barbecue, or if you are really organised, apply the rub to your meat the night before your cook.
The last step before you fire up is to make sure you have everything on hand for the cook. Meat, rub (if you haven’t done this already), smoking wood, and charcoal at the very least.
It is also worth taking a minute to check that you have your chimney, starter, and any thermometers that you plan to use, on hand.
Also, have a fire extinguisher handy. Of course, some kind of emergency situation isn’t part of the plan for your first cook, but stranger things have happened…
4) Starting your Weber Smokey Mountain using the Minion Method
If you want to cook low and slow (4+ hours), the standard method for firing up the Smokey Mountain isn’t ideal
If you follow Webers instructions, you’ll need to refill charcoal every 4 hours or so.
There are a variety of ways you can light your barbecue, but the Minion method is a very reliable way to setup any charcoal smoker for a low and slow cook.
There is no need to add fuel throughout the cook, and there is less chance of the cooker becoming hotter than you want. Taking all this into consideration, the Minion method is a good option for beginners.
Check out T-Roy Cooks YouTube video to see how he does it.
The basic Minion method goes like this:
1. Fill the coal ring with unlit briquettes
Many experts say that Kingsford Charcoal Briquettes work best for long, consistent burns in a

2. Light some briquettes in your chimney starter
Take into consideration the weather. On a warm day, around 20 briquettes should be enough to start your fire. On a cooler day, consider lighting 20-40, and if it is freezing, you may need to light up to 60 briquettes.
If you a lighting a small amount of briquettes, flip your chimney upside and light them in the smaller end of the chimney.
3. Put the lit coals in the cooking chamber
Spread the lit coals over the unlit coals in the charcoal chamber. Put your cooker back together, and you’re ready to go.
There’s a bit of controversy around using unlit briquettes.
The Virtual Weber Bullet, Firing Up Your
If there’s any controversy about the Minion Method, it’s that it contradicts the conventional wisdom that says all charcoal briquettes must be fully lit and covered with gray ash before cooking begins.
Everyone knows how bad charcoal briquettes smell while lighting, so some people assume that this smell permeates the meat during cooking, since fuel is lighting continuously over many hours.
Interestingly, the Minion Method does not seem to affect the appearance, aroma, or taste of food, and it is used with great success by many winning teams on the competition barbecue circuit.
All the times we’ve cooked with this method we’ve never noticed any effect on the smell or taste, so we say go ahead.
4) Make clean up easy by lining the water pan with aluminum foil
A useful tip is to line your water pan with aluminum foil. This will make the clean up a little quicker and easier, especially after cooks in which the water pan has not been filled.
Just wrap your pan, place it in the smoker like usual. Then when you’ve finished cooking and everything has cooled down you can scrunch it up and chuck it straight in the trash.
If you choose to line your pan with foil, moisture will get trapped between the foil and the pan. This will leave some discolouration in the water tray that cannot be cleaned up.
While this may be a little unsightly, it is not something that needs to be cleaned off. So you need to decide if some discoloration in your water pan bothers you.
5) Dealing with temperature variations
While the
The door on the
There are few solutions to this issue:
- Usually, you only need to adjust the bottom vents to control the temperature, but if the leaky door is causing issues, you can try adjusting the top vent as well.
- Seal the door with high quality gaskets, using food safe adhesives. Make sure everything you use will not melt at high temperatures.
- Replace the door completely with a better fitting, heavier duty door.
Over time it will become easier to control the temperature of your cooker, as grease and carbon builds up and seals your cooker.
Keep in mind that on a hot day, your cooker will tend to run hotter. Conversely, on a cool day, it will run cooler.
If you’re still struggling to control temps:
- Check that the wind is not blowing directly into the vents. The extra supply of oxygen will stoke the fire and make it burn hotter.
- Don’t take the lid off your cooker thinking it will bring the temperature down. This will only serve to supply more oxygen to the fire and make it burn hotter and faster.
- And a final piece of advice, don’t be overly concerned about the odd temperature spike. This will naturally happen through the course of the cook.
6) Cook to temperature, not time
Smoking charts like this are a good place to start, but you shouldn’t rely on them.
It is worth investing in a good quality thermometer to measure the temperature inside the cooker and the temperature of the meat itself.
As we have discussed, the thermometer that comes installed in the
How much the temperature varies from the dome to the cooking grate depends on a few factors, such as the temperature outside, or whether your
To make sure you get an accurate reading, place a thermometer probe about an inch away from the meat, whilst not touching the grate. Keep in mind that any meat on the lower grate will be a few degrees cooler than the meat on the top grate.
When using a meat temperature probe, make sure it is not in contact with the bone once inserted into the meat. Thread any cables through the top vent hole.
7) Don’t overdose on wood
It is worth keeping in mind these words of wisdom from Meathead Goldwyn:
“There’s always the risk of oversmoking, so until you really know your machine, don’t add any more wood.”
Too much wood will lead to an undesirable, overly smokey taste, so resist the “more is more” mentality. As a guide, 2-6 fist sized chunks of wood is a good amount for the entire cook.
Wrapping it up
Now that you are all clued up on how to use your
Pitmasters love using the
Do you have any further tips for using the
If you have found this article helpful, make sure you share it with your friends.

About Your Pitmaster
Joe Clements is the founder and editor-in-chief of Smoked BBQ Source, a leading barbecue resource that has helped tens of millions master grilling and smoking. Growing up in a vegetarian household, his love for barbecue was unexpected. Determined to master the craft, he launched Smoked BBQ Source in 2016 to document his journey from amateur to pitmaster.
Joe leads a team of expert barbecue creators and oversees the largest collection of in-depth grill reviews and a library of tested, foolproof recipes. Whether he’s firing up a pellet grill or charcoal kettle, he’s passionate about making barbecue approachable and enjoyable for all.
Hello, just a little question here from the UK. I am a newbie to the WSM and would like to know if there is a prescribed length of time between lighting the coals and putting on the meat? (using MM) The smoke produced during the first hour or so does not look to me to be good “clean smoke” and so it seems to me that it could be a good idea to wait for a while before adding food. Thanks for any help!
Hey Mick, I usually let it go for 10-15 mins so the temp can start to stabilize. There’s usually still quite a bit of smoke coming out when I put the meat on, but I’ve never found this caused a problem. It should calm down pretty quickly.
Thanks Joe!
I have a WSM grill and want to know if I can smoke chicken (legs and thighs) and baby back ribs at the same time. If this is possible, how do I place them? Chicken on top level with ribs on the lower level? Thanks in advance.
You definitely could, but I prefer to smoke chicken at a hotter temperature than I would smoke ribs, otherwise I find the skin goes rubbery. The chicken will still taste great if you cook them around 250-275°F (which would be fine for ribs), but you may find the skin a little unpleasant.
If you do them at the same time I would probably put the ribs on the bottom, so I can easily access the chicken to test temp etc.
Another option would be to take the ribs off, leave them in foil and wrap in a few towels, and do the chicken hot (over 300°F), then you can serve them at the same time.
Nooo! You don’t want poultry juices dripping over your meats. If it’s a mixed cook, chicken goes on the bottom. Always. That also benefits it as it is closer the heat source.
I’m using a smoker for the first time (WSM 18). When initially seasoning it – what does “Fully load your Weber Smokey Mountain” mean in terms of amount?
And am I using the chimney starter on this initial run or just lighting the charcoal directly in the WSM? If so – how do you do that?
Thanks in advance
Hey Chad,
I would consider 1.5-2 charcoal chimneys worth of briquettes to be pretty full. Basically you are looking to fill up the charcoal ring.
What I would do is fire up 1 chimney in the chimney starter, and then pour that into the charcoal ring of the WSM once that gets nice and hot.
That’s probably enough, but you could always pour a few more unlit ones over the top too.
Brilliant guide, thank you. We are just seasoning our first ever wsm, when we do start smoking do we soak the wood chunks first? Sorry if this is a stupid question.
No need to soak wood. If you want to be thorough I would fire it up nice and hot with no wood and just let it go for a few hours, shut it down leave it to cool then empty it all out and give it a quick clean. Then you are ready to setup to smoke.
If you are seasoning it you could just let it go for 30mins and then add some wood if you are really keen to start cooking though.