
How to Check if your Thermometer is Accurate
SmokedBBQSource is supported by its readers. We may earn an affiliate commission at no extra cost to you if you buy through a link on this page. Learn more.
Let’s be honest, barbecue thermometers have a tough life.
They are routinely dropped, splashed, rained on, and exposed to extreme conditions.
It is easy to understand why even a good quality thermometer can lose accuracy over time.
If you’re using an inaccurate thermometer to keep track of your pit temperature or decide when meat is done, you’re going to be serving sub-par barbecue.
Luckily, you can do some simple tests at home to check if your thermometer is accurate. You can then calibrate most thermometers and save cash on replacement probes.
Why you should test your thermometers regularly
You should check your thermometers for accuracy at least once a year.
If you have recently dropped, or mistreated your thermometer in some other way, a quick test may be in order right after the incident.
If you don’t do this, you run the risk of relying on inaccurate temperature readings. This could result in you:
- Taking meat off the grill before it’s done (or leaving it on too long)
- And potentially harming your friends and family with undercooked meat
You don’t want to be responsible for either of those things!
The good news is if your thermometer is out of whack, in many cases a simple calibration will get it working like a charm again.
You need to check your thermometer specs
We’ll show you the best way to test your thermometers in a second, but first you should familiarize yourself with the specs of your thermometer provided by the manufacturer.
My Thermapen came with this certificate of calibration which I thought was a nice touch.

Thermoworks, a respected producer of quality thermometers, outlines the details a manufacturer should provide:
“Reputable thermometer companies include their instruments’ specs on the packaging.
With thermometers, this should include the temperature range the thermometer is designed to measure, the accuracy it should exhibit over that range, the speed with which it should exhibit that accuracy, and the resolution it will display (typically whole degrees or tenths or hundredths of a degree).
Reproducibility (the ability of the instrument to repeat its performance over and over without hysteresis effects is also an important concept.”
As long as the reading that comes back is within the range of accuracy, there is no need to calibrate.
Depending on the quality of your thermometer, this range could include more wiggle room than you expected.
It could be the case that your thermometer is still accurate, but your requirements have changed. You may want to consider upgrading your thermometer if it does not promise to deliver readings accurate enough for you.
How to Test Your Thermometers Accuracy
The best way to test speed and accuracy is to undertake either an ice bath test, or a boiling water test.
As the names of the tests themselves suggest, they involve checking the accuracy of your thermometer against a known temperature—freezing point, or boiling point.
In some cases, performing just one of these tests will do the trick, and seeing the ice bath test is a little more straightforward, many opt to go with that one. Some manufacturers recommend you do both tests to ensure your thermometer is accurate across more than one temperature.
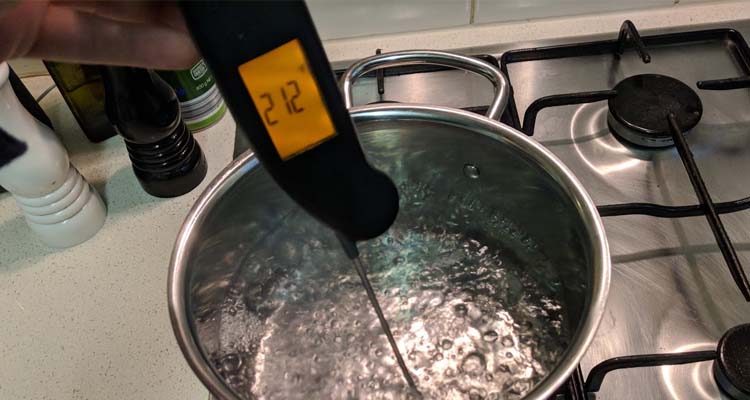
1. The Boiling Water Test
It is widely stated that water boils at 212°F, so dipping your thermometer into a pot of boiling and checking that it reads 212°F seems like a pretty straightforward test, right?
In fact, there are a few factors you need to take into consideration before you perform the test, otherwise you could be testing and calibrating your thermometer all wrong.
- Water boils at different temperatures depending on altitude and the atmospheric pressure. Atmospheric pressure varies from day to day. Look up your altitude, check the atmospheric pressure, then use this handy calculator to determine the boiling point.
- Hard water will boil at 1-20°F higher than soft water.
- Water heated in a tall, narrow pot will boil at about 10°F higher than if you boil it in a shorter, wide mouthed pot. To make your life easier, use a wide mouthed pot when performing the test so you don’t have to account for this difference.
Once you have made all these initial calculations, it is time to proceed with the test.
- Pour 4 inches of water into a wide mouthed pot.
- Bring the water to a vigorous boil.
- Insert the thermometer probe about 2 inches into the water. Gently stir the water with the probe for about 10 seconds, then take the reading. Be careful not to let the thermometer probe touch the side of the pot, this will affect the reading.
Remember that if the reading falls within the accuracy range stated by the manufacturer, there is no need to calibrate your thermometer.
2. The Ice Bath Test
While the ice bath test is a little more straightforward than the boiling water test, you still have to perform it correctly to ensure the temperature is reliable. The temperature should read 32°F.
The most important thing to note when preparing an ice bath test is that a cup of water with some ice cubes floating at the top is not an ice bath. If this is what you are using as your ice bath, your results could be up to 12°F too warm.
ThermoWorks have a helpful guide to creating an ice bath correctly:
Let’s break down how to perform an ice bath test properly:
- Fill a tall glass with ice cubes right to the top. Crushed ice is preferable as it will leave less gaps.
- Fill the gaps between the ice with chilled water.
- Gently stir for about 15 seconds to get the temperature even throughout the bath.
- Place your thermometer probe about 2 inches into the water.
- Gently stir the water with the thermometer probe for about 15 seconds, then take the reading.
Try not to let the probe touch the sides of the glass, rest on a piece of ice or sit at the bottom of the cup, as this will affect the reading.
Don’t let your ice bath sit on the bench for too long before you use it. If any of the ice at the bottom melts, the results will not longer be accurate. The ice must fill the entire glass, from top to bottom, for the temperature to be reliable.
How to calibrate an inaccurate Thermometer
If you haven’t skipped ahead then you’ll already know that your first step is to find out your thermometers specifications.
These should be included with your thermometer, or you can always find them on the manufacturers website.
If you have tested your thermometer correctly, and it is inaccurate, then it is time to calibrate.
Some thermometers are made so you can calibrate them yourself. To do this, you will need to refer to the manufacturer’s guidelines. However to calibrate some more expensive models, you may need to contact the manufacturer, or send the unit to them.
On the other hand, some very cheap thermometers will not allow you to calibrate at all.
It is a good idea to keep a record of calibrations. This will help you keep track of how often you have needed to calibrate, and how far off the readings were when you did.
If you notice that you are needing to calibrate often, your thermometer might be on the way out. An upgrade might be in order. Check out our guides to the best instant-read thermometers and the best leave in probe thermometers.
Alternatively, you might be able to address the problem by replacing the probe. You can reorder probes for some common thermometers here:
- Maverick replacement 3 Ft probe
- Weber iGrill meat & ambient probe
- ThermoPro replacement probe
- ThermoWorks Pro-Series Cooking Probe & Air Probe (both used for Smoke)
How to Calibrate Popular Thermometers
We’ve pulled together instructions for a few of the most popular thermometers. It’s always a good diea to double check your manual before you try to do any calibration though. Before you start the calibration process, it is a good idea to prepare your ice bath, and boiling water tests.
Calibrate ThermoWorks Thermapen
- Turn your Thermapen over so the back side is facing you, and the probe flips out to the right.
- Take off the Thermaworks label. This label is covering the calibration screws.
- The screw on the right is to calibrate to zero. The screw to the left is to calibrate to boiling point.
- Flip out the probe. This will turn on your Thermapen.
Ice Water Calibration
- Without letting the probe touch the side of the container which holds the water, dip the tip of your Thermapen probe into the ice water and gently stir.
- Once the temperature reading has stabilised, carefully turn the Thermapen in one hand so you have access to the calibration screws.
- With a small slotted screwdriver, adjust the zero calibration screw until it reads 32°F. Once this is done, you can take the probe out of the water.
Boiling Water Calibration
- Dip the tip of the probe into the boiling water, again, taking care not to let the probe come into contact with the side of the pan that you are boiling the water in.
- Once the reading has stabilized, carefully turn the Thermapen around so you can access the calibration screws.
- Adjust the screw on the left side (‘span’ setting) so that it reads 212°F.
Time to Double Check
- Dip your Thermapen back into the ice bath. Wait for the reading to stabilize and check that it reads 32°F. Do the same for the boiling water. Keep adjusting the screws as outlined above until the readings come back correct when the probe is dipped in the water.
- Once everything is properly adjusted, replace the cover and you are ready to use your thermometer again with confidence!
Smoke Calibration:
While ThermoWorks back the Smoke Thermometer enough to state you shouldn’t ever really need to calibrate it, they do say that you can use the calibration function on the unit to fine tune each probe on the Smoke to be accurate within +/-1°F.
The Smoke comes new from the factory with accuracy to +/-1.8OF. If the reading your Smoke returns is off by +/-4°F or more, then your thermometer is damaged. This will not be fixed by a calibration, and you may need a new probe.
ThermoWorks suggest the best way to calibrate the Smoke is by using the ice bath method.
- Turn on the Smoke and dip probe 1 into the ice bath and gently stir. Once the temperature reading has stabilized, make a note of the reading. Even if the reading falls within the accuracy tolerance, you should be able to get it even closer if you want.
- Repeat the same process as above with the second probe.
Using the Calibration Function
- Press and hold the “CAL’ button on the smoke control panel for five seconds. The display should say CAL and the temperature reading should be 0.0°F.
- Use the up and down arrow buttons to make up the difference between the reading you got and the correct reading (which is 32°F) For example, if the reading for the first probe was 34.6°F, then increase by 1.4°F. This will calibrate for probe 1.
- Press the CAL button to save this for probe 1.
- Press and hold the CAL button again to repeat this process for probe 2, again adjusting according to the reading you noted down when you tested the probe.
Time to Test
- Test both probes again using the ice bath. They should both return results either right on 32°F, or within +/-0.1°F.
How to calibrate Infrared Thermometers
There are a couple of ways you can calibrate an infrared thermometer. However some options are very pricy, so it is good to know that a properly made ice bath will still do the job. Let’s have a look at the options.
- Black Bodies: Industrial calibration lab technicians use black body devices to calibrate infrared thermometers. They are fast and easy to use, and allow you to calibrate your infrared thermometer to a number of temperatures with great accuracy. However, they do come with a hefty price tag.
- Infrared Comparator Cup: At a much more affordable price point, a comparator cup is portable, and can reliably calibrate an infrared thermometer at more than one temperature.
- Ice Bath: If you can’t get your hands on a black body or a calibrator cup then a properly made ice bath can also give you a reliable temperature of 32°F.
If you want to calibrate your infrared thermometer using an ice bath, you will need to refer to the manufacturer’s instructions. We have included a general guide below so you have an idea of what might be involved:
- Prepare an ice bath as we outlined the section “The Ice Bath Test”
- Set your infrared thermometer to an emissivity setting of 0.95 or 0.97
- Hold the thermometer above the ice bath so that the lens is directly above and perpendicular to the surface of the ice bath.
- Make sure that the field of view ONLY takes in the surface of the ice bath. (If the thermometer is held too far from the ice bath, or is held at an angle, it will take a reading from the glass and will not be accurate)
- Press the button on your thermometer to take the temperature reading.
Infrared thermometers are known to remain accurate and reliable, so it is likely that you will get a reading of 32°F, or within the tolerance range stated by the manufacturer.
If the reading falls outside the range stated by the manufacturer and you are sure you have performed the test correctly, get in touch with the manufacturer.
Tips to Keep your Thermometer Accurate
- Granted, cooking is a messy business, but try to keep areas where the wiring meets the probes dry.
- The manufacturers will usually provide a range of temperatures within which your thermometer will work. Try not to expose your thermometer to temperatures outside this range. Not only will the results be inaccurate, you will also damage your thermometer.
- When storing a thermometer which has cables attached to the probes, do not kink the cables or wrap them around the probes. The stress caused by the kinking and wrapping could damage the cable.
To wrap it up
As we have emphasised in many of our other articles, an accurate thermometer is an invaluable tool in any pitmasters collection.
No matter how much you paid for your thermometer, if it is not accurate, it is worthless. So, knowing how to test, calibrate and properly care for your thermometer is vital information for any barbecue enthusiast.
Do you have any further questions that we did not cover in this article? Or any tips or tricks to add regarding thermometers? Let us know in the comments section below. And if you found this article helpful, be sure to share!

About Your Pitmaster
Joe Clements is the founder and editor-in-chief of Smoked BBQ Source, a leading barbecue resource that has helped tens of millions master grilling and smoking. Growing up in a vegetarian household, his love for barbecue was unexpected. Determined to master the craft, he launched Smoked BBQ Source in 2016 to document his journey from amateur to pitmaster.
Joe leads a team of expert barbecue creators and oversees the largest collection of in-depth grill reviews and a library of tested, foolproof recipes. Whether he’s firing up a pellet grill or charcoal kettle, he’s passionate about making barbecue approachable and enjoyable for all.