
MEATER 2 Plus Review: Does the Newest MEATER Model Live Up to the Hype?

SmokedBBQSource is supported by its readers. We may earn an affiliate commission at no extra cost to you if you buy through a link on this page. Learn more.
As the first to hit the market with killer marketing, MEATER is hands down the most popular wireless Bluetooth probe.
I admittedly had some issues with my original MEATER probe. I couldn’t get the range that I wanted, and it disconnected while I was cooking. It could be due to the material of my smokers (thick steel) or the proximity of my kitchen & size of my backyard, but I got to the point where I pretty much stopped using it because it just wasn’t a good fit.
When MEATER launched its new MEATER 2 Plus, I had to try it out and see how it stacked up against the original model and some of the other Bluetooth probes on the market today.
Update:
Since we wrote this review, MEATER has changed the name from MEATER 2 Plus to just MEATER PRO. Everything else is still the same.
- High Temperature Resistance
- Multiple Temperature Measurement Points
- Improved Range
- Ambient Temperature Accuracy
- Battery-Powered Charging Base
First Impressions of the Meater 2 Plus
Since the first version of the Meater was released, the company was acquired by Traeger. This is the first new product since the acquisition, so I was especially interested to see what was new.
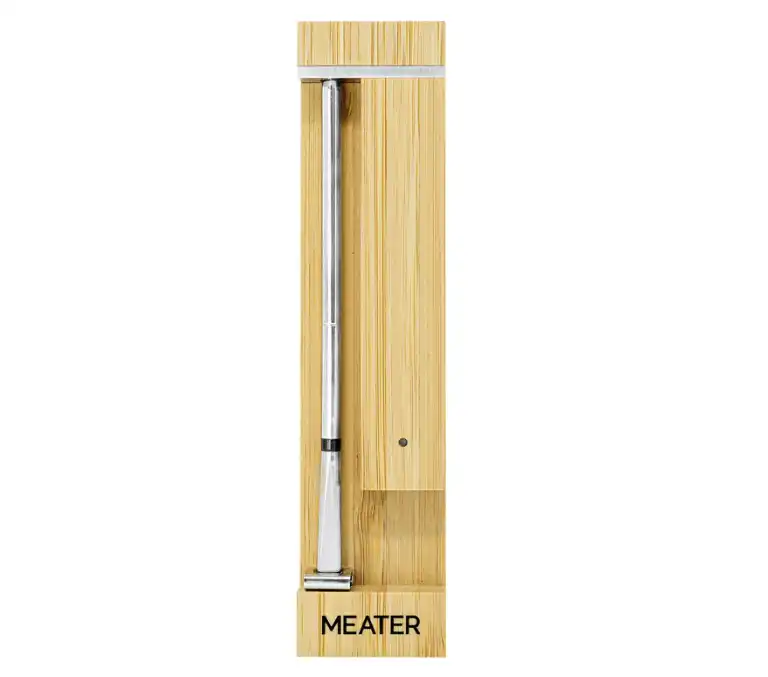
Upon opening the MEATER 2 Plus, I noticed that the probe is all silver/metal, as opposed to most other probes on the market, which have a black poly coating on the ambient probe portion.


I assume this slight design change contributes to the probe’s ability to handle higher temperatures during searing.
Similar to the original model, the MEATER 2 Plus comes in the classic wooden charging base that also doubles as the transmitter for Bluetooth. One thing I don’t like about MEATER is that their charging bases utilize battery power instead of rechargeable.
Most of the other Bluetooth probes I’ve tried, like the TempSpike by ThermoPro, are rechargeable, which is a more sustainable feature and more convenient for the user.
However, I’ve noticed that the batteries last a long time, so it’s not a huge issue, depending on how much you use them.
I tested the accuracy of the Meater with my Thermapen ONE instant-read and found it to be highly accurate.

The Plus offers 250ft of “typical range” with a direct line of sight and no interference. The original Plus model only offered 165ft, so it’s a decent step up.
What I liked:
- Withstand high temperatures – The probe can handle ambient temperatures of up to 932°F, making it perfect for direct searing.
- Measures at multiple points—The single probe takes the temperature at 5 different points down the barrel of the probe plus the ambient temperature, which gives you a much more accurate picture of the internal temperature.
- Easy-to-use app – It’s easy to navigate, looks sleek, and gets high user ratings in both Apple and Google app stores.
What I didn’t like:
- Charging base uses battery – It would be nice if this were USB rechargeable rather than taking batteries.
- Ambient temperature reading – Not as accurate as a dedicated ambient probe.
So, what makes the MEATER 2 Plus different?
The most significant improvements in the new model are increased temperature limits, durability, and range. The probe can handle ambient temperatures of up to 932°F, so the probe can be used over hot, open flames (think: reverse searing and rotisserie).
We actually managed to melt one of the original MEATER probes, so this higher resistance is a welcome upgrade!

Most other probes on the market have a max temperature of around 600°F.
I love that the probe can handle higher heat, so I can see the temperature of my meat during the entire cooking process to ensure I don’t overcook it.
I’ve always thought one of the best use cases for a Meater is cooking rotisserie style. I tested the Meater 2 out on a Rotisserie chicken. I followed the instructions in the app, but double-checked with my Thermapen and found the temperatures matched up well.


Another cool upgrade is that the probe takes the temperature in multiple places down the barrel of the probe. This is especially helpful when cooking things like Prime Rib because you can tell if you’re getting an even cook throughout the entire cut of beef.
One thing I like about the MEATER compared to similar products is the easy-to-use app. It’s easy to navigate and looks very sleek from an interface standpoint.


The app also automatically sets the alarm to go off when you should pull the meat off and attempts to calculate the carryover after removing the meat from the heat.
This can be a bit problematic in some situations, but overall, it’s a nice feature to have as not accounting for carry-over cooking is the most common way beginners overcook meat.
There’s also an ambient probe that gives you the temperature inside your grill or smoker. This isn’t super accurate but it gives you a ball park.
Should you buy the MEATER 2 Plus?
Compared to the other models I’ve tried, The Meater 2 Plus has the advantage of being able to handle higher temperatures. This is also the first Meater product I’ve used where I have not hit a single connection issue. I also found the app a lot easier to use and navigate.
If you’re going to buy a MEATER, I would definitely spend the extra and get the Pro model over the original Plus.
If you’re looking for a hands-off way to monitor the temperature of your meat, I’d say the MEATER 2 Plus is one of the best choices on the market.
- High Temperature Resistance
- Multiple Temperature Measurement Points
- Improved Range
- Ambient Temperature Accuracy
- Battery-Powered Charging Base

About Your Pitmaster
Breanna Stark is a Texas-based competitive pitmaster and barbecue educator. She grew up cooking over charcoal and open flames while camping with her father, sparking a lifelong love of barbecue. Since 2014, she has competed in over 100 IBCA, KCBS, and CBA events, earning recognition for her award-winning chicken and Texas-style barbecue.
Passionate about recipe testing and development to create approachable dishes that help backyard cooks level up their barbecue skills. Breanna shares her expertise with over three million followers on social media.
The Meater 2 plus is a piece of junk. Continuously loses connectivity between phone and probes when I’m less than 2 feet away. Phone app (android) loses cook set up. No refund policy, no contact information. Bought less than 3 months ago.
STAY AWAY
MEATER have the worst customer service in the world. If yours works, great. If not, if it’s a dud out of the box, you get the run around, but no repair, no replacement, no refund. Don’t give these rip off merchants your cash!
Thank you for the review!
But actually I do not agree that the battery powered charging base is bad. I think it is much better solution than built-in battery.
If you want to be sustainable just buy a good rechargeable battery. At least after a few years, when the batter dies, you just buy a new rechargeable battery instead of throwing away the whole thing.
Yeah it’s definitely not a bad approach, we just can see it being annoying for people who are used to being able to charge the base up via USB. I think it’s a personal preference.
MEATER does not work. Failed attempt unlike their Traeger partner and friend
What about it doesn’t work for you? We had problems with the original model disconnecting when the lid was closed but haven’t had any issue with the latest Pro models.