
Weber iGrill 2 Bluetooth Thermometer Review
SmokedBBQSource is supported by its readers. We may earn an affiliate commission at no extra cost to you if you buy through a link on this page. Learn more.
You can’t talk about Bluetooth meat thermometers without mentioning the iGrill 2 by Weber.
It’s at the top of every list for best Bluetooth thermometer.
But does this thermometer deserve its title? Or is it just a case of
In this detailed review of the iGrill 2, we look at the pros and cons to decide if it’s worth spending your hard-earned dollars on.
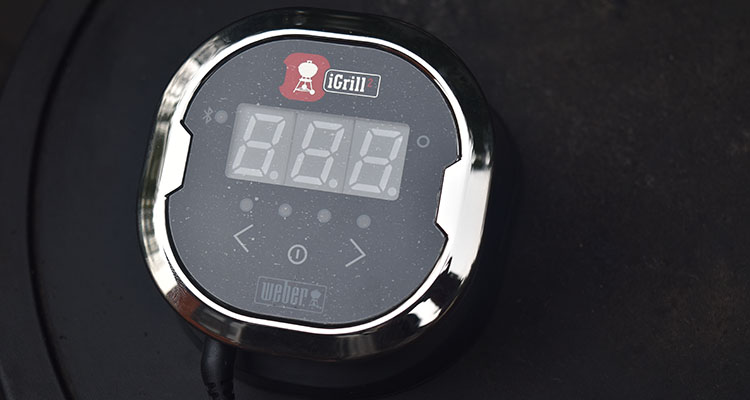
Weber iGrill 2 Overview and First Impressions
If you’re not familiar with Bluetooth thermometers, don’t worry. You don’t have to be a tech geek to understand how they work.
Rather than using radio style WiFi technology to display temperatures on a physical receiver, the iGrill 2 uses Bluetooth to connect to your phone or tablet so you can view the temperature of your smoker or grill and what you’re cooking.
Weber purchased the iGrill 2 from a company called iDevices a few years ago. While the thermometer is similar, they’ve been busy improving the companion app.
The iGrill app is now one of the best around and has some convenient features, including the ability to give each probe a nickname (e.g., pit, brisket). We’ll delve more into the app features in a bit.
When you order you can choose between a package that includes 2 meat probes or the complete iGrill starter kit which includes the two meat probes and an additional ambient probe).
You can order replacement ambient and meat probes as well.
Every Bluetooth thermometer we review seems to have a reputation for limited range and connection problems.
And the iGrill 2 is no exception.
Thankfully most of the issues seem to have been ironed out by now. This can be seen by the ever-increasing feedback and rating in the app store, where the
After acquiring the company from iDevices
After cooking with the iGrill 2 a few times, here are our top impressions.
What we like:
- Really nice app experience – I found using the app very easy and enjoyable. The pairing process was painless and the interface for setting up a cook was very straightforward.
Fairly reliable Bluetooth range & fast pairing – It only took a few seconds for the iGrill 2 to connect to my phone, once connected I didn’t have any trouble with signal loss. - Four probe capacity – While I only bought the two probe package, it’s nice you have extra capacity if you need it. If you had two smokers next to each other or just cook a lot of food at once this is essential.
What we don’t like:
- Range can be an issue – This wasn’t a problem for me, but some people report signal dropping way under the advertised 150 ft range. This could be due to lots of factors including your house building material and layout.
- Data lost when disconnected – If you walk to far away from the transmitter and the signal is lost, you lose the graph displaying the temperature over time. Would be nice if it could restore the data after you reconnect.
So long as you don’t need to walk too far away from your grill or smoker the iGrill 2 is a great thermometer anyone who likes to have the latest tech, or anyone who wants to be able to checking temps on your phone.
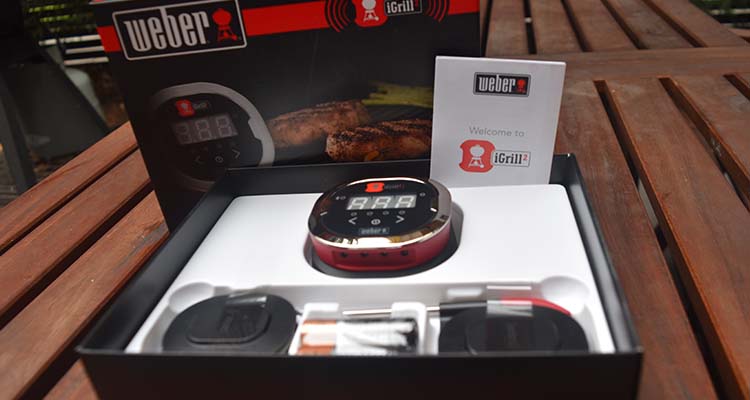
What’s in the box and manufacturer specifications
The iGrill 2 ships in a sturdy box with lots of glossy

Inside the box everything is nicely packaged, including the batteries and probes neatly wrapped up in protective casing.
I decided to buy the 2 probe package, but you can opt for the 4 probe option if you prefer. Or you can buy individual probes separately.
Package contents:
- iGrill 2 Bluetooth transmitter
- 2 x 48″ meat probes
- 2 x Probe Wraps
- 2 x Colored probe indicators (yellow and red)
- 2 x AA batteries
- Quick start guide
- Magnetic disc
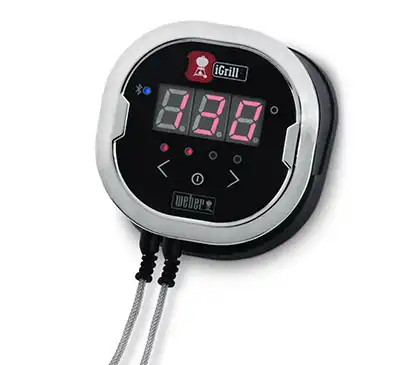
The iGrill will work fine without using the Bluetooth features. The base unit is basic, but it does display the temperatures.
But it would be a waste to spend this much and not use the features in the app.
Unlike a regular WiFi thermometer you don’t get a receiver. That’s what your phone is for.
It’s nice that they included the batteries, although I do prefer that I can charge my InkBird IBT-4XS via USB cable.
The quick start guide provides some helpful guidance for installing the app and getting started.
There’s no big surprises in terms of specs. The max heat resistence is on the high side, so if you are worried about your grill running hot and frying your probes you don’t need to fuss.
You should note that the range is always “best case” and can be a lot less depending on your setup.
Manufacturer specifications:
| Temperature range | -22°F – 572°F |
| Heat resistant up to | 716˚F |
| Bluetooth Range | 150 ft |
| Probe length | 24″ |
| Battery life | 200 hours |
| Waterproof | No |
| Warranty | 2 years |
You should also make sure your phone or tablet is compatible:
- iPhone® (4S and later)
- iPad® (3rd generation and later)
- iPad mini™ (all generations)
- iPod touch® (5th generation and later)
- Many Android™ devices equipped with Bluetooth® 4.0 and running Android™ software version 4.3 or later
Setup and using the iGrill 2
Luckily you don’t need to be a tech wizard to setup and use the iGrill 2. The quick start guide that is included provides a rough overview of what you need to do.
If you lost the guide, here are main steps you need to follow:
- Download the
Weber iGrill App from the App Store or Google Play Store - Make sure Bluetooth is enabled on your device under settings
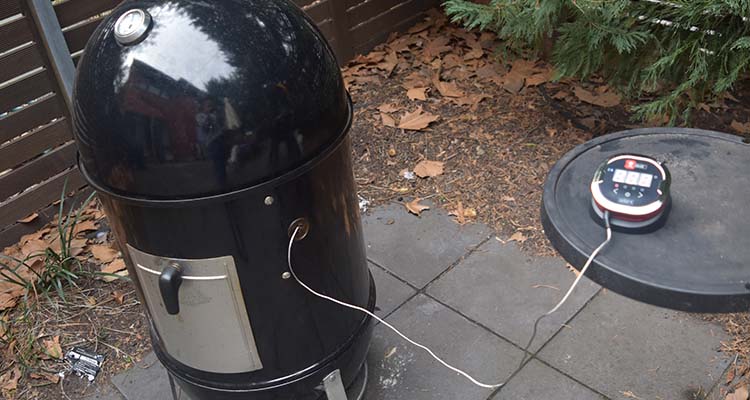
- Separate the iGrill 2 from its base by firmly holding the base with one hand and gently pulling the iGrill 2 top upwards with the other hand.
- On the underside of the iGrill 2, press down and remove the battery door. The two AA batteries that are supplied with your iGrill 2 should be inserted with their negative terminals compressing the springs. Replace the battery door.
- Clip the iGrill 2 top back onto its base
- Plug one or more probes into the probe ports of the iGrill 2
- Press the power button located at the bottom of the faceplate between the < and > buttons for two seconds. The unit will display “On”, animate and a single beep will sound, indicating that the iGrill 2 has powered on.
- Open the
Weber iGrill App to connect to your iGrill 2. Tap on the white iGrill logo in the black toolbar at the top of the app. Select your iGrill 2 from the ‘Available Devices’ drop-down.
Once you have powered on the iGrill and connected it to your phone you’ll go to the home screen where you have a bunch of options.
The most obvious is the big “Start barbecuing” button. If you click on that it takes you through a simple process where you choose if you are measuring food or barbecue temperature.

If you are choosing food you can select from a bunch of presets, or customize your target temperature.
I usually prefer to set my own temperatures to my liking. If you’re not sure what temperature to use you might want to check out our smoking time and temperature guide.
Actually viewing your temps is quite nice. There’s a large graphic showing the current temp and your target, with a colorful graphic that estimates how far through the cook you are.
You can also switch to graph view, edit the cook to change your target temp or end the cook.
Some other app features include:
- You can create custom presets if you don’t like the built in presets or if anything is missing
- You also have the option to set a ‘Pre-Alarm’ notification. For example if you want to know if your food is getting close to done you can get an alarm and start checking up on it.
- Identify each probe using the color, and then rename them to whatever you want.
- Set up a timer
- Graph the temperature progression over the entire cook
Issues with the app
I thought I had to address the possible issues you might find with the app. If you look at reviews around the web you can see two common issues.
- Poor Bluetooth range
- Not pairing or dropping off a lot
Now I can say that I didn’t personally experience either of these issues. From doing some research the most likely causes of problems are caused from having out of date software on your phone.
In those cases a software update should fix your issues.
The other issue is poor signal. This can be due to the building material of your home, and how many walls are between the Igrill transmitter and your phone.
Then you also have people complaining about issues with the app from several years ago. The problem with this is that
How accurate is the iGrill 2?
Weber claims an accuracy of within 1°F.
When I tested it with the super accurate Thermapen, we found the iGrill 2 recorded temperatures very accurately. There was usually no more than 1-5°F difference.
It will take 10-30 seconds to reach accurate temperatures when the probe goes from air temperature to inside the meat or grill.
Alternative thermometers you should consider
If you definitely want a Bluetooth meat thermometer, the best alternative you should consider is the InkBird IBT-4XS.
Weber iGrill 2 VS InkBird IBT-4XS
We named the InkBird our best budget Bluetooth thermometer. If you want to save money it compares surprisingly well to the more expensive
Both thermometers come come with either 2 or 4 probes, and they share the same range of 150ft.

The probes on the InkBird are longer which gives you a bit more flexibility for where you place the transmitter.
I also like that the InkBird can be changed with USB cable instead of batteries. Although the battery life is much better on the iGrill at 200 hours compared to 60 hours on the InkBird.
I would have to give the App advantage to the iGrill 2 though. The interface feels little bit more polished.
With double the warranty and a slightly better app, the main difference comes down to branding.
iGrill 2 VS iGrill 3
If you’ve seen the iGrill 3 advertised you might be confused why we named the iGril 2 our best Bluetooth thermometer.
While you might expect this to be an improved version of the iGrill 2, it’s actually only compatible with their range of Genesis II and Spirit II gas grills so you should ignore it unless you have one of those grills.
It’s a strange and confusing naming choice by
Should you buy the iGrill 2?
If you want to view your temperatures on your phone, then the question really comes down to the iGrill 2 vs the InkBird IBT-4XS.
If you value customer service, length of warranty, and want the best app experience possible, then I would recommend you buy the iGrill 2.
The accuracy, response time, and app all make this an excellent grill thermometer.

About Your Pitmaster
Joe Clements is the founder and editor-in-chief of Smoked BBQ Source, a leading barbecue resource that has helped tens of millions master grilling and smoking. Growing up in a vegetarian household, his love for barbecue was unexpected. Determined to master the craft, he launched Smoked BBQ Source in 2016 to document his journey from amateur to pitmaster.
Joe leads a team of expert barbecue creators and oversees the largest collection of in-depth grill reviews and a library of tested, foolproof recipes. Whether he’s firing up a pellet grill or charcoal kettle, he’s passionate about making barbecue approachable and enjoyable for all.
2nd year with a igrill2, at the end of first year and now I am having problems with the temperature readout turning off after about 2 seconds of operation, batteries do not make a difference the problem is. Getting worse with age. Appears to be a problem in temperature unit
Sounds like you might need to talk to Weber about this issue. So long as you are still within the second year you should still be covered by warranty.