
Z Grills 700D4E Wood Pellet Grill Review

SmokedBBQSource is supported by its readers. We may earn an affiliate commission at no extra cost to you if you buy through a link on this page. Learn more.
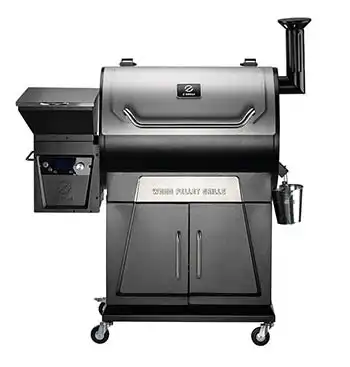
The 700D4E is Z Grill’s top-selling pellet grill.
Its price makes it a perfect entry-level grill, but it has some features you don’t usually see until you’re spending north of $1,000.
This is the third version of this grill we’ve tested, and this time they’ve added WiFi control.
I’ll go over my experience cooking on the Z Grills 700D4E, what I like about it, and what slightly missed the mark. And if you prefer video, check out my hands-on review below.
Z Grills sent me this grill for free in return for my honest review. All thoughts and opinions are my own.
- Holds nice stable temperature
- Good mobility
- Pellet hopper cleanout
- Need to be careful when closing the lid
- Minimal shelf area
Z Grills 700D4E overview & first impressions
The 700D4E with WiFi is priced a little higher than the previous 700 models we’ve tested.


Adding convenient features like easy pellet clean-out, a PID temperature controller, and a larger, more readable temp screen fix many of our issues with previous versions we’ve tested.
For a little less than the Traeger Pro 575, the 700D4E gives you 122 more square inches of cooking space (697 sq in vs. 575 sq in) It also boasts a closed cabinet for storage underneath the main chamber plus a larger hopper.
Let’s take a look at the full specs of the 700D4E:
| Cooking Area | 697 sq in (504 main rack + 193 top racks) |
| Pellet Hopper Capacity | 28 lb. |
| Temp Range | 160°F – 450°F |
| Shelves & Storage | One shelf on pellet hopper plus storage cabinet |
| Temp Probes | Two meat probes |
| Construction | Stainless steel |
| WiFi/App | Yes |
| Warranty | 3 years |
| Price | Check Latest Price |
The grill is made of rolled steel and stainless steel and has double-wall insulation construction, which helps maintain a steady temperature no matter the ambient temperature.
I did notice a small amount of smoke leaking out of the door during start-up. I would expect this to happen because there’s no built in door gasket.
What I like:
- Excellent temperature control: This is by far the most steady pellet grill I’ve personally experienced. Pellet grills are known for large swings in temperature as they try to regulate your target temperature. The 700D4E barely swings in 5°F increments off the target mark. The double-wall insulation and the new PID controls can be thanked for that. It should be noted that this was a calm day with no wind.
- Easy mobility: The four rotating casters make this grill easy to move around even over grassy areas. This is convenient if you don’t want to keep it out in the elements year-round. You can just wheel it out of your shed or garage.
- Easy pellet hopper clean-out: The pellet hopper has a small door on the back that makes emptying the hopper and switching out pellets a breeze. Simply twist open the latch to release the pellets into a bucket. Much easier than the 700E model.
What I don’t like:
- Need to be careful when closing the lid: The handle is a little awkward to grab when the lid is opened. You have to reach up and around the lip of the lid or risk burning yourself haphazardly on your wrist.
- Only one shelf area: The hopper lid doubles as a shelf, but that’s the only place you have to set things down. You’re better served setting up a side table to lay everything out that you need.
The market has a good bit of healthy competition going on, but the 700D4E should be on your shortlist when considering grills at this price point.
Unboxing and setup
The grill was well packaged and arrived in two separate cardboard boxes. The cooking chamber is already constructed, and was packed with other grill components and tools.
The instructions were very easy to follow, and the hardware and tools were in their own convenient packages, so you didn’t have to constantly hunt for stuff.


Setting the grill took a little over an hour with two people. One part of the process where you may need a helping hand is when you connect the pellet hopper and controller to the main grill.
After fully constructing the grill, you have to do the burn off. This is when you run the grill at high temps to make sure anyu residual oil is burnt off. This takes about 45 minutes in total and is pretty straightforward.
Be sure to follow the instructions in the manual. You’ll initially smell the debris burning off, then notice the clean combustion and lack of chemical smell when it’s completely burnt off.
Firing up the Z Grills 700D4E
Starting the Z Grill and getting it up to target temperature couldn’t be easier. You just open the lid and turn the knob to smoke mode.
The internal auger feeds pellets from the hopper to the burn pot and the ignition rod starts the fire. After you start to see smoke, you can close the lid and set your temperature.

The included temperature probes let you monitor the temperature of your food or various parts of the chamber. They work exceptionally well and eliminate guesswork.
The LCD temperature display is big and easy to read, even in direct sunlight. If you’re using the temperature probes you can see the internal temperature of your meat, or you can check that on the app.

One of the best parts of this grill is the four swivel casters and bottom cart. It’s so easy to move around, even when hauling through grass.
Cooking on the 700D4E
I wanted to test out the varying temperature settings on the grill to see how well the grill performed. One of the first cooks I like to do on any new smoker is ribs, so let’s start there.
How well does this grill perform as a smoker?
Smoking is where the 700D4E shines. Even though the marketing pushes versaility and grilling, I think first most people who are looking to buy a Z Grills are looking at making barbecue.
To see how it performed, I went with two racks option with two racks of no-wrap ribs. It took about ten minutes to get up to 250°F and then I put the ribs on.

The ribs took on a beautiful deep color, were perfectly tender and had a nice smoke ring.

The smoke flavor is a little lower than when smoking with charcoal and wood but it compared well to other pellet grills I’ve tested.
If you want more smoke, Z Grills have a “smoke” setting on the grill that uses lower temperatures and allows the pellets to smolder more. Sometimes I like to run this for a few hours before increasing the heat to 250°F.
But can you grill on it?
Grilling on pellet grills usually disappoints me, so I was trying to keep an open mind going into this one. Setting the temperature to 450°F, I threw on some burgers and crossed my fingers.
The burgers cooked fine enough, but there were some good grill marks and they did have that slight smoke taste, which was a nice layer of flavor.

The one standout cook I did was a couple of chicken halves. They were some of the juciest chicken I’ve ever cooked and the skin was crispy with great smoke flavor.

Storage and prep areas
I love the double-door storage underneath the cooking chamber. It’s large enough to hold a few bags of pellets, and accessories such as your probes and grilling tools. It’s one feature that helps the Z Grills stand apart from competitors like the Traeger Pro.

There’s a lack of shelving and prep area. You’ll probably want to add the folding shelf (sold separately) as you only have the top of the hopper as a place to set your food and beers on.
Grill grates
The porcelain-coated cast iron grill grates are very easy to clean, but like I said, they didn’t give great grill marks. That’s more due to the internal heat than the grates themselves though.

You get a bottom grate and one top grate. They are lighter in feel than some I’ve tested, like what you get on the
Build quality
This grill is in line with other pellet grills at this price point. Thin-walled steel and somewhat leaky fittings are to be expected.

The 700D4E does boast double-walled insulation which I found helped with heat retention and stability. This feels much more rugged than the L6002E (as well it should as it’s almost double the price).
Everything on the unit I tested was in pristine condition. The lid is made out of stainless steel and the cooking chamber is cast iron. Everything felt pretty light, but it fit together well during installation.
How good is the new WiFi?
For several years one of the knocks we had against Z Grills was they didn’t come with WiFi.
Well that’s no longer the case with the 700D4E.

But we’re always a bit dubious when I company adds WiFi, as we’ve seen too many botched roll-outs filled with annoying bugs and connection issues.
In my tests I found that app was pretty generic. The interface was nicer than the
It was responsive when I needed to check temperatures. I’ve researched reviews in the various app stores to see how other users found it, and it looks like there have been quite a few folks having issues with not being able to connect. I would expect to see teething issues as Z Grills continues to improve the app.
Cleaning the Z Grill 700D4E
Z Grills recommend adding a layer of aluminum foil over the top of the grease tray.
This does work well to catch drippings and make clean-up a breeze as you can just toss out the foil and reapply more.
I would like to see a better method of grease draining in these pellet grills. A drip pan under the cooking and out of the way like you find on Camp Chef and the Weber Searwood would be great. Let’s see it Z Grills!

Clean the grease bucket out with soap and water when necessary.
Remove the tray and baffle plate and use a shop vac to clean up all the pellet ash in the burn box. Be sure to keep this clean so your fire doesn’t burn out mid-cook.

Z Grills recommend removing any unused pellets after each cook as damp pellets can clog the auger mechanism.
This is much easier than previous models with the new pellet clean out feature. Just open the door on the back of the hopper and catch the pellets in a bucket.

Testing and benchmarks
I always like to run a couple of standard benchmarks to see how fast the grill comes to temp and how much temperature variance you can expect.
Time taken to get to temp
Initial startup took the grill 10 minutes to get to 225°F.
While the grill recorded 225°F, the middle of the grill had already registered at 225°F. This may be because the firebox is closer to the middle of the chamber.
From startup, it took about 30 minutes to get to the maximum temperature of 450°F. That’s pretty darn good for a pellet grill. The grill hit 450°F as advertised relatively quickly
Temperature variance and accuracy
To test temperature accuracy throughout the cooking chamber, I set the two probes at the middle and right sides of the grill at grate level.
The Z Grill thermostat probe is hardwired to the controller on the far left of the cooking chamber.
| Grill Setting | Left | Middle | Right |
|---|---|---|---|
| 225°F | 226°F | 226°F | 222°F |
| 450°F | 450°F | 450°F | 444°F |
This grill exceeded my expectations in terms of accuracy and temperature swing. The variance was negligible from each probe to the built-in thermostat.
I attribute this to the double-walled construction adding extra insulation to the cooking chamber as well as the new PID temperature controller technology. The best temperature accuracy in any pellet grill I’ve tested.
It’s worth noting that this was a clear day at 65°F with little to no wind.
Accessories
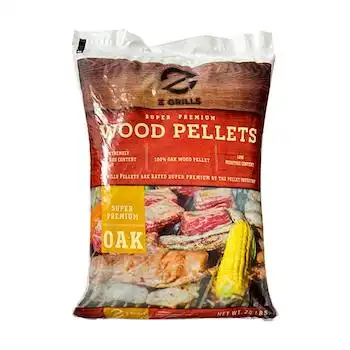
Z Grills offers their own grilling accessories as well as branded cooking equipment and pellets.
The covers are highly recommended and almost a necessity if storing your grill outside. You’ll want to protect your investment from the elements so it will last you well past the 3-year warranty mark.

Z Grills also has their own proprietary pellets. I did like the way these pellets combusted – very clean with little to no ash flying around in the cooking chamber. I’ve used pellets that were very ashy and would settle on the food as it cooked.
Other grills to consider
As I mentioned, the pellet grill market is ripe with competitors, and that’s good for the consumer.

As well as other Z Grills models, you’ll find good options from the big names like Traeger, RecTeq, and even Weber, but you’ll pay a premium.
You can find competitors at the same price point as the 700D4E though. The Pit Boss Sportsman is only a cheaper and gives you direct flame grilling. We have a video that campres those pits in more detail.
Final verdict
The Z Grill 700D4E is a great entry-level pellet grill and should be in consideration for those shopping around.
It has by far the most steady temperature in any budget pellet grill I’ve used.
The 8-in-1 claims are a little overblown, in my opinion, but it’s great as a smoker-type oven that bakes and grills. Just don’t expect a nice char or sear.
If you want an easy to use smoker then the Z Grills 700D4E is a great entry point into the world of pellet grills.
- Holds nice stable temperature
- Good mobility
- Pellet hopper cleanout
- Need to be careful when closing the lid
- Minimal shelf area
Z Grills is growing like crazy and their offerings get better with each model evolution. Buying directly from Z Grills’ official site will net you some added freebies like a cover and pellets. It’s a nice touch when you’re setting up a new grill and don’t have to run out of fuel or a cover.
Feel free to chime in below! Let us know your experience with Z Grills or pellet grills in general.

About Your Pitmaster
Jeff “Ricer” Rice is the face of the Smoked BBQ Source YouTube Channel, where he brings expert BBQ equipment reviews and mouthwatering cook videos to life. A lifelong barbecue enthusiast, some of his fondest memories have been made around a pit, and he’s passionate about sharing that experience with others.
Whether he’s testing the latest gear or firing up the smoker, Jeff takes a real, no-nonsense approach to barbecue, making it easy for anyone to fire up great BBQ at home.
The landfill will be full of all these electric driven grills & smokers while the plane ole WSMS’s will still be smokin.
I love my old stick burner, but the convenience of being able to cook 10 minutes later is great. I work sometimes 12 plus hours a day. I’ve never liked a gas grill even though there fast. The pellet grill my in-laws have is 10 plus years old. So I’m excited to have a new pellet grill.