
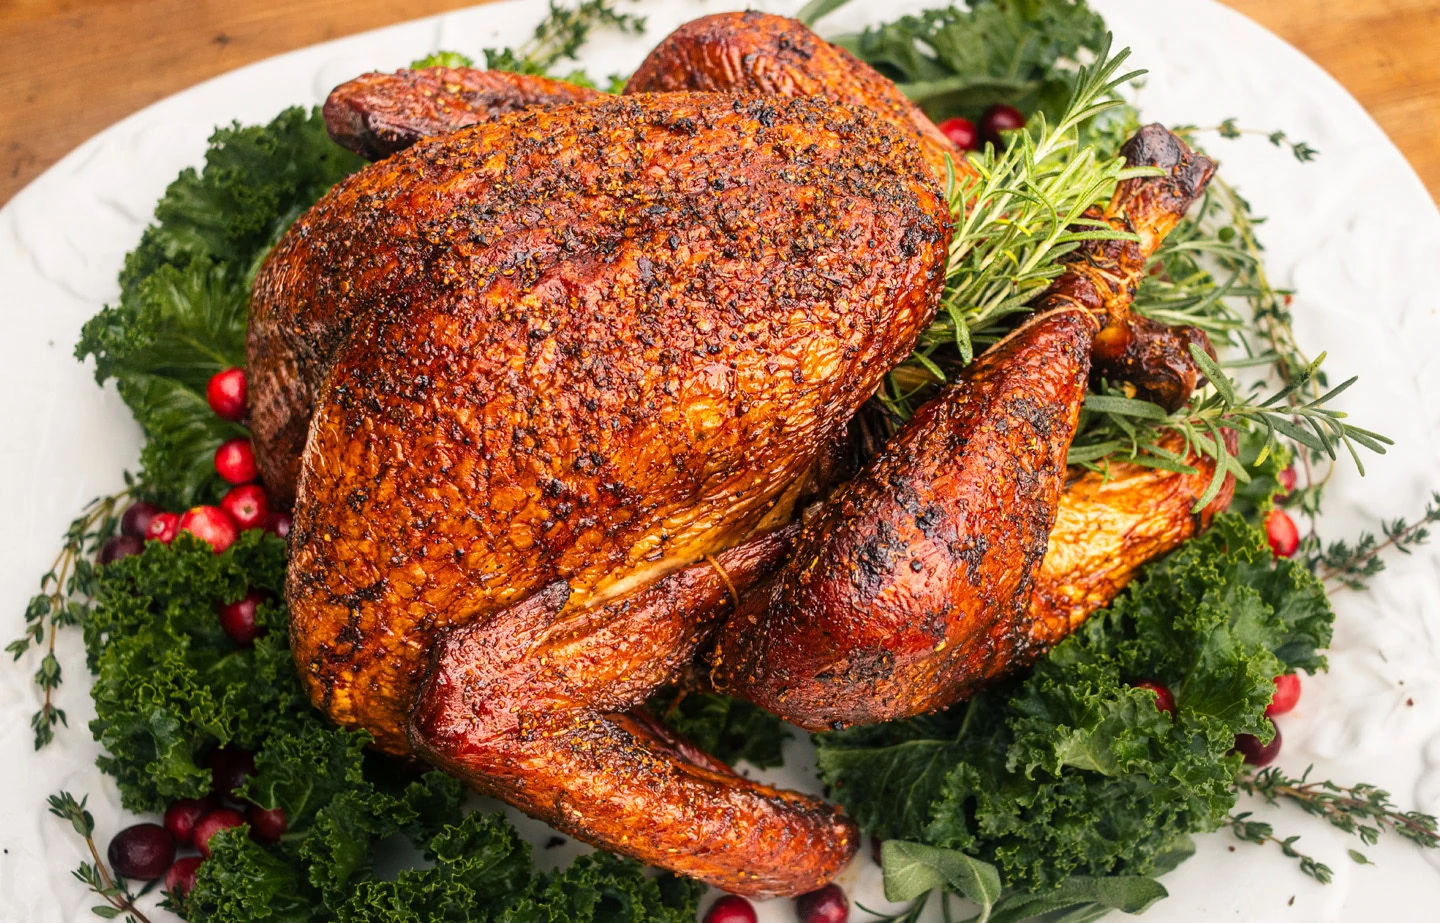
How to Dry Brine a Turkey
SmokedBBQSource is supported by its readers. We may earn an affiliate commission at no extra cost to you if you buy through a link on this page. Learn more.
Almost every turkey I cook starts with a dry brine.
There’s no mess, no water bath, and no huge brining container taking up half the fridge. It’s a simple overnight step that makes a real difference, keeping the meat juicy and drying the skin so it goes nice and crispy, ready for your favourite seasoning before it hits the smoker or oven.
This is the crucial first step in our dry brined smoked turkey recipe.
Why dry brining is my go-to method for turkey
Dry brining fixes the two most common problems with smoking turkey.
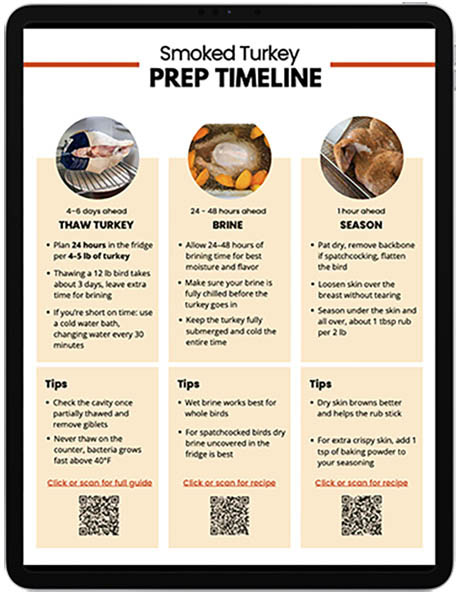
Do not risk a dry turkey this year
Download our free step-by-step turkey smoking cheat sheet.
Inside, you’ll find clear timelines, prep guides, and pro tips that you can follow on any smoker, ensuring your holiday bird comes out juicy, evenly cooked, and stress-free.
Turkey is lean, so it dries out easily, and the skin goes rubbery when cooked at lower temperatures.
Dry brining fixes both of those issues with one simple step.
You rub the turkey with salt and leave it in the fridge, and the salt does the work. It seasons the meat deeper than a surface rub, helps it stay juicy during cooking, and dries the skin so it browns properly.
Here’s what the salt actually does:
- It pulls a little moisture out, dissolves into it, and forms a natural brine on the surface.
- That brine is drawn back into the meat, which spreads the seasoning more evenly.
- As it absorbs, the salt loosens the muscle fibres, helping the meat hold on to moisture.
- Leaving the turkey uncovered dries the skin so it cooks cleanly rather than steaming.
You also have more control since the dry brine is just salt (and a little baking powder), you can easily adjust the amount if you’re working with a pre-brined, enhanced, or self-basting turkey. Reduce the salt for those birds, then leave the salt out of your final seasoning so you don’t push it too far.
Dry brining also avoids the hassle of wet brines. There’s no bucket of liquid to store, no risk of soggy skin, and no mess. Even an overnight dry brine helps, and a full 24 to 48 hours yields dry, dull-looking skin that takes on color well when smoked or in the oven.
By the time you’re ready to cook, the turkey is evenly seasoned and fully dry. All that’s left is to add your rub about 30 minutes before cooking.
How to dry brine a turkey
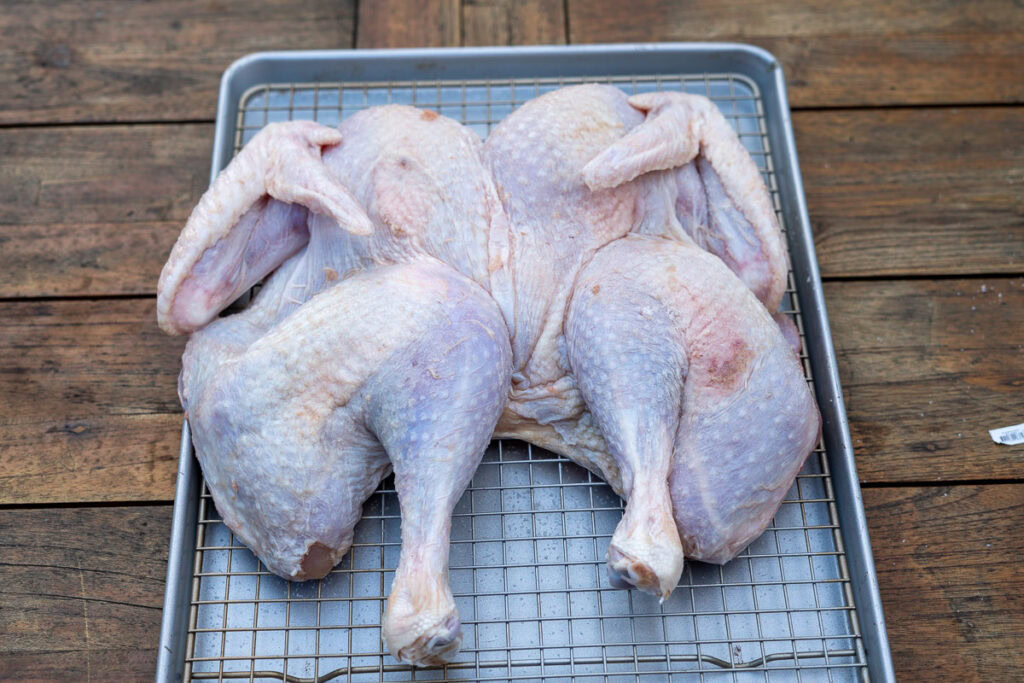
1. Start with a thawed and completely dry turkey
Unwrap your thawed turkey, remove the neck and giblets, and pat the entire surface dry.
Water is the one thing that slows the brine down, so take a minute to get the skin as dry as you can.
If the turkey is still a little icy inside the cavity, the dry brine will work, but it won’t spread as evenly. It’s worth waiting until the bird is properly thawed.
Tip: If you’re spatchcocking, do that before you start the dry brine. A flattened turkey seasons faster and fits better in the fridge.
2. Loosen the skin over the breasts
Slide a hand under the skin on each breast and lift gently. You’re not trying to peel the skin back, just create a little space so a small amount of salt can reach the meat. You’ll feel the membrane separate with light pressure.
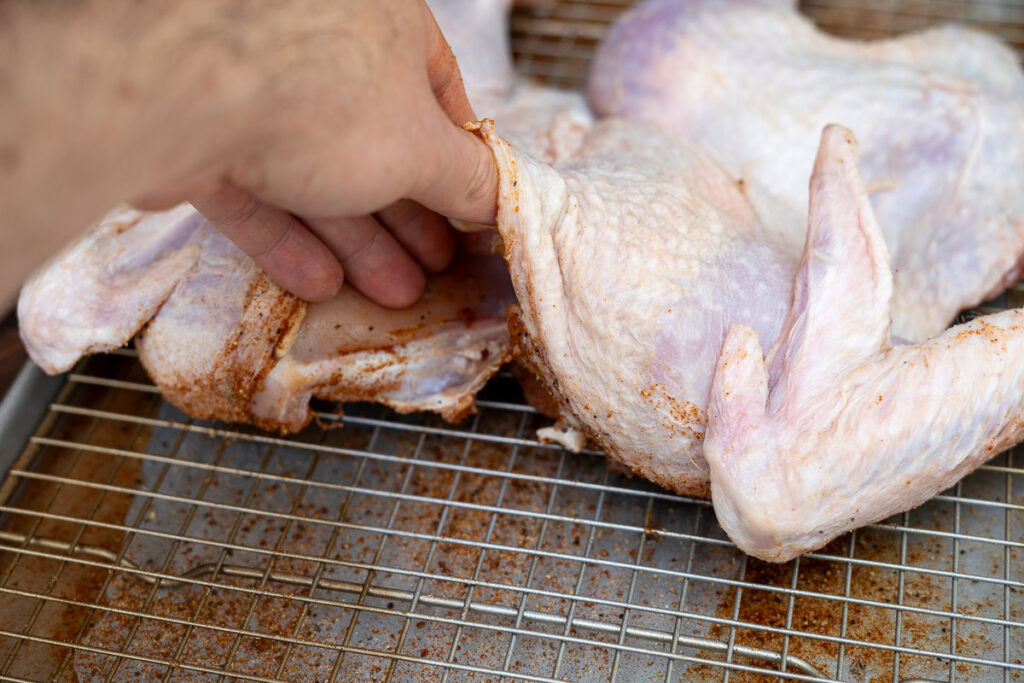
This helps the seasoning absorb and also lets air reach more of the skin, which speeds up drying. The skin should loosen easily. Using gloves will help prevent tearing, and if it starts to pull, back off and work from another direction.
3. Measure the salt based on the weight of the turkey
Use ¾ teaspoon of kosher salt per pound. This gives you an effective brine without pushing the turkey too far.
If your turkey is labelled enhanced, pre-basted, injected, self-basting, or kosher, reduce the salt by half. These birds already contain salt, and one of the advantages of dry brine is that you can adjust the amount easily.
- Example: For a 10 lb turkey, use about 2 tablespoons plus 1–2 teaspoons kosher salt.
Use kosher or flaky salt. Table salt has much smaller, denser grains, so a tablespoon of table salt contains significantly more salt by weight than a tablespoon of kosher salt. That higher concentration throws off the dry brine ratio and can easily over-salt the turkey.
Mix the salt with one teaspoon of baking powder. This doesn’t flavor the turkey. It raises the pH of the skin and helps it dry out faster, especially on smokers and pellet grills.
4. Apply the salt mixture evenly
Set the turkey on a rack over a tray. Season the underside first by sprinkling the salt mixture from a height or using a rub shaker so it falls in an even layer. Flip the turkey and repeat on the skin side. The goal is light, consistent coverage, not heavy patches.
If the turkey is spatchcocked, pay attention to the folds around the thighs and the edges of the breast. These areas stay damp if you miss them and won’t dry as well.
5. Refrigerate uncovered for 24 to 36 hours
Place the turkey on the rack, in the fridge with nothing covering it. Airflow dries the skin, which is the real advantage of dry brining over wet brining.
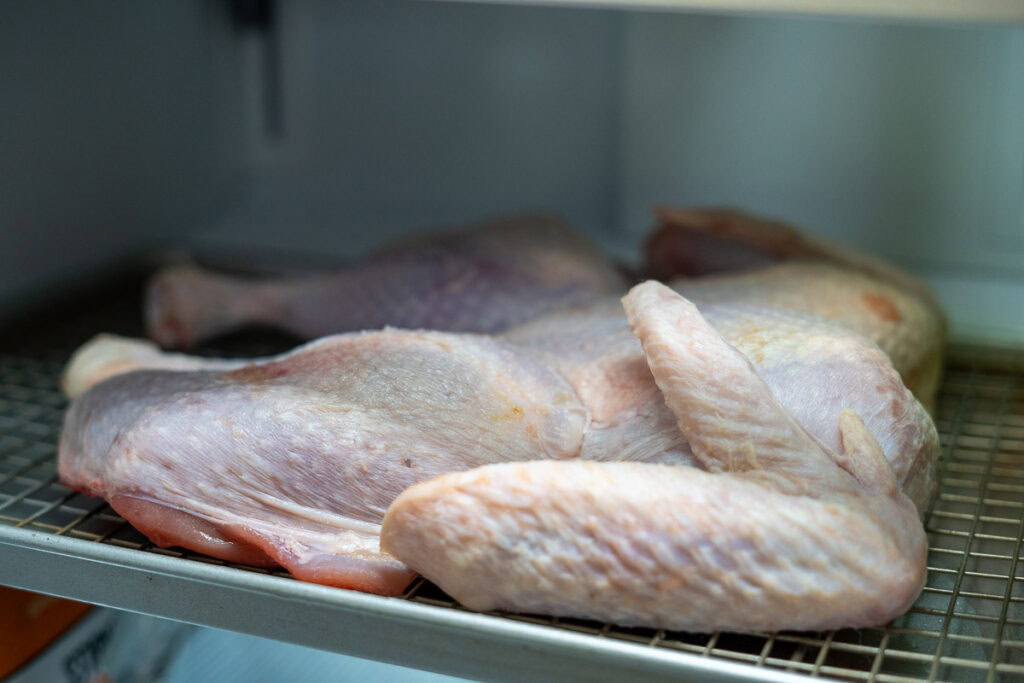
During this time:
- moisture is drawn out
- the salt dissolves
- the brine is pulled back into the meat
- the skin slowly dries and tightens
By the end, the skin should look dry, slightly tight, and dull. If it still looks shiny or wet, it needs more time uncovered.
6. Prep the Turkey for Cooking
On cook day, do not rinse the turkey. Rinsing puts moisture directly back onto the skin and reverses the drying effect achieved during the brine.
Pat the surface dry with paper towels and check for any pooled liquid anywhere on the turkey.
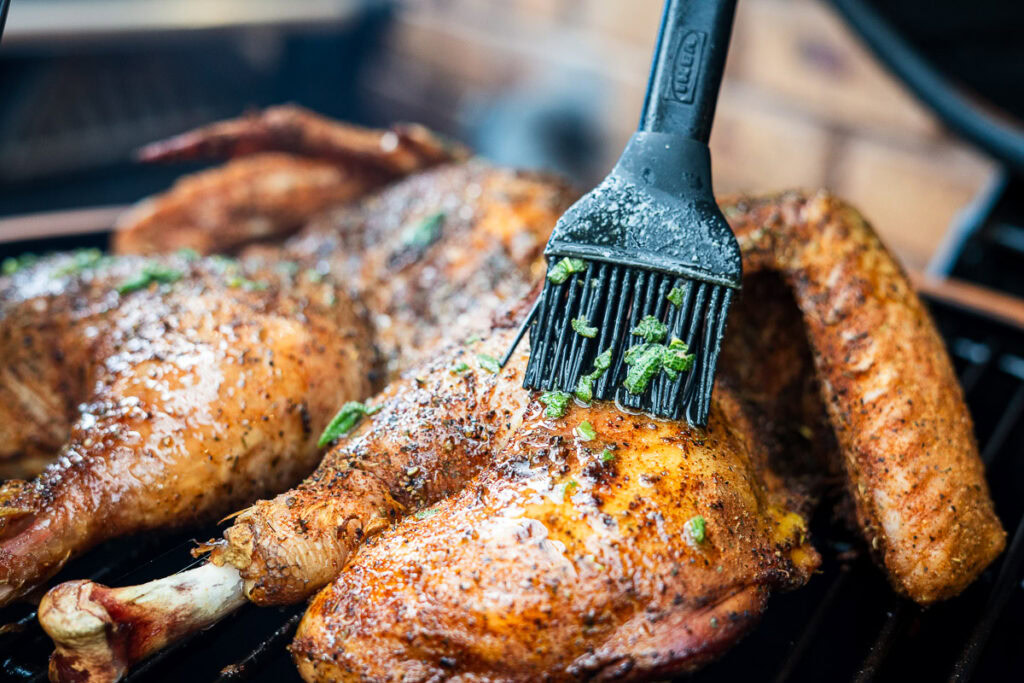
Add your turkey rub or seasoning about 30 minutes before cooking. Keep the seasoning low-salt or salt-free, since the dry brine has already done the work. This step is mainly for color and flavor.

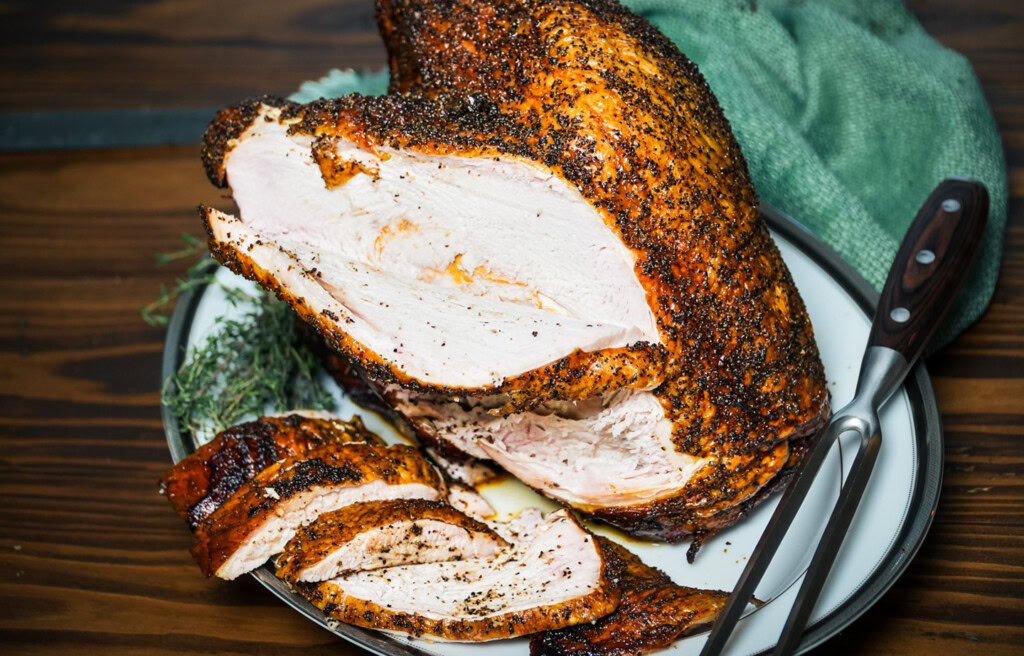
The turkey is now ready for your preferred cooking method. Whether you smoke, roast, or deep-fry, the dry brine yields evenly seasoned meat with a dry surface that browns and tightens properly, rather than turning rubbery.
Turkey recipes to try after dry brining


Ingredients
- ¾ tsp kosher salt per pound of turkey - e.g. about 2 tbsp for a 10 lb turkey, See note 1 for pre-brined-brined or self-basting birds.
- 1 tsp baking powder - optional, helps dry the skin
Instructions
- Pat the turkey dry with paper towels and remove any giblets or packaging from the cavity. If you plan to spatchcock the turkey, do that before brining.
- Mix the kosher salt and baking powder in a small bowl. Keep the brine simple and leave out herbs or spices so the skin can dry properly, these can be added before cooking.
- Place the turkey breast-side down on a rack set over a tray and sprinkle about half of the salt mixture over the underside, making sure it’s spread evenly.
- Flip the turkey over and apply the remaining mixture to the skin side. The salt should be visible but not clumped in any one area.
- Transfer the turkey to the refrigerator and leave it uncovered for 24 to 48 hours. The skin should dry out and look dull and slightly tacky rather than shiny.
- On cook day, do not rinse the turkey. Rinsing puts moisture back onto the skin. Pat it dry if needed, then use a low-salt or salt-free rub so you don’t oversalt the turkey after the dry brine. Proceed with your chosen seasoning and cooking method.
Notes
Nutrition
Nutrition information is automatically calculated and should be used as an approximation only. If you’re worried you could always add a side of kale.

About Your Pitmaster
Joe Clements is the founder and editor-in-chief of Smoked BBQ Source, a leading barbecue resource that has helped tens of millions master grilling and smoking. Growing up in a vegetarian household, his love for barbecue was unexpected. Determined to master the craft, he launched Smoked BBQ Source in 2016 to document his journey from amateur to pitmaster.
Joe leads a team of expert barbecue creators and oversees the largest collection of in-depth grill reviews and a library of tested, foolproof recipes. Whether he’s firing up a pellet grill or charcoal kettle, he’s passionate about making barbecue approachable and enjoyable for all.