
ThermoWorks Billows BBQ Temperature Controller Review
SmokedBBQSource is supported by its readers. We may earn an affiliate commission at no extra cost to you if you buy through a link on this page. Learn more.
Billows™ by ThermoWorks is a temperature control fan that works with their Signals thermometer.
It’s basically a fan that you connect to your charcoal or wood fired smoker to control the airflow and hold a steady temperature over a long cook without having to tend to your smoker.
At $69 Billows™ is a great option if you already own the Signals thermometer, as a separate bbq temperature controller can cost up to $350.
For this review, we put the Billows to the test to see how well it controlled the temperature on our
ThermoWorks sent me a free Billows in return for my honest review. All thoughts and opinions are my own.
Billows Overview and First Impressions
Update – Since our initial review ThermoWorks have released a new version of their App which now includes a lid opening feature that stops the fan from blowing when it detects the lid has been open as well as better graphing ability and the capability to save cook data. This removes the few issues we had with the Signals.
The first important thing to note is that Billows will only work with the Signals thermometer.
It will not work with the popular Smoke thermometer or any other third party devices.
“Signals hardware was especially designed and built to control Billows. Smoke’s hardware cannot be retrofitted to control Billows.”
ThermoWorks
While this is a shame for people who have already bought a Smoke, it’s understandable considering the price of similar products from other companies.
We have a detailed Signals review you can check out if you want more details about just the thermometer.
With that out of the way, let’s focus on the Billows.
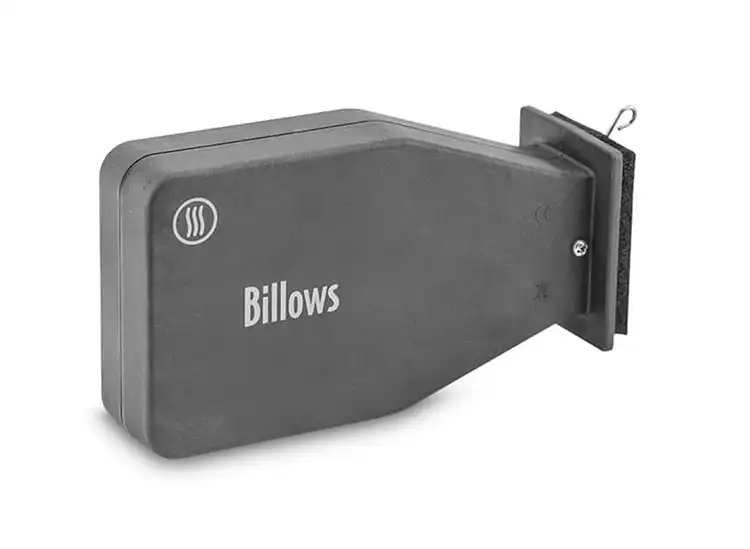
The main fan attachment unit feels nice and rugged, as we would expect from any ThermoWorks product. It’s made out of plastic but feels heavy-duty and stays cool to the touch during a cook.
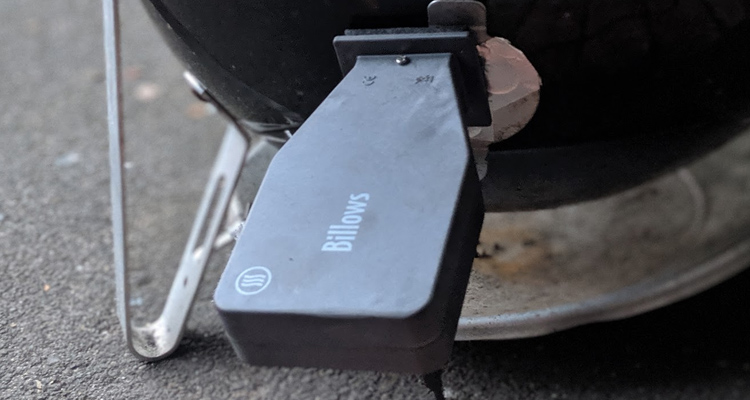
The connection process is straightforward. You just need to seal up all but one intake vent on your smoker using the included thermal tape, and then use the clever spring system to connect the Billows to your smoker.
From our research, the Billows connects to the majority of popular smokers including:
- Weber Kettle (with some setup see video)
- Primo XL
- Akorn Kamado
The billows uses the ambient temperature probe that cames with your Signals, then you can use up to 3 other channels for measuring food.
What I liked:
- Great value if you already own Signals – Adding thermostatic control for $59 is a bargain. The fan offers airflow capacity of 46 CFM and was super accurate during testing.
- Easy setup – I found the entire setup process very simple.
- Solid construction – The unit is made out of durable heat resistant plastic and feels incredibly solid. It says waterproof but I would be nervous using it in heavy rain.
What I didn’t like:
- Makes smoking too easy – OK this isn’t really a serious problem, but sometimes I actually find myself missing fiddling with the vents to try and dial in my temp.
If you already own a Signals or plan on getting one, then the Billows is a no brainer.
I didn’t realize how convenient using a temperature controller would be. Once everything was set up I found myself forgetting I had the smoker going at all.
We’ll have a more detailed comparison with other popular controllers at the end of this review.
Check the latest price on the Thermoworks website.
What comes in the box
Besides the main fan unit, you also get a few cables for connecting the Billows to your Signals, and some heat resistant tape to seal up any open areas around the fan.
What’s included:
- Fan unit (with removable yellow protective shield for the fan)
- 6′ USB-C to USB-C cable
- Fan adapter
- Flue tape

The USB-C cable connects to the underside of the fan and then plugs into the adapter.
The other port on the adapter connects to your power source using the adapter and cable used for charging your Signals, and then the adapter plugs into the USB-C port on the Signals.
If you have a Kamado style grill you will need to purchase an additional mounting plate for $5.99.
Using the Billows fan controller
To test out the billows I decided to cook a small brisket on my 18″ Weber Smokey Mountain.
This smoker has fairly good temperature stability already, but I do usually need to make an adjustment every few hours to maintain a nice even temperature.
The cook was on a cool day, with no wind. I plan to do a follow-up test to see how well the Billows performs in more extreme conditions.
Installation
The installation will vary a little depending on your smoker setup, but I will run through how I did it so you can see how it works.
I followed the manufacturer’s instructions and used the tape provided to close up the air intake holes I wouldn’t be using (there are 2 other intake dampers I also shut).
To start you leave the exhaust damper slightly open, and I never needed to adjust it.

Attaching the billows is as easy as pinching some clips together and pushing them through the vent hole.
Make sure you have the fan and USB-C connector pointing down. You may also want to plug in the USB-C cord first, otherwise, it can be a bit fiddly to plug it in.
This holds the fan securely in place. There is some high-temperature foam on the edge of the fan to help you get a tight seal.

Make sure you remove the yellow plug before using it!
Setup
One thing to note, you will probably need to update the firmware on your Signals to the latest version.
I forgot about this step, and it took me a while to work out why the Billows wasn’t working.
Luckily this process is straight forward and well explained on the ThermoWorks website.
Once the firmware is updated, getting Billows working is simple:
- Position your Signals near your Smoker
- Plug the Signals power cable into the “Power” side of the fan adapter
- Plug the USB-C cable that came with the Billows in to the “Fan” side of the adapter.
- Finally, plug the adapter into your Signals
You’ll need to position your Signals fairly close, as both the USB-C cable and your temperature probes need to reach. You may need an extension cable to power the Signals, as the fan can’t run without being plugged in.
The full setup should look something like this (I would recommend placing the Signals on a table, this setup was just to get a photo)

The final step is to plug the ambient pit probe that came with your Signals into port number 4.
Make sure you plug it into the bottom port, as this is the one used to control Billows.
All you need to do now is turn your Signals on and the fan will automatically start blowing.
The cook
I used the minion method setup which is also the recommended method in the manufacturer’s instructions.
I filled the charcoal chamber with Kingsford charcoal briquettes, leaving a small well in the middle and then poured half a charcoal chimney over lit briquettes over the top.
I turned on my Signals and set the pit temperature to 250°F. Controlling the Billows is done using the set alarm feature.
Once you set your target, the alarm will sound if the temperature goes 25°F above or below the target.
The alarm went off every time I opened the lid but was easily silenced by pressing the ‘VOL” button.
You can see in the picture below the fan icon in the bottom right, indicating the Billows is connected.

The billows fan started going and the internal temperature climbed rapidly to 250°F.
This was an unexpected benefit, as normally it takes a while for my
The billows kept the temperature nice and even all day, I even went to the store for a few hours and every time I checked the temperature was between 240-260°F.
The fan isn’t variable speed. It turns off and on automatically to maintain your set temperature.
This is what my pit temperature graph looked like after 6 hours.
The two big dips were caused by me opening the lid.
ThermoWorks have said they are working on improving the software so that it doesn’t record these big spikes and dips as the actual effect on your smoker is minor.

As you can see the temperature stayed nice and stable, almost always within +/- 10°F of my target temperature.
You can change the target temperature and the Billows will quickly respond.
My brisket wasn’t done until after 10PM, and the Billows did a good job keeping the temperature up as the charcoal supply started to run out.
Normally I would have had to keep opening the vents to supply more oxygen.
How the Billows compares to the competition
If you want to get a fan controller and already own a Signals, I wouldn’t even bother researching the competition. It’s a steal at $59.
However, if you’re in the market for a thermometer + controller, you do have a few options to consider.
Two of the most popular alternative choices are the FireBoard 2 and the Flame Boss 500.
We also have a detailed break down of some of the best temperature controllers if you want to see all the options.
FireBoard 2 Drive + Blower vs ThermoWorks Signals + Billows
The most obvious competitor to ThermoWorks is the FireBoard 2 Drive.

Just like Signals, the FireBoard 2 is sold as a stand-alone thermometer with an add-on blower available.
The FireBoard blower is rated 20 CFM compared to 46 on the Billows.
The FireBoard does have a few advantages though.
The main unit supports up to 6 channels, two more than the Signals. This is useful if you need to monitor a lot of items at once but more than I ever use.
The app experience is a little bit better, and you can set email or SMS alerts when your alarms are triggered.
You can also set rules for your alarms, for example, you can set it so it only triggers after a certain amount of time. This is a great feature to avoid triggering your alarm every time you open your smoker lid.
The FireBoard also supports Google Assistant and Amazon Alexa.
The primary screen on the Signals is a little better, showing all the information on one large LCD display, but the battery life of the FireBoard 2 is better.
Get the latest price on the Fireboard website.
Should you buy the Billows?
Based on my testing, I would recommend the Billows to anyone looking to add automatic temperature control to their charcoal or wood smoker.
While you are locked into using the Signals thermometer, this isn’t necessarily a bad thing as it’s one of the best options available.
You can purchase Billows and Signals from the ThermoWorks website.

About Your Pitmaster
Joe Clements is the founder and editor-in-chief of Smoked BBQ Source, a leading barbecue resource that has helped tens of millions master grilling and smoking. Growing up in a vegetarian household, his love for barbecue was unexpected. Determined to master the craft, he launched Smoked BBQ Source in 2016 to document his journey from amateur to pitmaster.
Joe leads a team of expert barbecue creators and oversees the largest collection of in-depth grill reviews and a library of tested, foolproof recipes. Whether he’s firing up a pellet grill or charcoal kettle, he’s passionate about making barbecue approachable and enjoyable for all.
How would you clean the ashes out of a Kamado Joe once this system is in place?