
5 Best Dehydrators for Jerky in 2026
SmokedBBQSource is supported by its readers. We may earn an affiliate commission at no extra cost to you if you buy through a link on this page. Learn more.
There are a few snacks tastier than homemade jerky that you spiced and dried yourself.
Slicing and flavoring the meat is the easy part. Properly drying out jerky can be tricky without a dedicated dehydrator.
These devices are easy to use and work by passing heated air over the surface area of your pre-sliced meat strips.
If you want to get serious about making jerky, we think the Meat! 10-tray dehydrator is your best option.
We’ve also compared various options to help you find the best dehydrators for making jerky at a range of price points.
- Large capacity
- Easy clean-up
- Thermostat control
- Quality construction
- Large footprint
- Trays fit tight at first
The best food dehydrators for making jerky in 2026
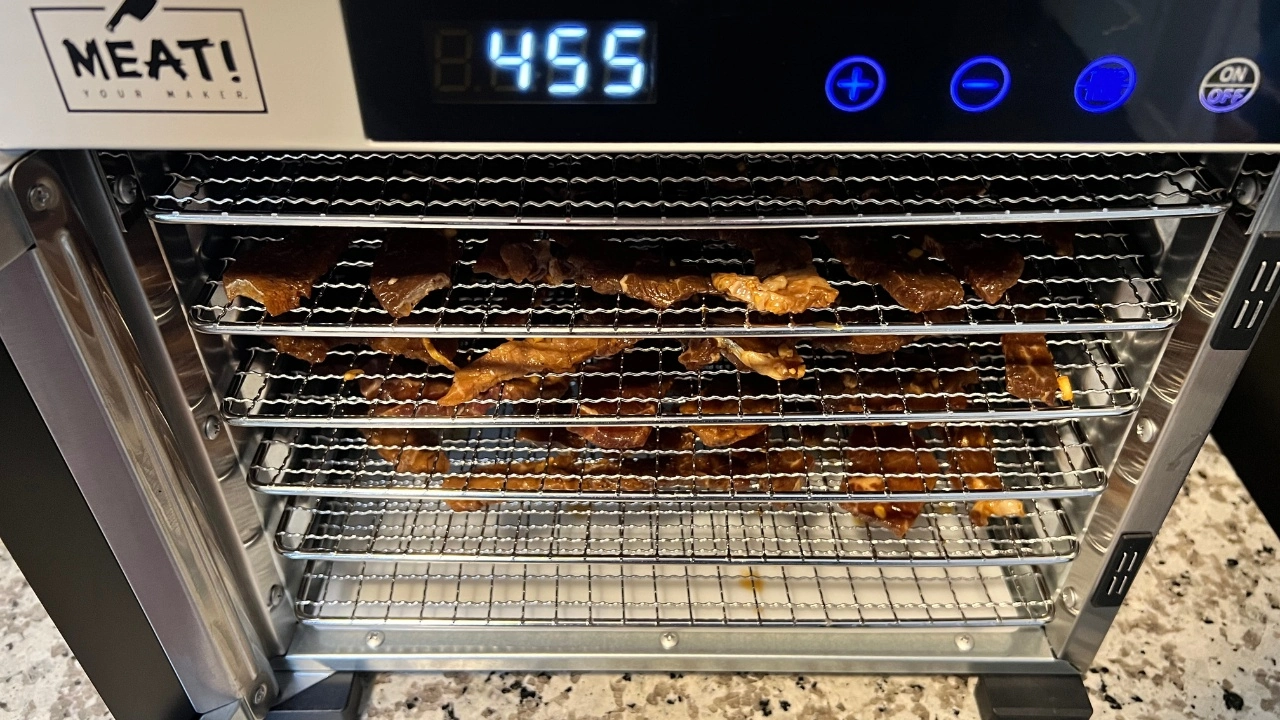
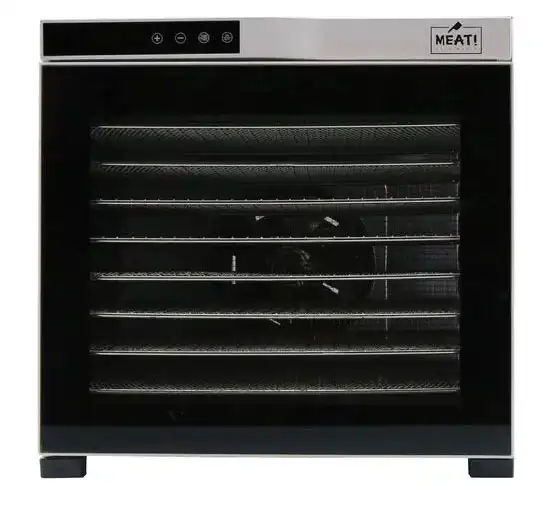
1. Best Overall – MEAT! Your Maker 10 Tray Dehydrator


The MEAT! 10 Tray Dehydrator is a serious jerky-making machine. With a ten-pound total capacity, this is for the serious jerky maker.
They also sell a smaller 6 tray model with an otherwise identical design.
The simple temperature and timing controls make drying foods easy with a range of 90°F to 167°F and an up to 30-hour timer. The auto shut-off feature kicks in after 24 hours of the end of a set timer.
Made of stainless steel, the construction is both durable and sleek, and a clear glass front allows you to check the progress without having to open the door.
Meat! (AKA Meat Your Maker) are a fairly new brand, making a big impact in the meat processing space with a range of grinders, food slicers, sausage stuffers, and more aimed at the home enthusiast level.
What we like
- Large Capacity – Bulk drying is a breeze with enough trays and space for ten pounds of jerky at once. The 360-degree air circulation ensures even cooking for each piece, so you shouldn’t have to rotate trays.
- Convenient Clean-up – The stainless steel wire trays are dishwasher safe, so no hand scrubbing is necessary. The fruit roll tray also doubles as a drip pan for easy cleanup.
- Thermostat control – You won’t have to babysit the dehydrator or guess when your product is done with its easy temperature and timing controls. Control your temperature and dry time for the best result no matter what you’re dehydrating.
- Quality Construction – The stainless steel construction makes this product top-notch quality. It looks and feels commercial grade. Sturdy, but not too heavy.
What we don’t like
- Large footprint – With large capacity comes a large footprint. You’ll need a dedicated place to store this dehydrator as it’s not going to fit under the typical kitchen counter.
- Tight Fit – Some of the stainless steel trays didn’t easily slide into the middle racks of the dehydrator. They had to be lightly forced into place, though they slid easier with more usage. It didn’t scratch or damage the inside, thankfully, so hopefully they loosen up even more as time goes on.
The MEAT! 10 Tray dehydrator is a workhorse and great for anyone drying large amounts of food in volume, whether that’s jerky, fruits, or vegetables. If you’re worried about the size, we also recommend the 6-tray version.
A fantastic addition to your home food processing and preservation setup.
2. Runner up – Excalibur 9-Tray Electric Food Dehydrator
With just one less tray, the Excalibur 9-tray is our runner-up to the Meat! dehydrator.
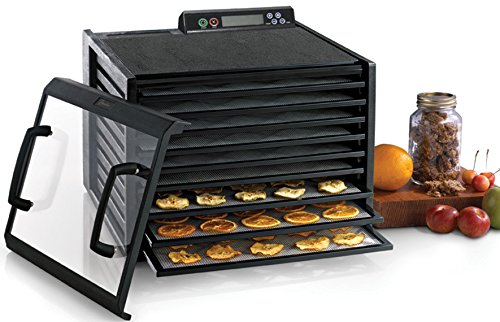
With nine separate trays for a combined 15 square feet of space the Excalibur 9 tray digital hydrator has all the features you need to make large volumes of jerky.
The window at the front lets you keep an eye on the entire process.
It has plenty of controls to make the dehydrating process easy on your part, plus a huge 7-inch fan that provides plenty of air circulation without too much noise.
What we like:
- Thermostat – It’s easy to control the temperature of this dehydrator thanks to the thermostat. You can go up to the poultry safe temperature of 165°F with the touch of a button.
- 15 square feet of space – Having plenty of room to stack various meats or vegetables is a huge plus. You can make giant batches of jerky or any other dried food all at once.
- Set and Forget – A timer is included with the thermostat controls. It’s great for setting the dehydrator so you can go about other activities while you wait for your jerky to be ready.
- Non-stick insert – The poly-tray design stops food from sticking to the trays. It’s excellent if you make something other than jerky which contains sugar. No one likes to spend a lot of time cleaning up their dehydrator.
- Quiet operation – If you make jerky often then a loud dehydrator sitting on your bench can get annoying. This model runs extremely quite so it shouldn’t be annoying.
What we don’t like:
- Few issues with damaged units – Some people seem to have received damaged units due to poor packaging. Not sure if this is a fault with Amazon or the manufacturer, but be sure to check everything is working well the first time you set it up.
- No instructions – Without a small booklet to show you how things work, it can be tricky starting this dehydrator up for the first time.
3. Best budget dehydrator – Presto Dehydro Electric Food Dehydrator
This dehydrator is extremely affordable and easy to use.
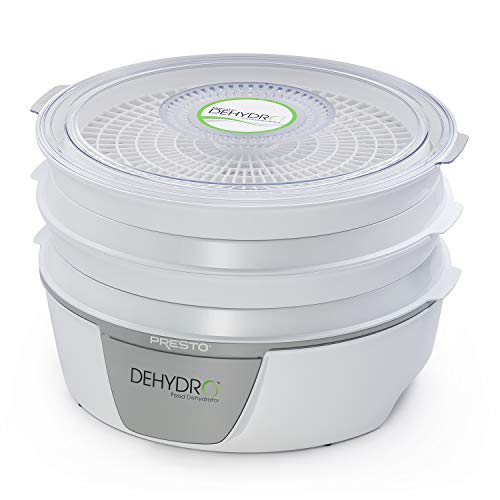
Setting it up and starting your newest batch of jerky can be done quickly due to the preset temperature; no need to fiddle with temperature settings.
It lets you check the status of your food as it dries without disturbing it.
It’s also easy to clean and put away when you’re finished.
What we like:
- See-through cover – You can check on the progress of your jerky just by peeking into the top of the unit. It’s a lot easier than having to take the trays out by hand.
- Easy to store – The trays all nest against one another and the corridor wraps up in the base. It’s easy to fit this evening to a cramped.
- Dishwasher-safe trays – You can throw these in the dishwasher for easy cleaning after being used.
- Expandable size – Comes with four trays and you can purchase an additional four trays for added capacity.
What we don’t like:
- Starts with only four trays – The initial size offered by this dehydrator leaves a little to be desired. There isn’t enough room for huge batches of jerky at once.
- No temperature controls – While the temperature is preset to 165°F, you can’t alter it from this setting. The lack of control can be unhelpful with some foods, or if you prefer your jerky to be 160°F.
4. Best mid-range dehydrator – Hamilton Beach Digital Food Dehydrator
This dehydrator has a lot of excellent technical additions that make it a great kitchen companion, like an auto shut-off timer and an adjustable thermostat.

It’s also great for making foods other than jerky, like fruit rolls. A powerful 500-watt motor provides plenty of drying power for five stackable trays.
What we like:
- Timer – You can set your jerky to work for up to 48 hours or use the auto shut off function. It’s great for drying out your jerky without having to hover over the machine the whole time.
- Adjustable thermostat – Choose between 100°F and 160°F with just a few presses of buttons.
- Two specialized sheets – Included with the purchase is a fine mesh sheet for drying out herbs and other small foods. There’s also a solid sheet for making your own fruit rolls.
What we don’t like:
- A bit noisy – Compared to the other dehydrators we’ve looked at, this one makes a bit of a racket.
- Large grids on most trays – Be sure to slice your jerky wide enough to fit on the grids with these trays. Otherwise, they may fall down during dehydration.
5. NESCO Snackmaster Pro Food Dehydrator
If you aren’t serious enough about making jerky to justify the cost of the Excalibur, the Nesco FD-75A is a popular alternative.
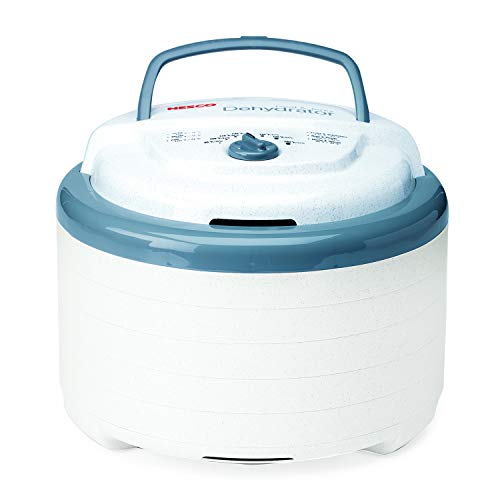
This vertical dehydrator is easy to use, has a small carrying handle, and is expandable to a larger size. With a top-mounted fan that projects 600 watts of drying power, it offers good results for food positioned properly beneath the air currents.
You can see how to use the Nesco to make beef jerky in the video below.
It also boasts some decent temperature controls to make your snack-making sessions even easier to manage.
What we like:
- Can purchase extra trays – While it comes with five by default, you can purchase an additional seven. This allows for plenty of drying space to make big batches of jerky or other food.
- Quiet – This dehydrator won’t annoy you even as it runs for several hours. Feel free to stick this in the kitchen since the low hum isn’t likely to be a bother.
- Decent vertical drying – This dehydrator makes use of a patented flow drying system to force air down and across your meat. It’s thorough for meat in the middle of the stacks.
- Vita-Save exterior – This patented design blocks out harmful UV radiation to keep your food nutritious as it is dehydrated.
What we don’t like:
- Uneven drying – The top-down design, while workable, isn’t as efficient as dehydrators with fans in the back. The air doesn’t flow quite evenly over the edges of meat pieces at the sides of the trays.
- Trays are cheap – You’ll occasionally run into a warped tray as it bends from the heat. This requires you to get a new one.
Do you need a dehydrator to make jerky?
You don’t need a dehydrator to make delicious jerky, although it makes the process much easier.
You can use a combination of smoker and dehydrator like in our smoked beef jerky recipe, or just a dehydrator like in our teriyaki jerky recipe.
Each option uses slightly different methods to make the jerky, but the end result can be roughly the same if done properly.
Kitchen oven vs dehydrator vs smoker
All three of these machines can be used to make tasty jerky. Let’s see how they compare.
You can make jerky in a conventional oven by slicing the meat into thin strips and laying them on baking sheets. Turn the temperature of the oven up and watch the meat dry out and cook carefully.
Making jerky in an oven
Pros:
- You already have an oven in your home, so you can start making jerky ASAP.
- A built-in oven doesn’t take up any counter space at all.
Cons:
- Some ovens might not be able to reach low settings like 160°F. You’ll have to check the jerky frequently to ensure you don’t burn it.
- Most ovens don’t have racks pre-sized for fitting thin-sliced strips of meat. It’s hard to make larger quantities of jerky at once.
- Ovens don’t have dedicated air fans, might dry the meat unevenly.
- Ovens can sometimes eliminate valuable nutrients and vitamins in your meat strips.
- If you’re using the oven to make jerky, you can’t use it for other important jobs like actually feeding your family.
Making jerky in a dehydrator

Dehydrators use airflow to dry out meat strips. The airflow and raised temperature make the meat safe to eat and evaporate moisture in the strips at the same time.
Pros:
- It can be stored out of the way when not in use.
- They have plenty of space on the racks or shelves for fitting lots of jerky at once. This way, you can make larger batches and have jerky for several days or weeks in advance after one drying session.
- Dehydrators are also typically easier to control in terms of temperature. Most of them have temperature controls that reach up to the standard 160°F recommended for jerky making.
- Dehydrators can also be used for drying other types of food besides jerky. Their versatility shouldn’t be underestimated. They can pull moisture from practically any food and dry it for storage or snacking without having to adjust much at all.
Cons:
- Dehydrators do require some counter space when in use.
- Some cheap models can also run loudly unless you get a more expensive unit with built-in soundproofing technology. In certain kitchens, the whine of the fan can echo and be quite annoying.
- Drying jerky in the oven is usually quicker than drying it in a dehydrator. While the overall quality of the jerky will be better, you’ll have to wait longer for your snack if you don’t have any in reserve.
Making jerky in a smoker
Smokers are a third option for making your own jerky. You slice meat into thin strips and hang them vertically from the rack inside the smoker.
The meat is cooked and bathed in the smoke at a relatively low temperature, and the smoke helps remove excess moisture until it is totally dry.
Pros:
- If you already own a smoker then this method can be the most practical.
- Electric and pellet smokers are quite easy to use and can hold an exact temperature within the recommended ranges for safe jerky consumption.
- Well insulated so, they’ll cook your jerky evenly most of the time.
- Many smokers have extra controls like 24-hour timers or automatic shutoffs. These can make drying out your own jerky an easier experience.
- Smokers also usually enhance the taste of your jerky.
- They can protect your meat from fermenting or fat from becoming rancid. There’s a reason that people have used smokers to preserve food for thousands of years.
Cons:
- It’s easier to burn food in a smoker, whereas it’s practically impossible to do that with a dehydrator.
- Some types of smoker like charcoal will require more effort to maintain the correct temperature.
How dehydrators work
Dehydrators are fairly simple machines. They usually have a series of trays or shelves on which you spread meat strips. Dehydrators use fans, so you can start the dehydration process whenever is convenient.
Air passes through the trays since they usually have open spaces to allow for adequate airflow. The trays can be either vertical or horizontal in design depending on which model you purchase.

Some dehydrators also work with heating elements that let you set a temperature for the airflow on the shelves.
Heating up your drying meat will accelerate the process by drawing moisture to the surface of the food. The air can then evaporate extra moisture and dry the meat.
Features to look for
Great dehydrators will have a few key features you should keep in mind as you shop.
Vertical/horizontal airflow
Both of these airflow variants are common among dehydrators. Neither is necessarily better than the other, although each has advantages and disadvantages.
- Vertical airflow dehydrators will have fans mounted at the top or bottom of the unit, and they usually aren’t too expensive.
- They’re also smaller than horizontal dehydrators, so they can be a good choice if you have a crowded kitchen counter.
- They aren’t quite as efficient as horizontal dehydrators, however.
This is because any air passing up or down through the dehydrator doesn’t flow over the entire length of any given piece of meat. Moisture evaporation and drying happen a little more slowly as a result.
You can try rotating the racks of your vertical airflow dehydrator to adjust for this somewhat.
- Horizontal airflow dehydrators have fans placed at the back of the unit.
- This fan placement allows every shelf of the dehydrator to get the same level of air circulation.
- Air passes over the entire length of a strip of meat, improving moisture evaporation and ensuring that the entire strip will be dried evenly.
It’s also easier to check your meat racks with a horizontal dehydrator. These trays usually slide out like a removable shelf or drawer. It’s easy to add or remove meat in this manner.
Size
The size of your dehydrator also matters a great deal. Smaller units won’t be able to dehydrate as much jerky at the same time as larger ones.
Dehydrating meat takes a long time no matter which kind of dehydrator you purchase. So, you’ll likely want to make a lot of jerky in advance rather than making smaller batches whenever the mood for a meaty snack strikes you.
Essentially, consider how much jerky you plan to eat in the future and go from there. Pick up a bigger unit, even if it’s more expensive, if you prefer jerky as your go-to daily snack. Or choose a smaller dehydrator if you only have jerky once in a while.
Temperature settings
Dehydrators with temperature controls integrated into their designs are well worth a look. Because temperature matters a great deal when making your own jerky, being able to control it is a great bonus.
The internal temperature of jerky has to reach 160°F unless it is poultry, which needs to reach 165°F.
Temperature settings let you easily prepare your jerky at this predetermined safe level without having to check frequently.
Consider picking up a temperature probe, especially if you buy a dehydrator without detailed temperature settings.
If your dehydrator doesn’t reach temperatures of 160°F, you can always cook the jerky in the oven to this temperature beforehand. Then you can place it in the dehydrator to fully dry.
However, this takes longer than being able to simply throw the jerky in the dehydrator in the first place.
Noise level
Finally, don’t forget to examine the likely noise levels of a dehydrator. These machines can be pretty loud since they use fans and flowing air to dry your meat strips.
You should be able to find the exact noise levels of a given dehydrator in the instruction manual or their product specifications.
Usually, more expensive dehydrators will have quieter fans or soundproofing measures. These make them more comfortable to use over a long period of time.
Cheaper units will probably be louder overall. You’ll definitely want a quieter dehydrator if you plan on using it frequently.
Wrapping it up
Overall, we think the Meat! 10-tray dehydrator is your best option for making big batches of jerky. It’s an excellent choice if you want an all-around good dehydrator.
There’s lots of space, temperature controls, and even timers, so you can customize your jerky just the way you like it. Whatever you choose, have fun, and enjoy your next snack!

About Your Pitmaster
Joe Clements is the founder and editor-in-chief of Smoked BBQ Source, a leading barbecue resource that has helped tens of millions master grilling and smoking. Growing up in a vegetarian household, his love for barbecue was unexpected. Determined to master the craft, he launched Smoked BBQ Source in 2016 to document his journey from amateur to pitmaster.
Joe leads a team of expert barbecue creators and oversees the largest collection of in-depth grill reviews and a library of tested, foolproof recipes. Whether he’s firing up a pellet grill or charcoal kettle, he’s passionate about making barbecue approachable and enjoyable for all.