
Masterbuilt Gravity XT Review: Are the Upgrades Worth the Price?

SmokedBBQSource is supported by its readers. We may earn an affiliate commission at no extra cost to you if you buy through a link on this page. Learn more.
We’ve spent a lot of time cooking on the Masterbuilt Gravity Series over the years, from the original 560 to the 1050, and now the upgraded Gravity XT. Masterbuilt built its reputation on making charcoal cooking as easy as a pellet grill, and the XT is their latest attempt to refine that idea.
After months of regular use, including plenty of low-and-slow barbecue and high-heat grilling, we’ve learned a great deal about how this pit performs day-to-day and whether the upgrades are worth the price jump.

Our Verdict: The Masterbuilt Gravity XT refines everything we liked about the original, with better insulation, smoother airflow control, and easier digital operation. It delivers true charcoal flavor with pellet-grill convenience. The price is higher, but the upgrades make it a worthwhile step up.
- New heat and air intake slides
- Improved hopper design
- Better fuel efficiency
- Digital control panel
- Better build quality
- Large price jump from the older model
Masterbuilt sent me this grill in exchange for an honest review. All opinions are my own.
UPDATED Nov 05, 2025: Expanded with insights from our YouTube video review and extended testing, including detailed performance data, app feedback, and long-term maintenance notes.
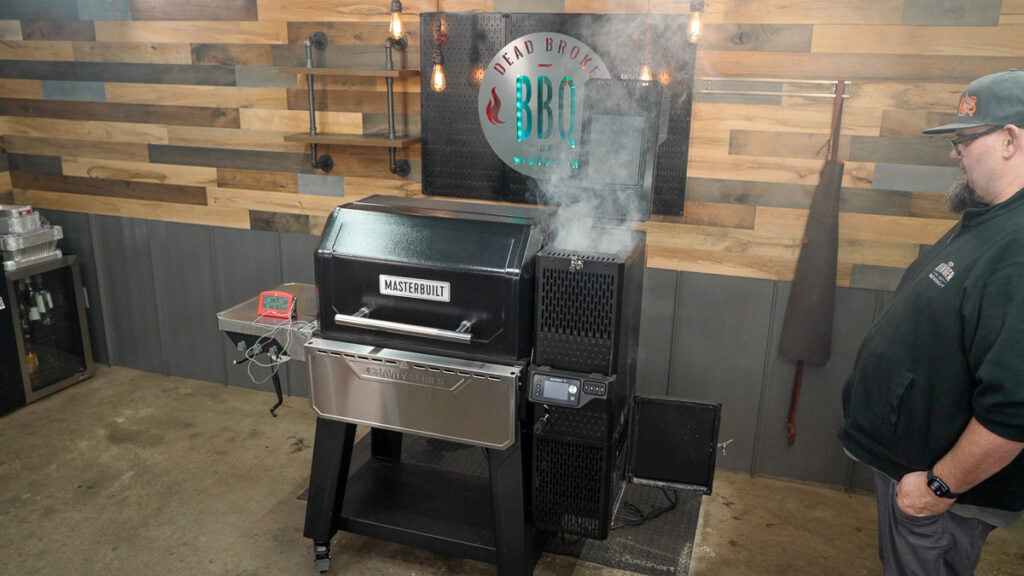
Masterbuilt Gravity XT overview and first impressions
We’ve been running the older 1050 model, for years now, and a family member has the 800 model with the integrated griddle. So when Masterbuilt asked if we wanted to test out the new XT model, I jumped at the chance to get my hands on it.
After we assembled the grill, I immediately noticed that it looked very similar to the 1050 model. The overall design has not changed significantly, but it does look a bit sleeker than its predecessor.
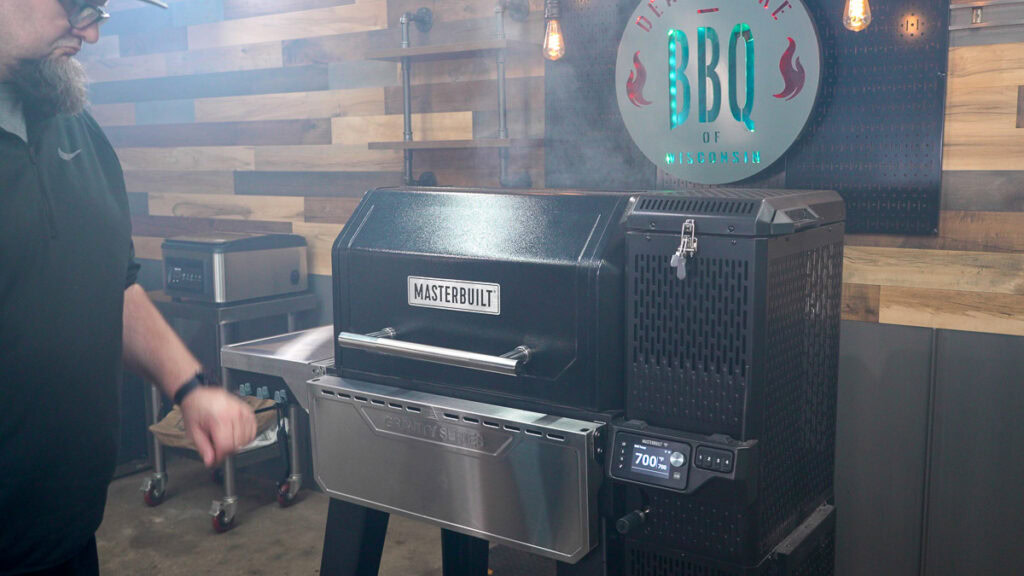
I love that they’ve ditched the barrel lid typically found on most pellet grills and opted for a taller, more angled design.
As I started to play around with the grill, I noticed that they made some really thoughtful updates to the original model.
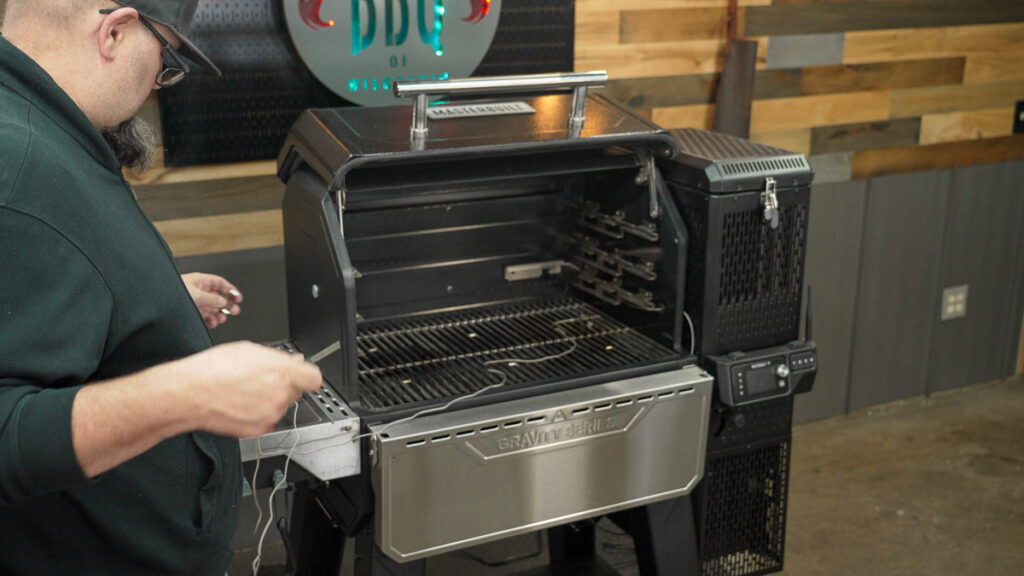
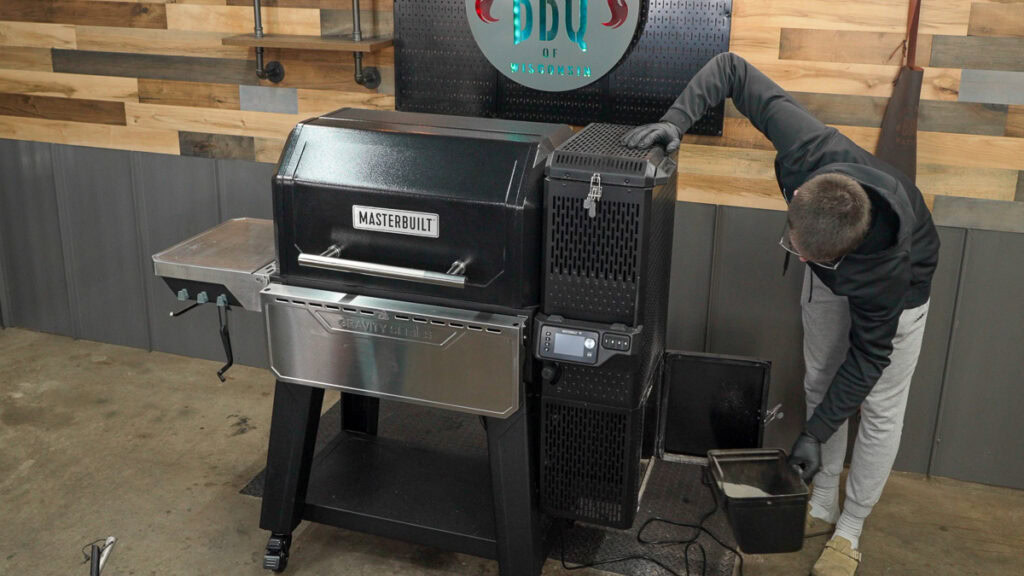
The XT feels sturdier than any previous Masterbuilt we’ve used. The double-wall body, gasketed lid, and upgraded components make it feel like a step above their earlier designs. The folding front and side shelves, tool hooks, and small storage drawer are all nice touches for day-to-day use.
Four swivel casters (two locking) make it easy to move around, though it’s still a heavy unit.
Masterbuilt Gravity XT specifications:
| Cooking Space | 1260 sq. in. |
| Hopper Capacity | 18 lbs of briquettes 12 lbs of lump charcoal |
| Dimensions | 60.3 W x 52.2 H x 33.2 L in |
| Capacity | 20 chickens 16 racks of ribs 33 burgers |
Assembly and pre-seasoning
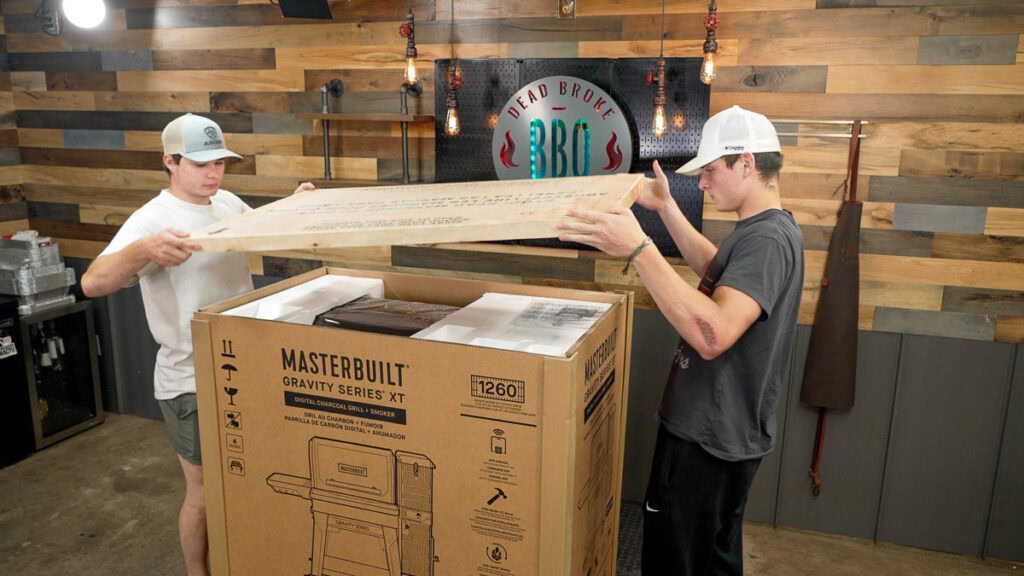
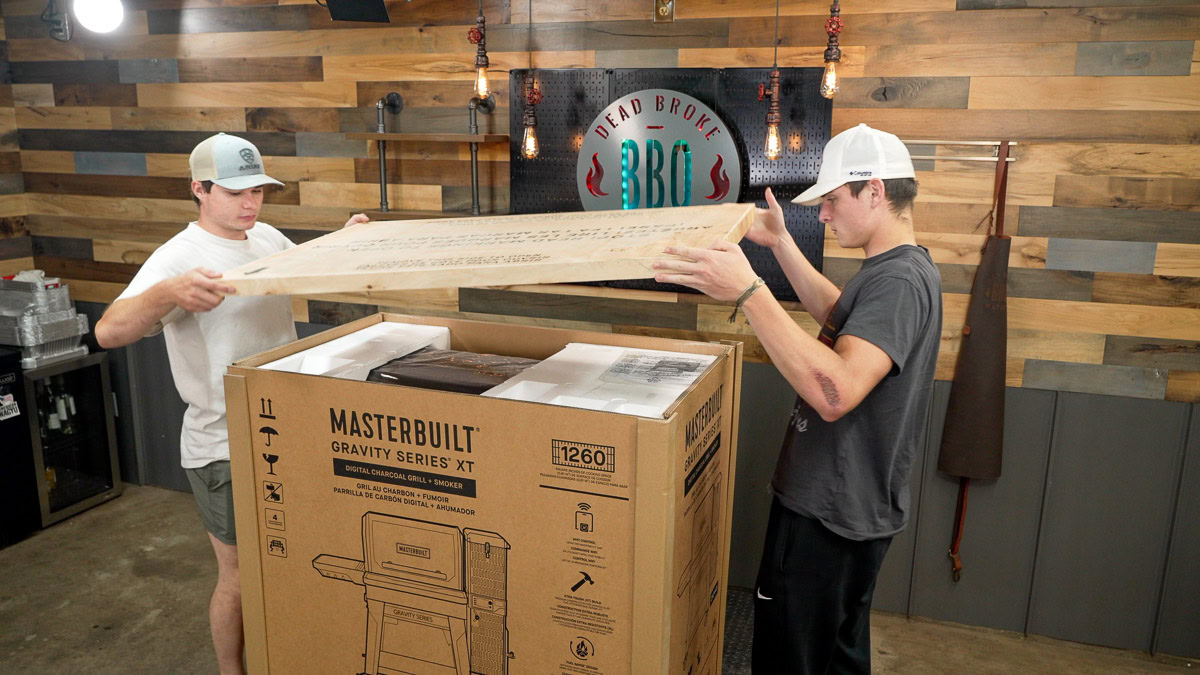
The box for the Masterbuilt Gravity XT is huge, and that’s your first clue this grill means business. Luckily, some of it comes preassembled, and most of the assembly is straightforward and well-documented. The included instructions feature clear photos and diagrams, and if you’ve ever put together a grill before, this one should feel familiar.
You’ll start by laying the grill on its back to attach the legs, followed by the bottom shelf and wheels. Given the weight, having a second person to help maneuver and stand the unit upright is a smart move.

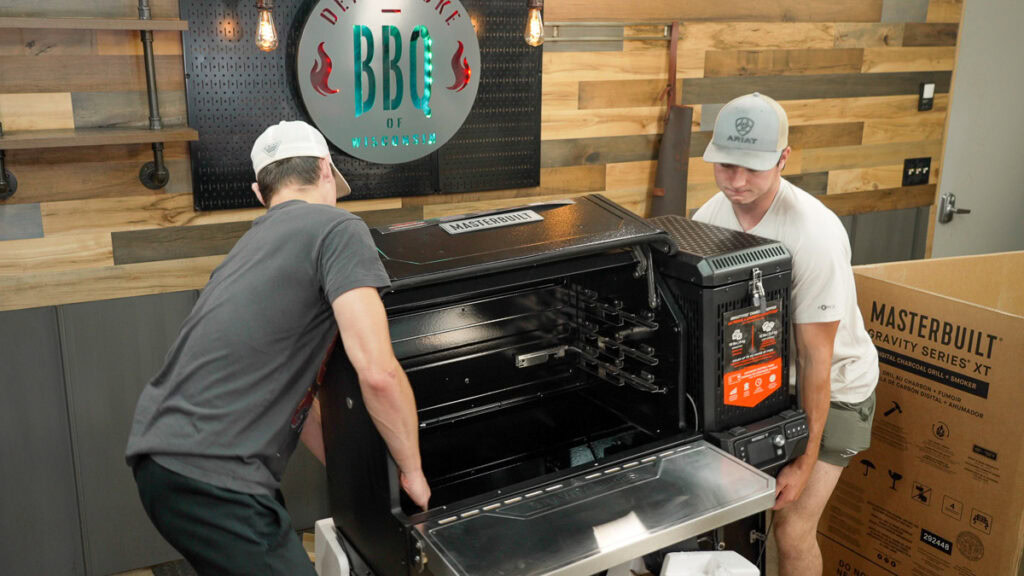

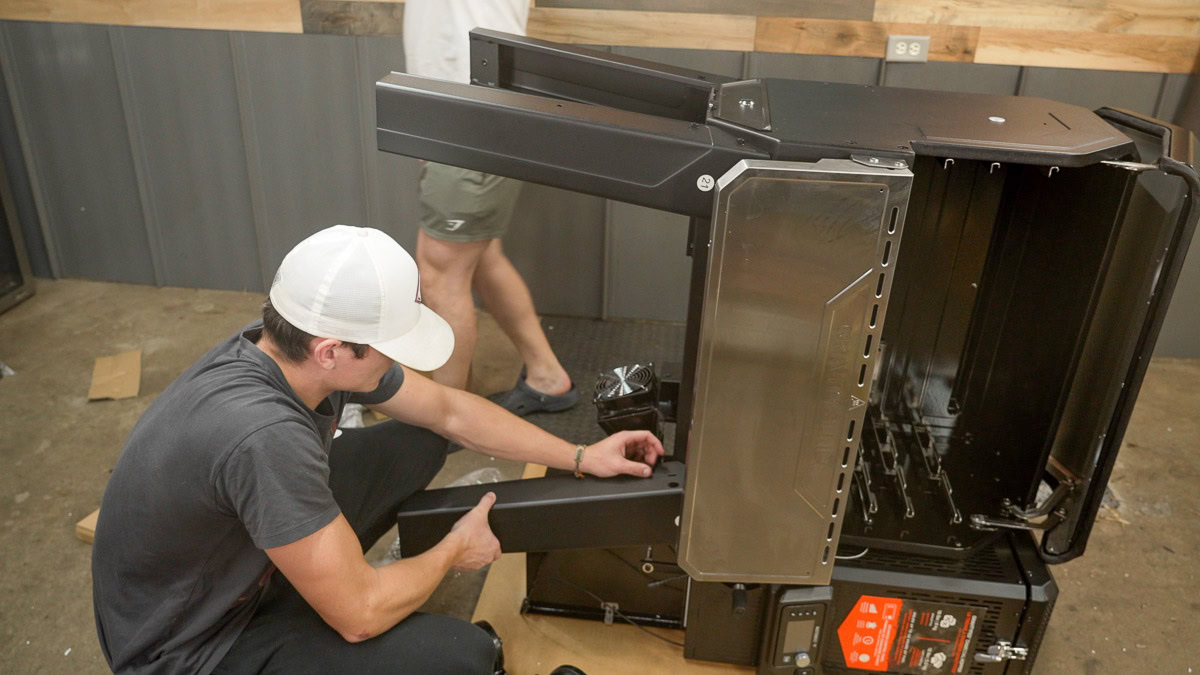

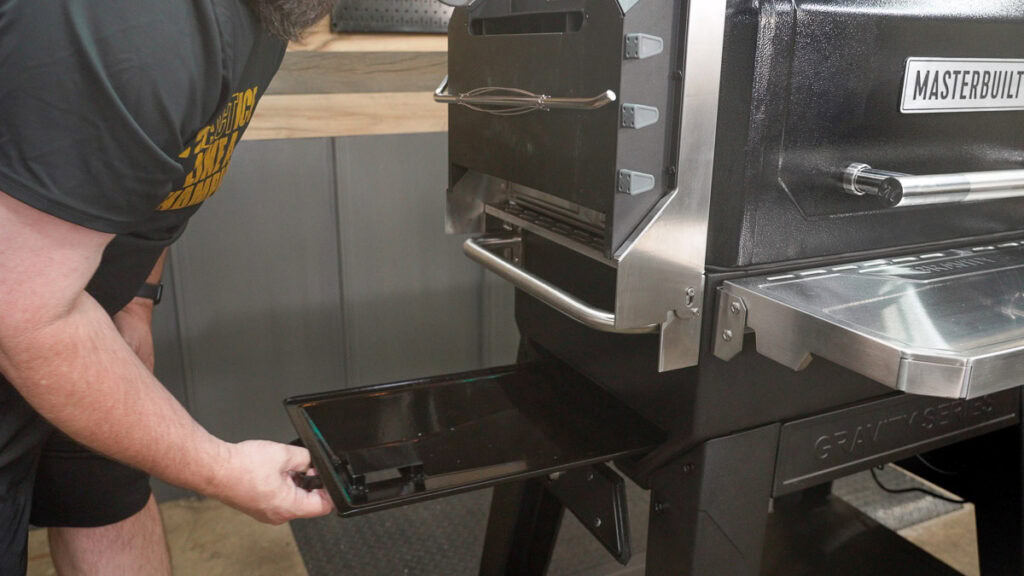
The front shelf comes pre-installed and can be folded down for storage or left up as a prep surface. The hopper is already attached, but you’ll need to bolt on the ash/charcoal basket and install the main handle. The final steps include attaching the side shelf (which now includes a handy paper towel holder) and sliding the grease and ash trays into place.

All in, it took us about 90 minutes to complete the setup.
Before your first cook, you’ll need to season the grill. The manual outlines the process clearly: run it at 250°F for 60 minutes, then at 400°F for 30 minutes, and finally at 350°F for an additional 30 minutes. This burn-off helps eliminate any manufacturing residue and gets your grill ready for action.
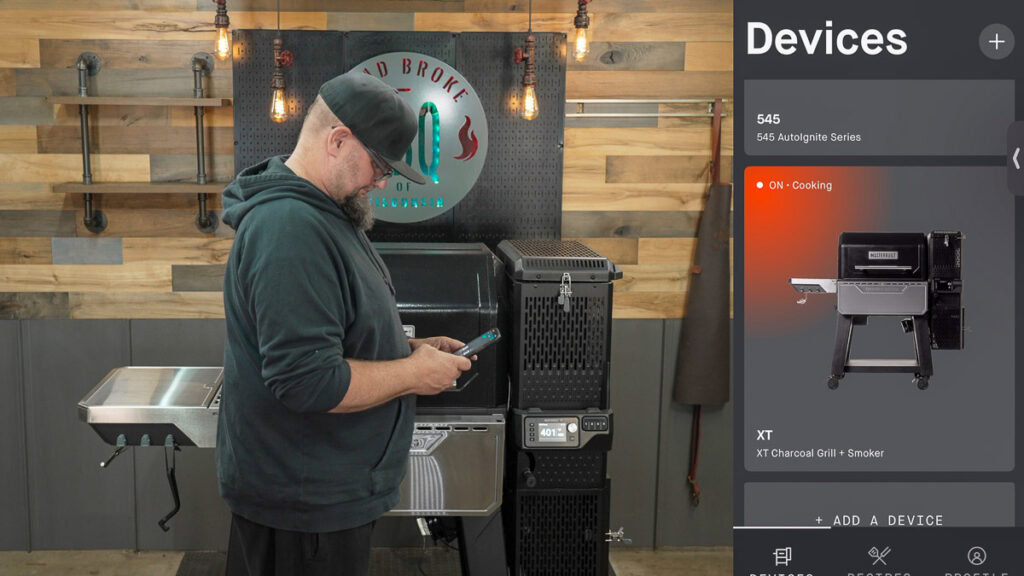
Connect WiFI: While you’re at it, this is a good time to connect the grill to Wi-Fi and update the firmware. This only took five minutes once the app was paired but you don’t want to be doing it when you’re in a rush to get dinner on.
Every meaningful upgrade in the Gravity XT
At first glance, the Gravity XT doesn’t look that different from the old 1050. But once you fire it up, it’s clear Masterbuilt made a bunch of upgrades and tweaks that really matter. We’ll get into if they justify the hefty price jump later in the review.
1. Heat & air intake slides
This one’s my favorite change. The old models used little metal plates that you had to pull in and out by hand to control airflow. They never had a good place to store, and I can’t count how many times I dropped one or jammed it trying to slide it back in.
The XT fixes that with a simple lever on the front of the grill. Flip it up, and the hopper seals off. Flip it down, and the air flows freely. It’s such a small thing, but it makes a big difference. Whoever came up with that deserves a bonus.

2. Beefed up components
The XT has better insulation, a thicker gasket along the lid, and a porcelain-coated interior that holds heat more evenly. It also seems to burn charcoal more slowly than the old models. In my testing, it held temps more steady and didn’t eat through fuel as fast, which I’ll take any day.

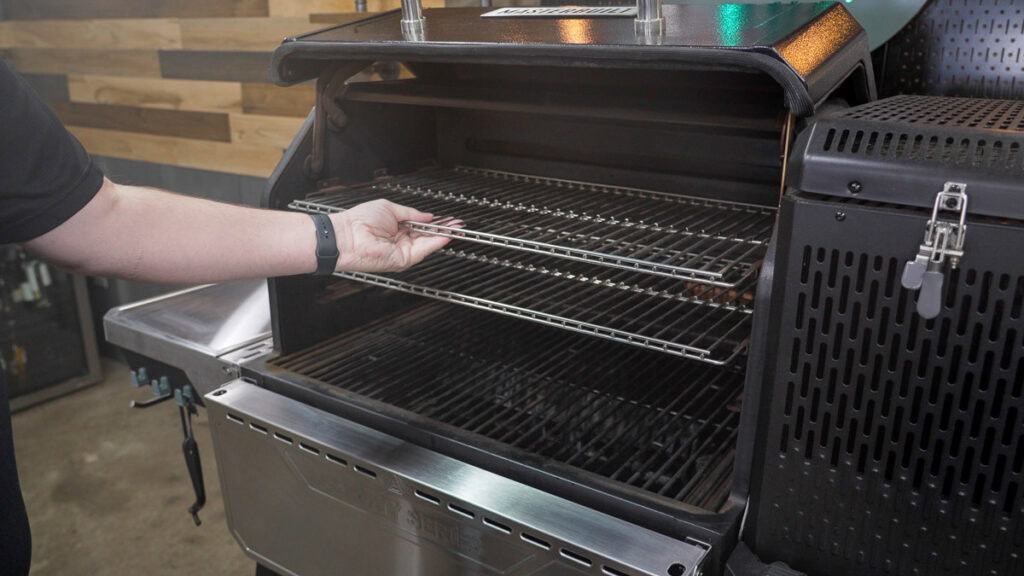
3. Stainless cooking grates
Masterbuilt swapped out the cast-iron grates for stainless steel. I did like the old cast iron ones for the sear, but stainless is easier to clean and doesn’t rust if you forget to oil it. It’s a good trade-off for most people.

4. Control panel and temp reading
The control panel moved from the left shelf to the right side of the hopper, and the old analog temp gauge is gone. Everything’s digital now. It’s easier to read, and I found it simple to navigate once I got used to it. Plus, it feels like a sturdier setup overall.

5. Bigger cooking space
The XT gives you 1,260 square inches to work with, which is more than any of the older Gravity grills.
That is split over three rows of racks, so you may not get the full use of that space if you’re smoking larger items.
It’s a big pit, and you notice that extra space right away when you’re running a couple racks of ribs next to a chicken or two.

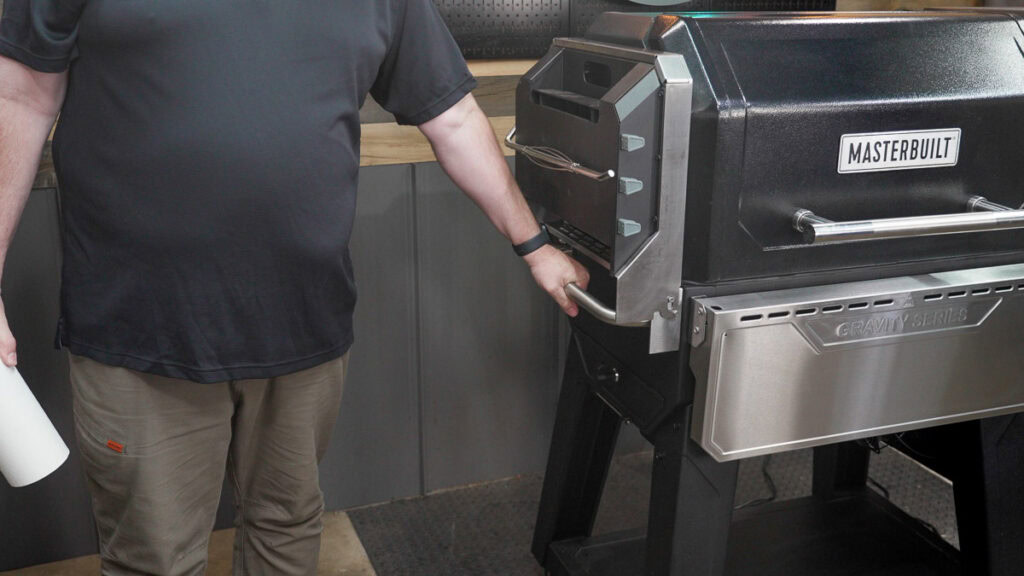
6. Updated door & grill body
The door hinge design has changed slightly, so now you lift slightly before swinging it open. Not a big deal once you’ve done it a few times, just something different from the older models. The body itself feels thicker and tighter too, with a better seal.

Firing up the Masterbuilt Gravity XT
Lighting the XT works mostly like the older Gravity models, but a few small habits make the process smoother. Start by opening the heat and air intake slides and both the hopper lid and ash door so air can flow freely.
Fill the hopper with charcoal (it can hold approximately 18 pounds of briquettes or 12 pounds of lump charcoal) and drop two tumbleweed starters into the bottom. Light them up and let them catch for a minute or two.

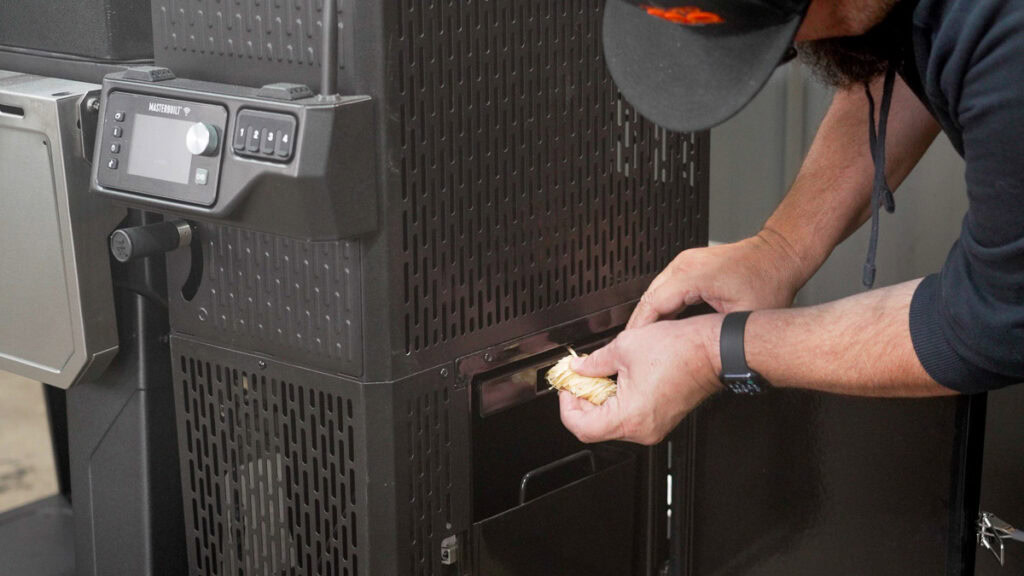

Once the starters are burning strongly, open the shutdown vent for a couple of minutes to help airflow move into the cooking chamber. After that, power on the controller, set your temp, and close the lids. The fan will kick on automatically and start bringing the grill up to heat.
You’ve got about 10 minutes to hit 150°F, so don’t close the lids too early or you’ll risk an error code. With everything lit properly, the XT ramps up steadily from there. In our testing, it took around 30 minutes to reach 700°F, plus another 10 minutes for the grates to heat soak.

The grill’s safety switches keep the fan from running if any doors are open, and once it’s sealed up, the XT handles the airflow and temperature on its own. Just set your temp and walk away.
Tip: Skip lighter fluid or “quick light” charcoal. It burns too hot and messes with the fan control. Regular briquettes or lump charcoal work best.
Cooking on the XT
The XT is marketed as a true all-in-one charcoal grill and smoker. To see if it really lives up to that, we ran it through a series of low-and-slow barbecue and high-temperature grilling tests.
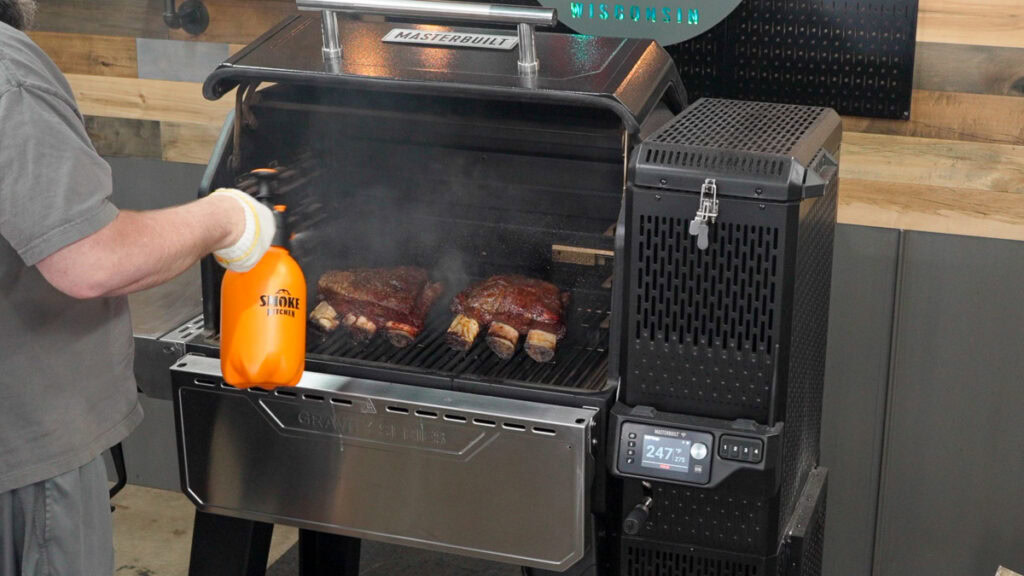
Smoking performance
For low-and-slow cooks, the XT runs best around 250–275°F. That’s where the insulation and airflow design really show up.
Charcoal alone doesn’t give much smoke, so adding a few wood chunks makes a big difference. We liked dropping them right into the ash bucket, which slowly feeds light smoke into the cook chamber.
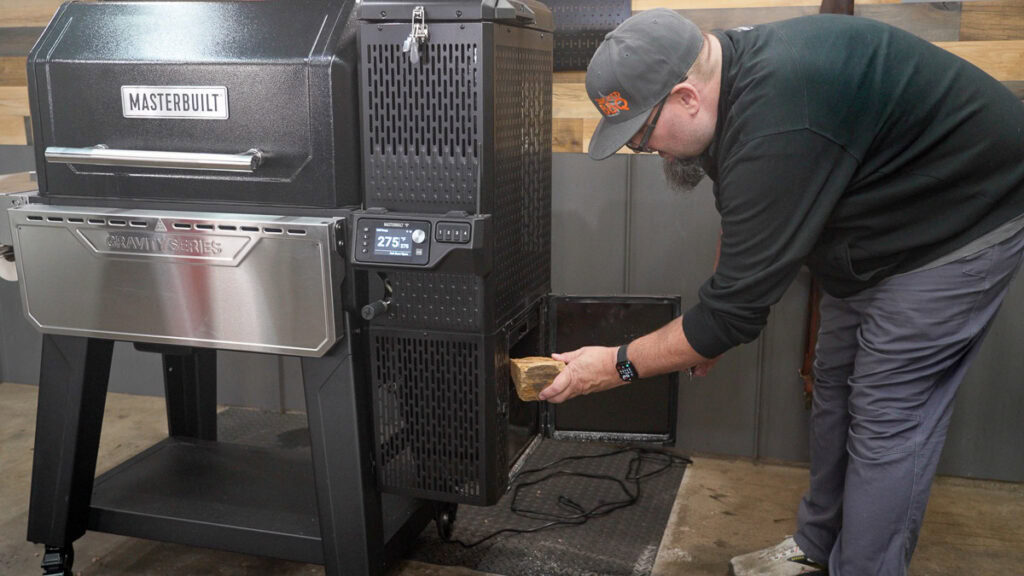
This worked better than added wood to the hopper, as we found that caused temp spikes.
We smoked St. Louis ribs that finished around 4½ hours with a deep color and perfect bite. A pair of beef plate ribs ran about six hours unwrapped and came out juicy, with a great bark and smoke ring.

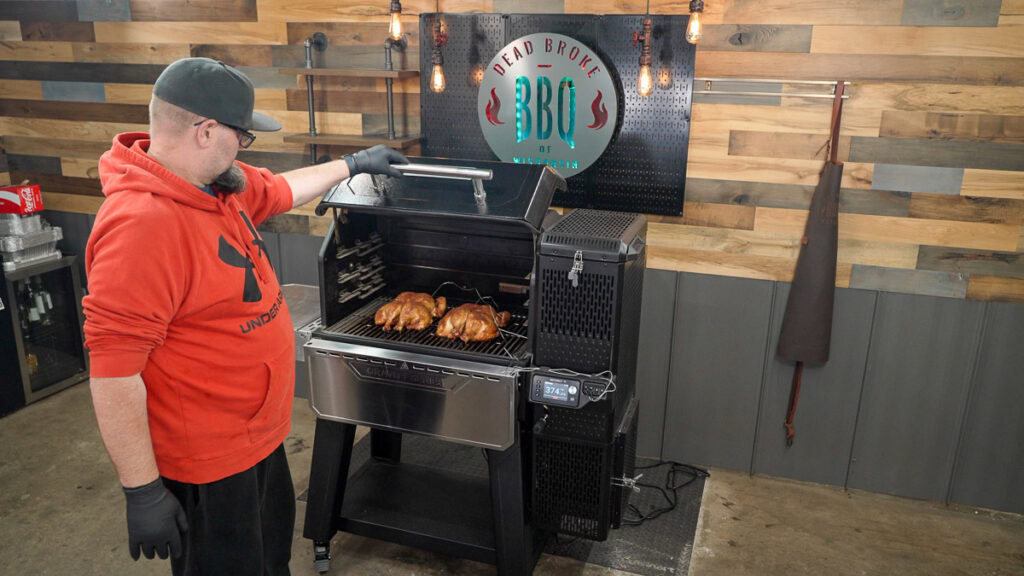
The pit also did nice work on spatchcock chicken, taking on a gentle cherrywood flavor without over-smoking.
In short, you get a clean-burning fire, solid bark, and that classic wood-charcoal flavor that’s hard to fake. It’s not heavy or acrid, just the right balance.
Tip: Stop the fan when you lift the lid or add fuel. Otherwise, you’ll get a blast of sparks and a quick temp spike.

Where XT really shines is in hot-and-fast smoking. Unlike pellet grills, which can’t generate much smoke in this range, the XT still delivers great smoke flavor thanks to its charcoal and wood-fueled fire.

Grilling and searing
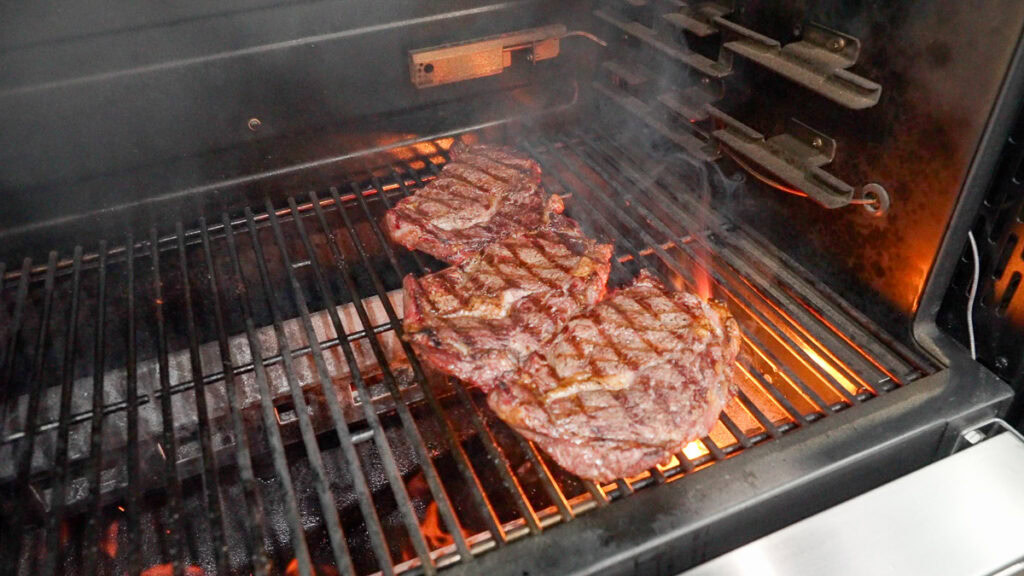
When it’s time to grill, the XT feels more like a traditional charcoal cooker with digital control. It took around 30 minutes to reach 700°F, and we gave it another 10 for good measure. From there, it was all about fun, fast cooks. We made burgers with a deep charcoal crust, and ribeyes that seared beautifully and still came off juicy.
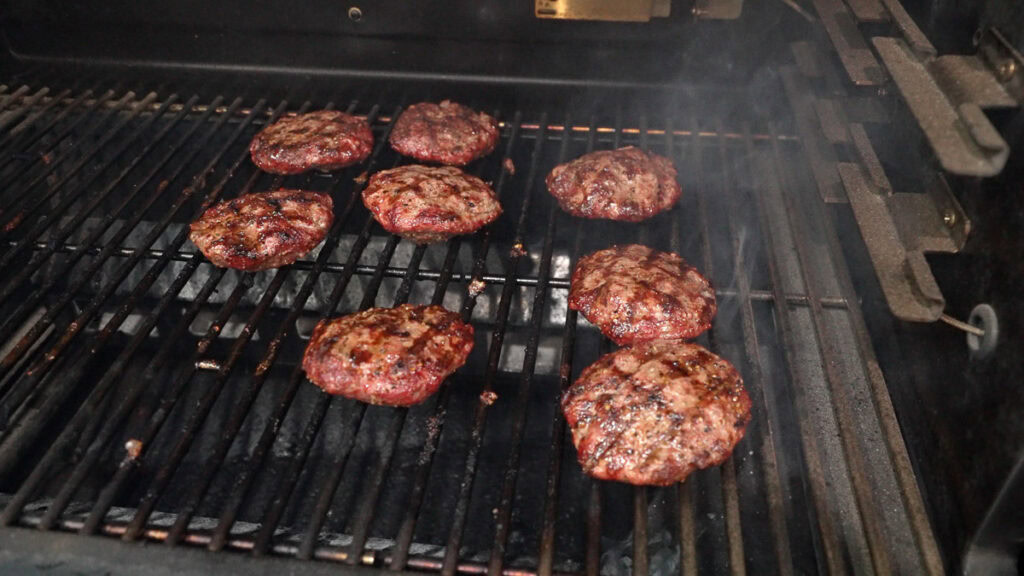
The stainless grates left clean grill marks, and the flavor was unmistakably charcoal, not the light smoke you get from pellets. Heat recovery was quick after opening the lid, and the grill stayed consistent throughout each cook.
Before cranking up to those high temps, clean the grease tray and drip pan. The XT can flare if old grease is left behind, especially during longer grill sessions.
Temperature performance
To get a better idea of how evenly the Gravity XT cooks, we ran a few temperature variance tests using a ThermoWorks Smoke X4 with four probes placed across the lower cooking grate. The grill was set to 275°F, a typical temperature for ribs or brisket.
At first, the left side ran noticeably hotter, showing roughly a 200°F difference between the two sides once it hit temp. After about ten minutes of running, the temps started to stabilize as the pit settled in, eventually evening out to within 10–20°F across the chamber.
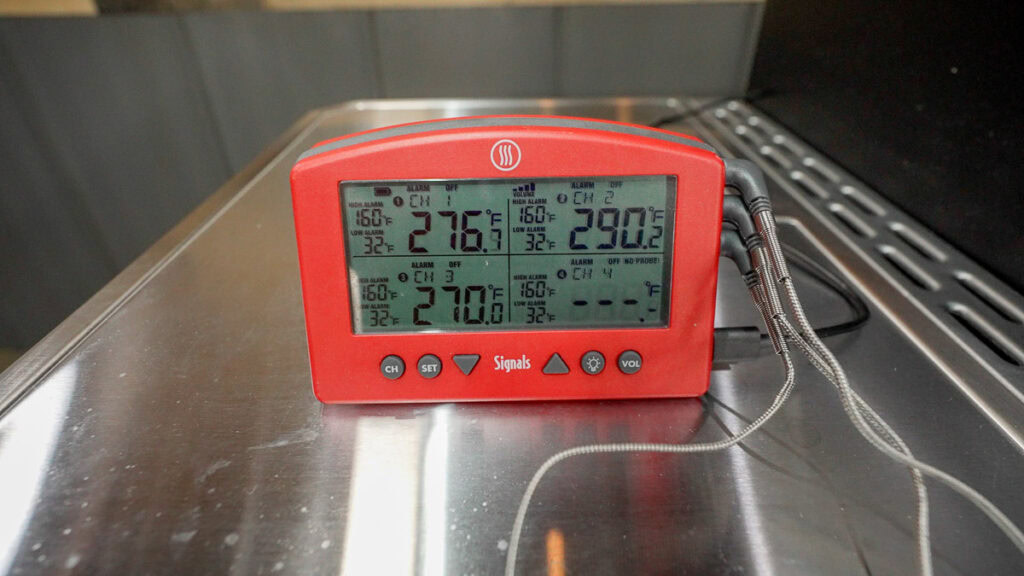
The center section stayed slightly hotter than the edges, but overall, that’s a very tight range for a charcoal cooker this size.
For high-heat tests, we cranked the XT to 700°F to measure heat-up time and recovery. It took about 30 minutes to reach the target temperature, plus another 10 minutes to let the grates fully heat-soak. When we opened the lid during grilling, the temperature dropped roughly 100°F but recovered to 600°F in just under three minutes, which is excellent for a charcoal pit.
App control performance
Setting up the XT’s controller and app is pretty painless. Once that’s done, you can control temps, timers, and alerts straight from your phone.
The app itself is simple but solid. You can view live temperature graphs, set cook alerts, and even browse a few built-in recipes if you want a place to start. It’s not fancy, but it does what it needs to.
The meat probe presets could use some work. The poultry settings operate on a “rare-to-well-done” scale rather than exact temperatures, and custom temperatures only adjust in 5-degree increments. So if you like to pull chicken breast at 162°F to allow for carry-over cooking, you’ll have to choose between 160°F and 165°F. Not a dealbreaker, just something to know.

The grill ships with two probes, but the controller has four probe ports. We’d love to see Masterbuilt include all four in the box since it’s easy to fill up that cooking space.
Clean up
Cleanup is simple once the pit cools down. The removable drip tray pulls out easily, and scraping the manifolds keeps things running smoothly. We wish the grease bin had disposable liners, as cleaning it by hand can be messy.

Like other Gravity models, it’s not waterproof, so a fitted cover is a must if it lives outside.
Should you buy the Gravity XT?
After plenty of time cooking on the Gravity XT, I can say Masterbuilt really brought this design a long way from the early Gravity models. It’s still the same idea, a gravity-fed charcoal system with digital control, but everything about it feels tighter, sturdier, and more refined.
I’ve always liked gravity-fed cookers because they give you that same “set it and forget it” convenience you get from a pellet grill, but with the real charcoal and wood flavor that pellet burners can’t quite match. The XT pulls off that balance better than any of the earlier versions I’ve used.
Now for the elephant in the room. The price jump from the older Masterbuilt models is significant. This is the most expensive grill they make, and I’ll be honest, at first, it gave us some sticker shock. But after spending more time with it, the cost started to make sense. The build quality is sturdier, the temperature control is smoother, and it really works as both a smoker and a grill.
In terms of what it delivers, the XT actually compares really well with something like a Traeger Ironwood. You get similar cooking space, better searing ability, and that deeper charcoal flavor, and even after adding a few accessories, you’re still spending less overall since the XT comes with things like the front shelf included.

If you are a “stick-burner” and considering a pellet grill, this is the middle ground that makes sense. You still get that live-fire flavor and bark without having to babysit it.
It’s a great, happy medium between the classic charcoal smoker and the technological bells and whistles that we’ve come to expect from pellet grills.
It’s not perfect. The XT burns more fuel than a Kamado, and it’s not waterproof, so a good cover is mandatory if you want to keep the controller and hopper in good shape. Over time, the hopper can start to rust if it’s left exposed to the elements, and we noticed a little smoke seep along the latch at higher temps. It also needs to stay clean inside, or you’ll risk grease flare-ups during hot cooks.
Still, those quirks seem small in comparison to what it gets right.
Our Verdict: The Masterbuilt Gravity XT refines everything we liked about the original, with better insulation, smoother airflow control, and easier digital operation. It delivers true charcoal flavor with pellet-grill convenience. The price is higher, but the upgrades make it a worthwhile step up.
- New heat and air intake slides
- Improved hopper design
- Better fuel efficiency
- Digital control panel
- Better build quality
- Large price jump from the older model

About Your Pitmaster
Jeff “Ricer” Rice is the face of the Smoked BBQ Source YouTube Channel, where he brings expert BBQ equipment reviews and mouthwatering cook videos to life. A lifelong barbecue enthusiast, some of his fondest memories have been made around a pit, and he’s passionate about sharing that experience with others.
Whether he’s testing the latest gear or firing up the smoker, Jeff takes a real, no-nonsense approach to barbecue, making it easy for anyone to fire up great BBQ at home.
Does it support a rotisserie ?
It does! Masterbuilt sell a Rotisserie Kit although the ratings don’t look amazing. We haven’t tested it ourselves.
Good write up. Am considering this to replace my propane upright smoker which is difficult to maintain temp, my old Weber charcoal grill and my Weber Propane grill. Can you put a griddle on it? That would allow me to also ditch the old griddle….
Hi Rob, it doesn’t look like they have one specifically for the XT. If you on the Masterbuilt website on the XT page they do list a half griddle insert and then a full insert for the 800, 1050 and 1150 models. I’d probably still keep a seperate griddle if it was me, but one of those might get the job done.
I’m seeing overshoots of over 100 degrees (at least that’s what the controller says) and huge temperature spikes even though I paused the controller. Eventually, it levels off but can take 30 minutes. My ThermoWorks Signals is consistently below the pit temp by 25-30 degrees so I trust the thermoworks readings. When I contacted Masterbuilt, they claimed this is “normal”. A bit disappointed but it is a solid build.