
How to Setup a Kettle Charcoal Grill for Smoking

SmokedBBQSource is supported by its readers. We may earn an affiliate commission at no extra cost to you if you buy through a link on this page. Learn more.
While I own six different grills and smokers, if I ever had to choose one grill for life, it would be my faithful kettle.
A kettle grill is incredibly versatile. It allows you to quickly grill classics like burgers and steaks or smoke your favorite barbecue meat low and slow.
With this beginner’s guide, I’ll share everything you need to know to start smoking on a Kettle grill. This post and the accompanying video covers everything you need to know, including smoking methods and controlling temperature.
Can you really make BBQ on a Kettle grill?
Countless households have a kettle grill on the back patio that has never been used to its full potential. Many kettle owners do not know they can use their grill as a smoker. Instead, they use it much like a typical gas grill.
But it’s incredibly easy to perfect low and slow smoking on the kettle. With some practice, you can achieve 12+ hour burn times.
I’ll cover using a
Controlling your grill temperature
Before you can start smoking on your kettle, you need to understand how to use airflow to control the grill temperature and achieve the temperatures needed for proper low and slow cooking.
Let’s make this simple: you need oxygen for the fire to burn.
So, the less oxygen you allow into your kettle, the lower the temperature. The more oxygen you allow into your kettle, the higher the temperature.
Your kettle has two vents, one on the bottom and one on top. These vents control your airflow and, thus, your temperature. Think of it like an oven—you trap heat inside with the lid and let out as much as you want via the vents.

Position your top vent over your meat, forcing the oxygen to enter from the kettle’s bottom, move over the food, and then up through the top. If you have your vent over your fire, you will simply send warm air up and out of the kettle.
Learning how to control your temperature requires experimentation. Start by leaving your bottom and top vents 100% open. Then, as your temperature rises, you can start to close one of your vents until it reaches your desired temperature.
If it’s too hot, close the vents a bit more. If it’s too cold, open them a bit more. It’s a delicate balance, but you’ll get the hang of it with practice.
If you want an insider’s tip, I only open my bottom vent about a quarter for a low and slow cook to keep the temperature at 250 to 275 degrees. Keep the bottom and upper vents wide open for high heat (around 350 to 375 degrees).
The only time you should ever fully close the vents is when you’re finishing smoking and want to extinguish the charcoal.
If you really want to work on managing your temperature, a quality digital thermometer on the cooking grate monitors your temperature right next to the smoking meat.
Beware the lid temperature gauge
I don’t recommend using the temperature installed in the
How to set up a kettle grill for smoking
There are two primary ways I like to set up any kettle grill for smoking low and slow. For both methods, you’ll need a few basic items:
- Wood chunks – When lit alongside the charcoal, chunks smolder and provide the smoke that gives your food that delicious BBQ flavor. We have a detailed guide to smoking wood if you want to learn more about what types of wood are best for flavoring your food. But in this instance, I’d stick to the classics like oak, cherry, pecan, or hickory hardwood chunks.
- Charcoal briquettes – Briquettes are my preference for low and slow cooks, as lump charcoal can burn too hot.
- An aluminum foil pan – Place it under your meat filled with 2 to 3 liters of water below the grill grate and opposite the hot coals.
- Charcoal chimney starter – The easiest way to light your charcoal before smoking is with a charcoal chimney starter. Here are our preferred charcoal grill starters, plus a beginner’s guide to using a chimney starter.
- Fire starters – Place one or two under the charcoal chimney to light the charcoal
I would avoid using wood chips. Chunks are better as they continue to produce smoke for much longer.
1. The 2-Zone Method for smoking
A two-zone setup involves having charcoal on one side (the “hot zone”) and cooking your meat on the opposite side (the “cool zone”).

It’s the most straightforward method, allowing the meat to slowly rise in temperature without exposure to high direct heat. It’s perfect for beginners.
How to prepare for the 2-zone method
- Fill your charcoal chimney up and place it on top of a few lit fire starters
- Once your charcoal ashes over in the chimney, dump the coals on one side, a.k.a. the direct heat side.
- Place the water pan underneath your grill grate opposite the hot coals.
- Place your meat on the indirect heat side above the water pan.
2. The Snake Method
While the 2-zone setup is great, it’s better for short cooks (less than 4 hours). If you have a pork shoulder or a brisket that will take all day to cook, we recommend the snake method (also known as the fuse).

It’s called the snake method as you place the charcoal in a C shape like a snake. You light it on one end and let it slowly burn around, lighting the other coals.
How to Prepare for the Snake Method
- Dump a pile of unlit briquettes into your kettle and stack them 2×2 along the outer edge until you have a big C.
- You’ll need to experiment with different snake setups. In warm weather, the 2×2 snake should suffice. If it’s cold or you need to smoke hotter, add another row of briquettes.
- Use fire starter rolls called tumbleweeds placed between the briquettes at one end to light the fire. Keep the lid off until the fire is established (about 10 minutes). This method allows up to 16 hours of burn at a steady temperature between 225 and 250°F.
- Place 2 to 4 wood chunks along the snake to provide continuous smoke. I like to place them toward the front/middle, as I want the bulk of my smoke in the first few hours. I’m using oak wood chunks.
- Place the largest aluminum foil pan you can fit into the space inside the C and fill it with water.
- Leave your vents fully open to begin with, then adjust as required.
Placing the wood closer to the start of the “C” is a good idea.
Now you’re ready to smoke. Simply place your meat on the grill racks above the water pan you should be good to go for the next 12-15 hours.
If you’re looking you ain’t cookin’
Limit the number of times you remove the lid. Each time you do, you let out valuable heat and smoke. I only recommend lifting the lid to check the temperature or add more coals.
Accessories for turning your grill into a smoker
Some neat gadgets on the market make smoking on a kettle grill easier by removing any guesswork. While they aren’t necessary, they have their place, and you’d be wise to consider them.
My favorite is the Slow ‘N Sear. It fits perfectly inside your kettle and can hold a full chimney load of charcoal.
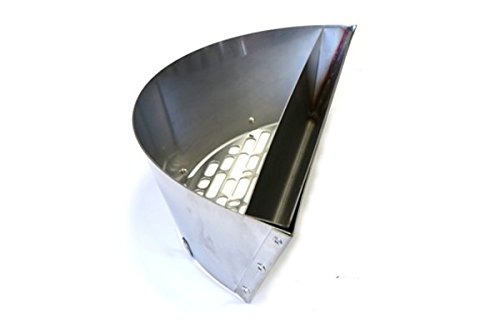
To set it up for a long, low, and slow cook, simply load the Slow ‘N Sear with unlit charcoal, then light a fire started in the corner. It will slowly burn like a wick.
The Slow ‘N Sear can easily reach 10+ hours on a single load of charcoal.
One other tool I recommend to quickly get your charcoal snake lit is an electric or gas torch like the Looftlighter.

How Long to Smoke Your Food
There is no easy solution or quick answer to the question of “how long will it take?” A wise man once told me “barbecue is done, when it’s done.”
One thing I can tell you is that the deciding factor most of the time will be the internal temperature of the meat. The amount of time it takes for the food to get to that temp will depend many factors, including the weight and thickness of the meat and the temperature you are cooking at.
We have a handy times and temperature chart to help you estimate.
Start smoking!
Smoking on a kettle may seem intimidating at first, but once you master the basics of airflow and setting it up correctly, you’ll be amazed at the versatility of this classic grill.
I recommend starting by smoking a pork butt, which is one of the most forgiving low and slow cooks, or if you want a shorter option, a spatchcock chicken would be a perfect choice.