
Smoked Pulled Beef (Chuck Roast)

SmokedBBQSource is supported by its readers. We may earn an affiliate commission at no extra cost to you if you buy through a link on this page. Learn more.
This smoked pulled beef uses chuck roast and a simple two-stage cook: smoke first for flavor, then wrap and braise until the meat is tender enough to shred. The result is juicy pulled beef that works well for sandwiches, tacos, or baked potatoes.
I prefer a more savory version with subtle sweetness from the onions, but I’ve included notes if you want to lean into a classic sweet BBQ-style flavor.
Why you’ll love this foolproof smoked pulled beef
Chuck roast is one of my favorite cuts to smoke because it’s forgiving, versatile, and works especially well for pulled beef.
- Beginner-friendly: Uses a simple two-step process, smoke first, then wrap and braise, for consistent results.
- Beef-forward flavor: Seasoned with SPG to build bark, then braised with beef broth and onions for rich, savory pulled beef.
- Flexible flavors: Keep it savory for meal prep, or add BBQ sauce later if you want a sweeter finish.
- Meal prep–friendly: Shreds easily and reheats well for tacos, sandwiches, and quick weeknight meals.

Ingredients you need

- Chuck Roast – Use a 3–4 lb chuck roast or beef shoulder with good marbling and connective tissue. Smaller roasts cook faster but won’t pull quite as cleanly. Brisket also works if you’re cooking for a crowd.
- Salt, Pepper, and Garlic – SPG keeps the flavor focused on beef while building a good bark. It also keeps the pulled beef versatile for tacos, sandwiches, and meal prep.
- Binder – Worcestershire sauce helps the seasoning stick and adds light umami. Neutral oil works if needed.
- Wrap Liquid – Beef broth keeps the meat juicy during the braise. Sliced onion adds subtle sweetness and makes the pulled beef more usable across different meals.
Best cuts for smoked pulled beef
This recipe works with a lot of different cuts of beef. The key is to find something that has a good fat content that will benefit from the low and slow style of cooking. Brisket is a great option, especially if you are serving a larger crowd, but chuck roast, shoulder roast, and even beef short ribs are all great options.
You can also use this recipe as a guideline for smoking pork shouder, lamb shoulder, or other large cuts. It lends itself well to many different proteins.
Testing This Smoked Pulled Beef Recipe
I’ve tested sweeter versions of smoked pulled beef, including a coffee rub, but I keep coming back to this savory approach. Using SPG, beef broth, and onions keeps the flavor focused on beef, with just a subtle natural sweetness from the onions. It also makes this a reliable meal prep staple.

I’ve also tried shorter smoke times. The beef still tastes good, but it doesn’t pull as cleanly. Letting it smoke longer before wrapping gives better texture and makes shredding easier.
You can smoke chuck without wrapping it, which we cover in our brisket-style smoked chuck recipe.
How to make Smoked Pulled Beef from Chuck Roast
1. Trim and season the chuck roast
Depending on where you buy your roast, prep should be minimal. Typically, a beef chuck roast comes trimmed and essentially ready to cook. If you notice any small pieces hanging off or any uneven places, you can do some light trimming with a boning knife, but you should not need to do much.
Do not try to cut any big chunks of intramuscular fat out, as they are holding the muscle together.
I like using Worcestershire sauce as a binder when smoking beef, although a quick spray of oil will get the job done as well.
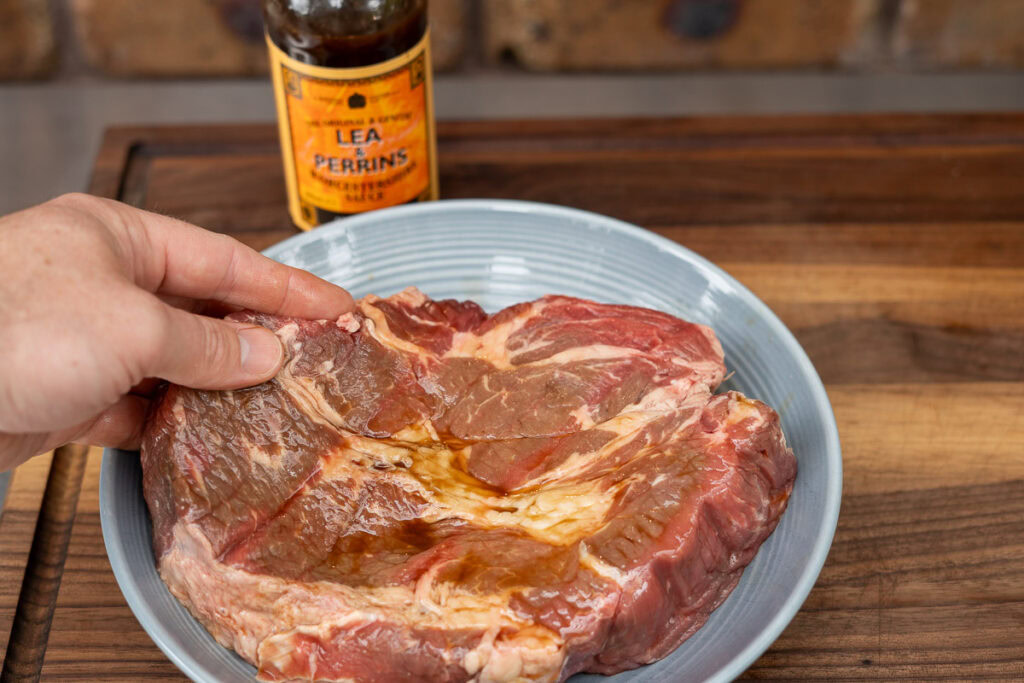
Chuck roast can handle a heavy hand with seasoning. Don’t be shy. Season generously, then use any seasoning left on the cutting board to coat the edges of the beef so nothing goes to waste.

You can let the chuck rest at room temperature while your smoker is coming up to temperature.
2. Smoking the chuck roast
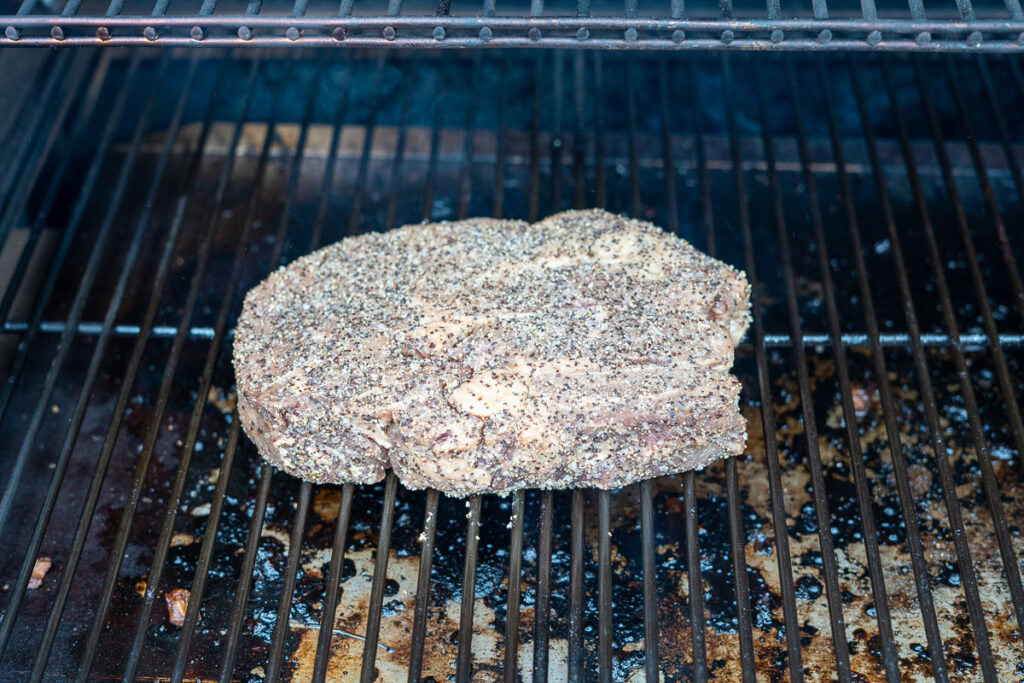
The first step in the cooking process is just to get some smoke on your roast and start working on building some bark. Preheat your smoker to 250°F and place your chuck roast directly on the grates.
For this recipe, I used my Camp Chef Woodwind Pro pellet grill which allows you to burn chunks of wood so I used two pieces of pecan during the first couple of hours along with the Kirkland pellet blend.
When it comes to wood (or pellets, or charcoal), I recommend something bold but not overpowering. I’ve found that harsh woods like mesquite can overpower the flavor of the beef, so I try to opt for something a bit milder like oak or hickory.
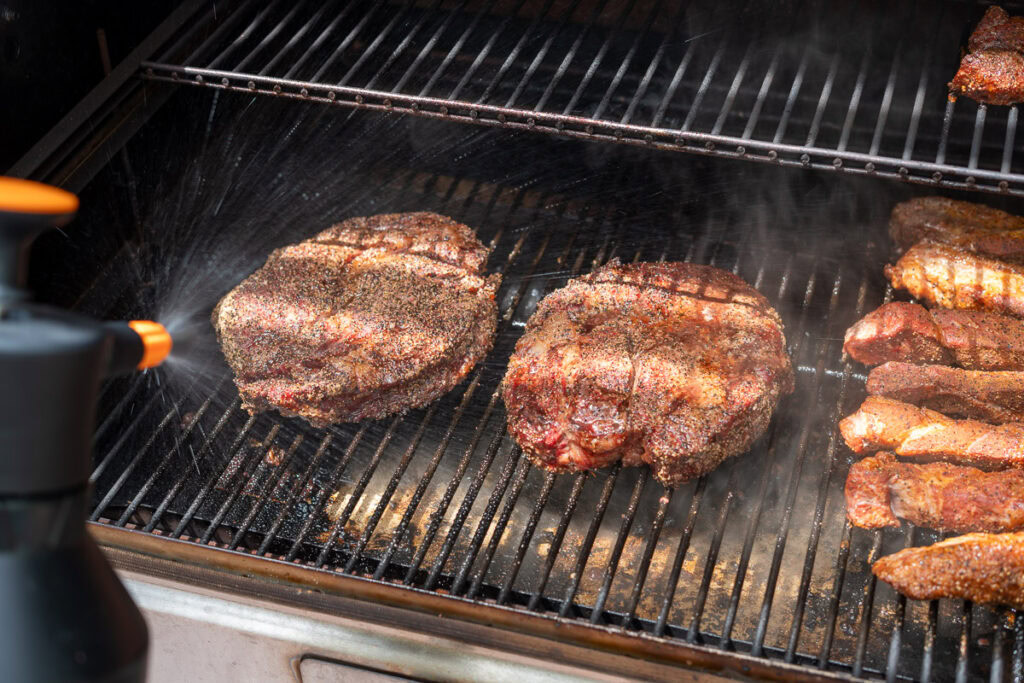
Once the chuck has been smoking for an hour and a half, I start spritzing it with a mixture of apple cider vinegar and water. Every 30 minutes, or if it’s looking dry.
Depending on the size of your roast, the first part of the cook should take three to four hours, but the best way to check is to keep an eye on the internal temperature with an instant-read meat probe. I like to use my Thermoworks ThermaPen One for this because it’s quick (less than a second) and accurate.
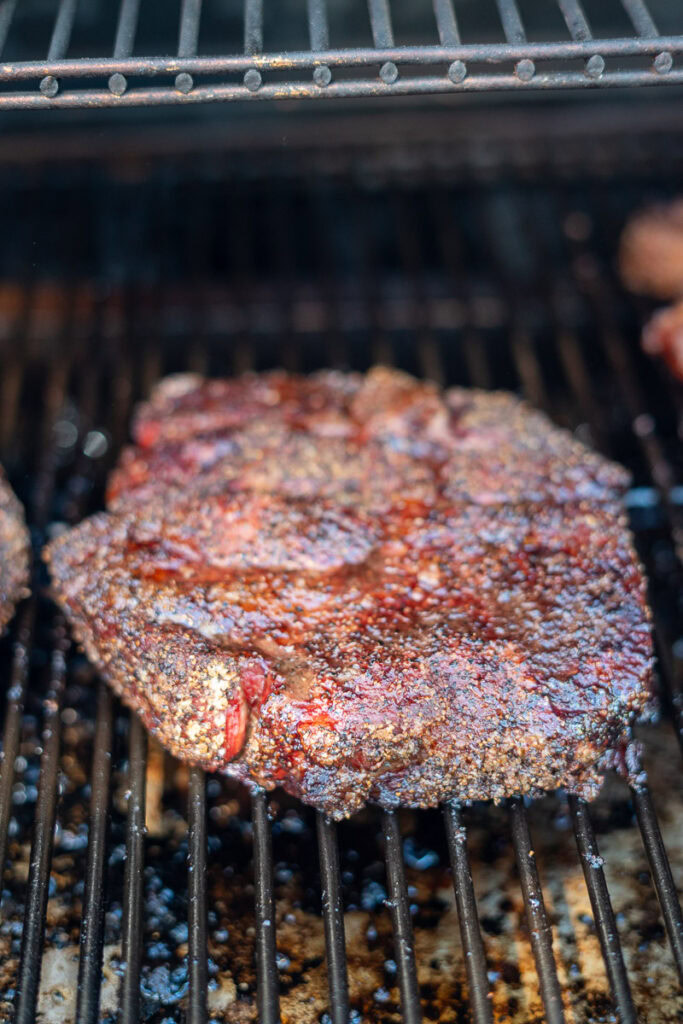
You could wrap anytime after 165°F, but I find the bark sets a lot nicer around 175°F.
When the color has turned mahogany and the exterior is darkening up you can proceed to the next stage of the cook.
3. Braising for pulled beef
If the goal is pulled beef, braising is key. This approach mirrors the Texas Crutch used for brisket, shortening the cook and helping the meat stay moist and tender.
Braising not only reduces overall cooking time but also adds flavor. You can get creative with the ingredients you use. Beef broth and onions is classic, or you can use barbecue sauce, butter and brown sugar for a sweeter chopped beef style.

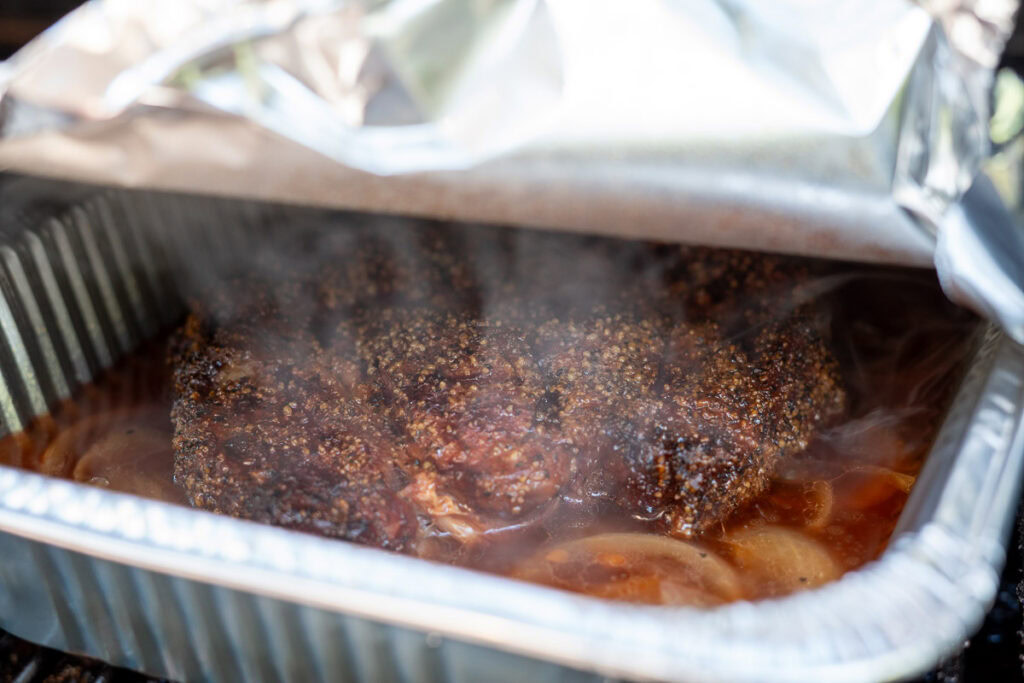
To set up the braise, transfer the chuck roast to a large aluminum pan. A roasting pan works too, but disposable pans make cleanup easier.
Wrap the pan tightly with foil to trap the steam and moisture. This turns the setup into a braising environment as the roast finishes cooking.

Place it back on the smoker and continue cooking for another 2 to 3 hours, depending on the size of the roast. The internal temperature should reach between 205 and 210°F.
To check if it’s done, slide a probe or toothpick into the meat. It should go in with almost no resistance, like softened butter.
Once it’s probe tender, remove the roast from the smoker and let it rest for 30 minutes. This lets the juices redistribute and makes it easier to shred.
4. Shredding Your Smoked Beef Roast
This beef will be so tender that you should be able to shred it easily with your hands.

If it’s still a bit too hot to dig into, you can use gloves (I recommend nitrile gloves with cotton liners) to shred it apart. If you prefer a bit more civilized approach, feel free to shred it with forks or meat claws as well.
Shred it directly in the pan so it stays coated in the braising juices or if you want to reduce excess fat, pour the liquid into a fat separator, then add some of the juices back and mix well before serving.

How to serve smoked pulled beef
My favorite way to serve this on tacos with pickled red onions and chopped cilantro.

You also can’t go wrong with pulled beef sandwiches with pickles and coleslaw.
It’s extremely versatile and reheats well, which makes it a good option for Sunday meal prep to get you through the first few days of the week.
It’s also a good meat for stuffing Jalapeño poppers, baked potatoes, and other barbecue snacks!
Storing and Reheating Pulled Beef
Pulled chuck roast is ideal for leftovers. Let the meat cool completely, then store it in an airtight container in the fridge for up to 5 days, or vacuum seal and freeze for up to 3 months. For easy meal prep, portion it out before sealing and label each bag with the date and contents.
To reheat, place the vacuum-sealed bag in gently boiling water for 5 to 10 minutes, depending on the portion size. This method keeps the beef moist and flavorful without drying it out. If reheating in a pan, add a splash of beef stock or reserved juices, cover, and warm gently over low heat.
How to avoid dry pulled beef:
- Don’t rush the wrap stage – Chuck roast needs time braising for the connective tissue to fully break down.
- Cook to tenderness, not just temperature – The probe should slide in with little to no resistance before pulling.
- Shred the beef in the pan – Mix it back into the juices before serving.
Smoked Pulled Beef Recipe
If you try this smoked pulled chuck roast, let us know how it turns out in the comments. And if you love it, don’t forget to leave a five-star rating. It helps more people find the recipe!

Smoked Pulled Beef (Chuck Roast)
Ingredients
- 4 lb beef chuck roast - or beef shoulder roast
- 2 tbsp kosher salt
- 2 tbsp coarse ground black pepper
- 1 tbsp granulated garlic
- 2 tbsp Worcestershire sauce - as a binder to help the rub stick (neutral oil also works)
For the wrap / braise
- 1 cup beef broth - see note 1 for more wrap ideas
- 1 whole onion, sliced
Instructions
- Preheat your smoker to 250°F.
- Pat the chuck roast dry with paper towels. Coat lightly with Worcestershire sauce, then season all sides evenly with kosher salt, coarse black pepper, and granulated garlic.
- Place the chuck roast directly on the smoker grates. Smoke uncovered for about 1½ hours, then begin spritzing lightly every 30–45 minutes with a 50:50 mix of apple cider vinegar and water.
- Continue smoking until the internal temperature reaches around 175°F and the bark is well set, usually about 3½–4 hours total. Transfer the roast to a aluminum foil or cast iron pan, add the sliced onion and beef broth, then cover tightly with foil and return to the smoker.
- Continue cooking until the internal temperature reaches 205–210°F and the meat is probe-tender.
- Remove from the smoker and rest, covered, for 20–30 minutes, or hold in an insulated cooler for up to 2–3 hours if needed.
- Shred the beef directly in the pan, mixing it with the onions and cooking juices. Serve hot.
Notes
- Savory default: Beef broth and sliced onion for classic pulled smoked beef. This keeps the pulled beef rich, beef-forward, and versatile.
- Deeper flavor: Replace up to half of the beef broth with a dark beer like a stout, porter, or brown ale.
- Sweeter option: Add 2–3 tablespoons of barbecue sauce or a splash of apple juice to the beef broth for a more BBQ-style pulled beef.
Equipment

Nutrition
Nutrition information is automatically calculated and should be used as an approximation only. If you’re worried you could always add a side of kale.

About Your Pitmaster
Joe Clements is the founder and editor-in-chief of Smoked BBQ Source, a leading barbecue resource that has helped tens of millions master grilling and smoking. Growing up in a vegetarian household, his love for barbecue was unexpected. Determined to master the craft, he launched Smoked BBQ Source in 2016 to document his journey from amateur to pitmaster.
Joe leads a team of expert barbecue creators and oversees the largest collection of in-depth grill reviews and a library of tested, foolproof recipes. Whether he’s firing up a pellet grill or charcoal kettle, he’s passionate about making barbecue approachable and enjoyable for all.
I know temp is how you know when it’s done but is there an approximate time it takes to hit the 200 degrees?
We used an estimated total cook time of 7 hours for this recipe
We made this and loved it! Very close to brisket. I bet some people wouldn’t know the difference. Will definitely keep this recipe on hand
I’m not sure I understand this from your Smoked Chuck Roast recipe-
6. Rest butcher paper-wrapped chuck roast in a cooler wrapped in a towel or in an oven with the warming feature for an hour before
You can place it in a Cooler?
What type of towel?
Thank you, John
Any old towel you have lying around the house you don’t mind getting a bit of meat juice on. We go over the full method here https://www.smokedbbqsource.com/faux-cambro-keep-bbq-warm/
Followed recipe directions exactly. Turned out overcooked. Good bark but very dry. Will try again using lower temps. And times.
Hey Roy, sorry to hear the chuck came out over cooked. What internal temp did you take it to, and how long did you rest it for?
Joe, went to 175, spritzing occasionally, 3hrs. Wrapped it with butcher paper, back on until 195 then into the oven on warm setting for 1 hour. I think a larger piece would have been better. Used a 4lb. Piece of meat
Sounds like you didd everything right. Sometimes you do just get unlucky with a small or unusually poorly marbled piece of meat.
Thank you for the recipe! 3.5 lb Chuck. Pulled at 170, wrapped with butter and back on until 200. Wrapped in a towel and let it sit in the microwave for an hour. Came out moist, sliced beautifully and tasted great! I used a Req Tec RT700 and it was just a tad over 6 hours. Going for a bigger one next time, family inhaled it.
Just found your site, can’t wait to try some other recipes.
Thanks Paul! Sounds like a great cook! Nice call on the butter wrap and long rest. Glad the RT700 held steady, those were nice pits!
3.5 lb roast came out a lil’ dry on me after I took it to 205 post-wrap, though some of the thicker, fattier parts were still decent. Will try and test starting at 190 next time after otherwise following the directions to a T, as I still got some good tasting beef out of this.
I love and have made many a brisket on my WSM. I know this is a depends question, but would you guesstimate that 4 1/2 pound chuck roast would take approximately seven hours? Does it go through the traditional stall that a brisket does?
Hi John, it should stall but nowhere near as long as a brisket. I think 7 hours is a reasonable estimate. If you’re in a rush you can increase the temp a bit (up to 300) when you wrap it.
Meat turned out great! The only difference was it took us about 9 hours for a 3 lb roast.
Thanks Melanie, wow that’s a stuborn chuck especially for only 3lbs. That’s why we always say to cook to temp not time.
The article talks about using a disposable aluminum pan but the recipe at the end calls for a caste iron pan.
The recipe instructions at the end say “Transfer to a foil or cast iron pan” so aluminum or cast iron works fine. The pan itself isn’t important, I like using the disposable pans because then I’m not messing up any of my wifes nice dishes…
I did this in my Titan Gas Grill with a UFO smoker attached. I used brisket (cheap here in NZ). A good bark formed after 2 hrs although I think I should have gone a bit longer as the internal temp wasn’t quite to where it should have been, but I was pushed for time as I had forgotten we were going out. But the twist I used (I’ll be lynched in Texas if I ever get there) was not braising it in the Titan. I bunged it in the Slow Cooker for 6 hrs! No worries about it drying out and it was tender, moist, smokey and utterly superb on serving, plus enough liquid left for a rich onion gravy. I could have used a spicier rub though.