
How to Grind Your Own Meat

SmokedBBQSource is supported by its readers. We may earn an affiliate commission at no extra cost to you if you buy through a link on this page. Learn more.

We’ve all had experience buying pre-ground meat at the grocery store, but nothing beats the freshness and quality of grinding your own meat.
You’ll get the best results with a meat grinder, but don’t fret if you don’t have one or aren’t in the market to buy one. There are alternative methods for grinding your own meat we will discuss below.
If you want to make the best burgers, sausages, and meatballs, grinding your own meat is a great way to start.
You have control over the quality of meats that go into the grind, the percentage of fat put into the grind for juiciness, and the spices or seasonings for flavor as well.
What you will need
Ok, so you’re on board and ready to take on grinding your own meat! Let’s take a look at a few of the things you will need to ensure success.
1. A meat grinder or food processor
We recommend using a meat grinder for the best overall meat grinding experience. Meat grinders are made for the sole purpose of grinding up meat and are often easier to work with when grinding large quantities.
The STX International STX-3000 Turboforce Speed Electric Meat Grinder is our favorite option. The STX-3000 is a robust machine offering 1200W of grinding power that can process up to 360 pounds of meat per hour.
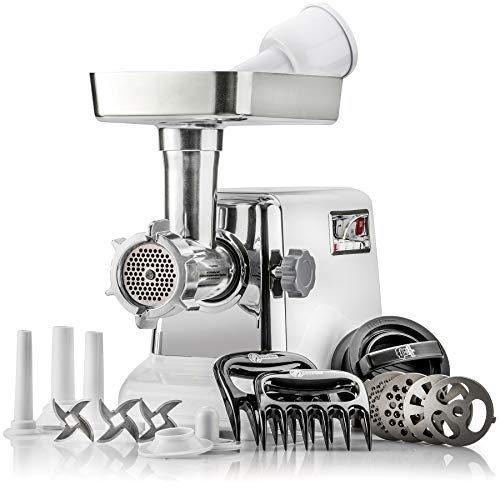
The STX-3000 can chew through tough cuts of meat and can handle both fine or coarse grinds easily. The included attachments make this grinder especially versatile.
That’s a lot of meat for the casual home-cook to grind, but it’s good to know this grinder will get the job done without clogging up or over-running the motor as some cheaper machines are known to do.
Alternative choice – Stand mixer attachment
Another option for those that have table-top stand mixers such as KitchenAid or Cuisinart are grinder attachments.

These attachments fit onto your mixer and turn it into a meat grinder. This is convenient as you don’t need a separate appliance, just the add on attachment.
Though these attachments are generally cheaper than counter-top meat grinders, they are not made to grind large quantities of meat, so keep that in mind.
2. A sharp knife
You’ll want a very sharp knife to cut up your meat into small, uniform pieces. The size you cut the meat into will depend on the opening of your grinder. You want the meat portions small enough to easily fit into the grinder opening without having to force them.
3. The right type of meat for grinding
Cheaper, fatty cuts of meat are best to use when grinding meat at home.
These cuts generally don’t do well when roasted or grilled, but when ground up with fresh herbs and spices, they’re melded into flavor bombs!
For beef try the chuck part of the cow. For pork or lamb, try the shoulder.
Once you get the hang of grinding your own meat, you can experiment with different combinations. Later, we’ll delve into the different types of meat combinations you can grind, and how those can affect flavor and texture.
How to grind your own meat: step by step
Now that you’ve got everything together, it’s time to start grinding meat!
1. Chill your equipment
One of the keys to grinding success is to keep everything cold. This not only ensures that the meat is ground up more efficiently but also keeps the fat in the meat from melting.
Cold meat and cold blades will keep the grinder working smoothly.
To do this, thoroughly clean your grinder parts – or the grinder attachment if you’re using a stand mixer – and put them into your freezer at least 20 minutes before you plan on grinding.
While the grinder parts are chilling, you can prepare the meat. The bowl that the ground meat will fall into should be chilled as well.
If you have a large freezer you can always store your grinder in it permanently so you are always ready to grind.
2. Cut and prepare your meat
Cut the meat into cubes, approximately one to two inches in size. You’ll want to remove any bone fragments or tough sinews such as tendons or silver skin.

Place the meat on a large sheet pan and place in the freezer for 20 to 30 minutes.
Along with chilling the equipment, you want the meat to freeze just enough so the outside surfaces feel rigid, but the middle is still malleable.
Be sure not to freeze the meat completely. Any longer in the freezer and you risk the meat being too solid for the grinder blades to cut. The more you practice grinding, the more you’ll get the hang of this step.
3. Assemble your grinder
While the meat is chilling in the freezer, it’s time to put together the grinder.
Pull the parts out and assemble your grinder or grinder attachment.
The larger grind plate will give you a coarser grind with more texture to your meat, while the smaller plate will give you a smoother grind useful for sausage or burger making.
You’ll usually want to use a coarse grind to start with, and then regrind with a smaller plate if you need to.
4. Get your grind on
Pull the meat from the freezer and place it immediately into the grinder hopper.
If you’re following a recipe, now is the time to incorporate any fresh herbs or spices along with the meat as it grinds.
If you are grinding burgers don’t add salt or pepper at this stage.
Remember, the bowl the ground meat is falling into should also be chilled. A good tip is to get a large bowl with some ice and water, and then place another bowl in that

You want to grind the meat in batches so everything stays as cold as possible during the process.
Use the plunger to gently push meat down into the grinder, but don’t force it. The grinder should be pulling the meat along without the need to force through.
You want to keep the temperature of everything under 40°F in the temperature safety zone. If you’re grinding a large quantity of meat, periodically stick everything back in the freezer to firm it all up.
Grind your meat with a food processor
If you don’t have a grinder or meat attachment, you can use a food processor. The results won’t be quite as good but it will still get the job done Follow the steps above with a few changes.
1. Chill your processor blades
As you would with your grinder parts, you’ll want your processor blades to be chilled. If you’re able, place the bowl of the food processor into the freezer as well.
2. Cut and prepare your meat
Same as above, you’ll want the chunks of meat to be uniform as you put them in your food processor.

3. Assemble your food processor
When the meat is almost done chilling, put together the food processor on a countertop or stable surface.
4. Grind in batches
Put the chilled meat in the food processor no more than half full. Cover and pulse the meat for one-second intervals. Continue pulsing until your meat is the consistency you want – coarse or fine.
If you’re adding herbs or spices, add them after your initial grind. Re-grind the meat in similar one second pulses. This will incorporate all the flavors together and tighten the bind of the meat.
The meat is now ready to be cooked or can be packaged and frozen for a later date.
Why grind your own meat?
There are a lot of reasons to grind your own meat at home. Let’s take a look at some.
Greater freshness
Grabbing a pound of ground meat at the grocery store is certainly convenient, but you don’t know if the meat has been ground fresh that day or if it’s been sitting in the meat counter.
Chances are it’s been ground a day or more before you make the trip.By grinding your own meat, you ensure it is as fresh as possible.
Better safety
Once the meat is ground and is exposed to air, it becomes susceptible to bacteria and the longer it sits idle, the more the quality begins to degrade.
Think of it like cutting vegetables: the cut side that is exposed to air begins to brown and dry out.
By grinding your own meat, you increase the safety of your ground meat meals because you control how long it sits before use.
Better quality and taste
Your self-ground meat will be as fresh as it can get, resulting in better quality and taste.
The meat hasn’t had a chance to lose flavor as it would be sitting on the shelf at the supermarket
Customizable meat combinations
Grinding your own meat gives you full control of the meat you’re using, as well as the meat-to-fat ratio.
If you’re grabbing meat from the grocery store, chances are you won’t be finding cuts with beef short rib mixed with sirloin off the shelf.
Once you get comfortable grinding meat, you can experiment with mixtures such as those.
Some are juicier than others and make great burgers, while lean cuts play well with meatloaf and meatballs. It’s all about experimenting and having fun.
Save some money
By-the-pound, you are saving money if you grind your own meat. Since you’re putting in the labor, you don’t have to pay the mark-up that most ground meat has in the supermarket.
Despite what you may have heard, you can always freeze burgers and grill them frozen.
Which cuts of meat to grind
Now that you’re comfortable with your grinding setup, let’s dive into what cuts of meat go well with what kind of meal.
We’ve already mentioned beef chuck and pork/lamb shoulder as these cuts of meat generally already have a good meat-to-fat ratio as a whole.
An 80/20 meat-to-fat ratio will serve any grind well, but if you’re looking for a juicier end result, 70/30 meat-to-fat is the way to go.
Chuck and shoulder are already at the 80/20 ratio when processed from the animal, so all you have to do is chunk up the meat for the grinder.
Brisket also works well, although you may want to combine it with some lean meat like sirloin.
What is the best meat to grind for hamburger
You can’t go wrong starting with the beef chuck here. Chuck is naturally 80/20 and alone can serve as a hearty burger, but you can up the ante by adding in other cuts of beef.

Try a combination of half ground chuck and the other half being one of the cuts below:
Sirloin
Adding sirloin to your burger will give it a meatier flavor and make the patty denser. Sirloin is a leaner cut of 90/10 meat-to-fat ratio.
Round
The round cut of beef comes from the rear legs of the cow and is a lean, economical cut. Generally, 85/15 in ratio, adding ground round to your chuck will cut the fat of your burger and add a beefier flavor, just not as much as sirloin.
Brisket
We all know brisket is great for BBQ, but have you ever had it in your burger?
The fat content throughout brisket varies, so you can’t nail down an off the shelf ratio, but there is enough intramuscular fat that your grind will stay juicy.
Check out this video from Pitmaster X for a delicious, simple way to make brisket burgers.
Brisket burgers are hearty, juicy and full of flavor with and without mixing with chuck.
Use the flat part of the brisket for a leaner grind, or the point for a fattier, juicier option.
Just watch out when you are cooking as so much fat will drip out that it can cause a lot of smoke and fire, especially when cooking over charcoal.
Rib cuts
Short ribs, ribeye, and short eye from the rib are all great cuts for grinding. These cuts have high fat content and fine marbling throughout the meat, allowing your burger to stay moist and juicy – and hard to overcook.
The marbling adds succulent flavor to your burgers that you won’t get with other cuts of meat.
What is the best meat for sausages
Traditionally, the foundation of a good sausage starts with pork – specifically pork shoulder.
Bratwurst, kielbasa, Italian, chorizo, and breakfast sausage all use nothing but pork shoulder. It’s the herbs, spices and cooking methods that make all these sausages unique.

Some sausage recipes call for a combination of some other meat with pork.
Ground veal mixed with pork is a popular combination. Pork and lamb make for a good sausage too, just make sure you have a good fat ratio between 70/30 and 80/20 meat to fat.
If you think your grind is a little too lean, you can add pork back fat and regrind to incorporate the fat until you attain the appropriate ratio.
Check out our guide on making your own sausages to learn more, or check out our guide to making hot dogs from scratch.
How long can you store ground meat in the fridge
The USDA states once meat is ground up, it will last for one – two days in a refrigerator. Longer storage requires the meat to be frozen.
Frozen ground meat will last indefinitely, but will begin to lose quality. It’s best to use within 4 months of freezing.
How to make your burger meat stick together
If you’re going for a lean burger, the lack of fat can make the meat dry and crumbly. There are a couple of ways to combat this issue though, so let’s take a look.
Eggs – Using whole eggs as a binder is popular when making meatloafs, but the same principle works when making burgers as well. Add one whole egg per pound of ground meat and mix in thoroughly by hand. Wet, cool hands work best when forming the patties so the meat won’t stick to your hands.
Breadcrumbs – Similarly, using breadcrumbs has been a meatloaf staple, but they work for burger binding as too. With breadcrumbs though, you need to add more liquid or else the meat will be even dryer. Try adding liquid condiments by the teaspoon such as worcestershire or soy sauce. Mustard works well too. Adding liquid to the breadcrumbs will get them tacky and bind the meat together.
Conclusion
As you can see, grinding your own meat has a slew of benefits that not only make your food taste better but offer more quality and control. Whether you’re in it for the burgers or want to dive into the world of sausage making, grinding your own meat is worth it.
Have experience with grinding at home, or on the fence about your first grind, let us know in the comments! Remember to have fun with it, and share your story with us!

About Your Pitmaster
Joe Clements is the founder and editor-in-chief of Smoked BBQ Source, a leading barbecue resource that has helped tens of millions master grilling and smoking. Growing up in a vegetarian household, his love for barbecue was unexpected. Determined to master the craft, he launched Smoked BBQ Source in 2016 to document his journey from amateur to pitmaster.
Joe leads a team of expert barbecue creators and oversees the largest collection of in-depth grill reviews and a library of tested, foolproof recipes. Whether he’s firing up a pellet grill or charcoal kettle, he’s passionate about making barbecue approachable and enjoyable for all.
12,000 watts? Does it also grind up scrap cars? Hah
Can’t say we’ve tried running any cars through it 😂 Thanks, will fix the typo.
I have ground a lot of meat, using hand turned grinder and the Kitchen Aide. Recently I purchased the “Meat” brand grinder and it is a game changer. What took me an hour with the Kitchen Aide was done in about 10 minutes with the Meat grinder. I highly recommend that if one is to get into grinding burgers or sausage, they invest in something more robust than the Kitchen Aide – which is made of plastic, and mine broke, which really helped in my decision to get a quality grinder.
Love the emails! Keep ’em coming!