
Best Outdoor Pizza Ovens in 2026: We Tested 9 Ovens

SmokedBBQSource is supported by its readers. We may earn an affiliate commission at no extra cost to you if you buy through a link on this page. Learn more.
At Smoked BBQ Source, we usually focus on reviewing grills and smokers, but once you’ve got a solid setup with charcoal, gas, or pellet, it’s only natural to start eyeing the next backyard upgrade: a pizza oven.
We got our hands on 9 of the most popular ovens, from wood-fired to gas-powered workhorses and cooked dozens of pizzas to see how they stack up.
Whether you’re craving that blistered Neapolitan crust or want to upgrade from soggy oven pizza, we’ve got you covered.


How we test pizza ovens
We selected 8 of the most popular portable and semi-portable tabletop-style outdoor pizzas from brands like Ooni, Gozney, Alfa, Solo, and Ninja to see how they compared.
We tested each oven by cooking multiple pizzas using a combination of homemade and store-bought dough. We evaluated preheat times, ease of use, heat retention, crust texture, topping doneness, and cleanup effort.
Best outdoor pizza ovens to make a perfect pizza at home
1. Best Overall – Gozney Roccbox


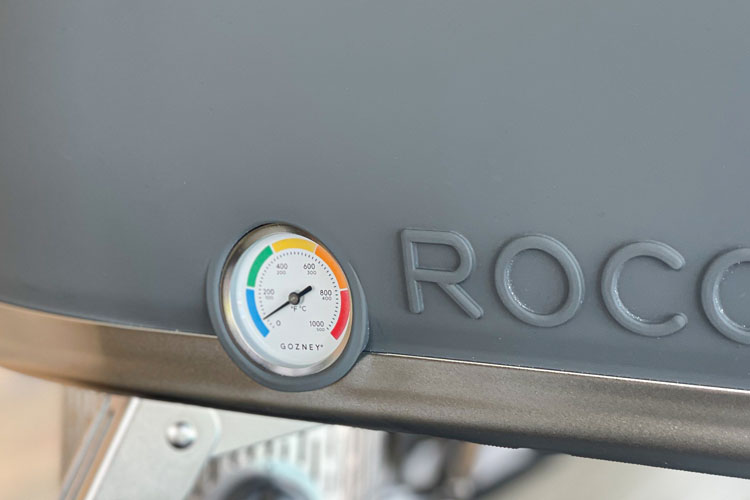
The Gozney Roccbox delivers restaurant-quality pizza in a compact, user-friendly package. With dual fuel capability, a built-in thermometer, and a unique safe-touch exterior, it combines pro-level performance with thoughtful features that make it ideal for home cooks.
It’s not the largest oven we tested, but it hits the sweet spot between versatility, design, and value for most people.
Reaching 950°F, it can cook a pizza very fast, while the safe touch silicone jacket surrounding the pizza oven is cool to the touch.
The safe touch system is unique to the Roccbox as the other ovens I tested got extremely hot on the outside.
The overall setup was very easy. The oven comes with a lifting strap straight out of the box, which makes pulling it out of the box quick and painless.
The Roccbox has a gas burner, while a wood burner option can be purchased separately.
It also includes a quality pizza peel, a welcome bonus you don’t always see at this price point.
Despite weighing 44 lbs, the Roccbox remains compact and easy to move thanks to its dual folding legs and included lifting strap.

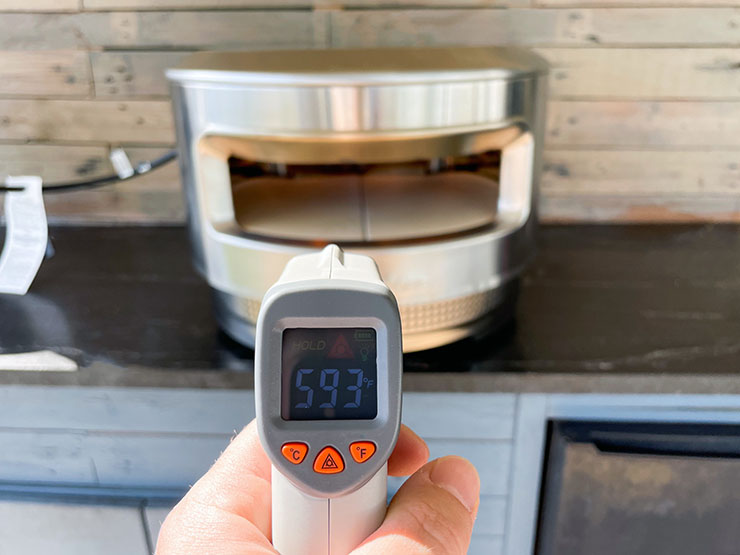
The built-in thermometer comes in handy, and most ovens do not carry this feature. I knew exactly when the oven was at the right temperature to start cooking. For ovens that don’t have a built-in thermometer, using an infrared thermometer gun will give you an accurate reading.
The cooking space does seem a little tight (12 inches) compared to the opening of most of the other ovens I’ve tested, but I was still able to get a decent-sized pizza inside.

Preheating took a little longer than some of the other ovens we tested, but once it hit temperature, the Roccbox cranked out pizzas one after another with no issues. The patented baffle plate directs flames toward the oven’s mouth, promoting even heat distribution. I was genuinely impressed by how consistently and evenly it cooked each pie.
This oven is well-priced for all the features it includes. It does feel like a luxury oven at a very reasonable price. The fact that it comes with a peel, has a built-in thermometer, and has a safe-touch silicone jacket, while giving you the flexibility to use wood or gas as a fuel source, gives the user a lot of options at this price point.
The one big consideration is size. If you want to cook larger pizzas, you should consider upgrading to the Gozney Arc, our one of the Ooni’s we cover below.
What we like:
- Easy assembly – Took about 5 minutes.
- Detachable burner system – Can switch between wood or gas.
- Built-in thermometer – Easily track the internal temperature of the oven.
- Safe touch silicone jacket – Keeps the outside nice and cool.
What we don’t like:
- Longer preheat time – The oven takes 5-10 minutes longer than other ovens to preheat.
- Small opening – With only a 12-inch opening, you are limited in what you can cook.
Click here to read our full Gozney Roccbox review.
2. Runner Up – Ooni Koda 16
Read our full Ooni Koda 16 review.


The Ooni Koda 16 is a propane or natural gas-operated pizza oven that is very easy to use right out of the box. It has an extra large cooking area for pizzas up to 16 inches and can get as hot as 950°F.
It’s our top pick if you don’t want to fuss around burning wood, and want a larger oven than the Roccbox.
Weighing 40 lbs, it is slightly lighter than the Gozney despite being heavier. We assume this is due to the cool touch on the Gozney.
The L-shaped gas burner provides more even cooking than a traditional oven, with just a single burner coming from the back. The folding legs make it easy for transport and storage, and the built-in gas ignition makes for a fast start-up.

Firing up the oven for the first time was quick and painless. Assembly was easy. Just remove the oven from the box, unhinge the legs, and hook up the gas. The 16-inch space for cooking extra large pizzas was a great option to have and makes sliding most pizzas in and out a breeze.
Preheating the oven takes around 20-30 minutes.
Pizza cooks quickly and evenly. I did make a few rotations of the pizza and could maneuver it inside easily. The large cooking space allows you to move the pizza closer or further away from the heat source to cook each pizza the way you want.
Inserting and removing the pizza stone is easy, and there is no cover plate or screws to secure it. After the pizza oven cooled down, I could slide out the stone and clean it easily. For its price point, it is a great value for its size and dependability.
We have a more detailed Ooni VS Gozney Roccbox comparison for a more detailed breakdown.
What we like:
- Large cooking surface – Can cook pizzas up to 16 inches.
- Modern and sleek design – Looks great in your outdoor space.
- Quick set up – All ready in 5 minutes.
- Oven gets hot – Oven temps can get up to 950°F.
What we don’t like:
- Long preheat time – Took 5-10 minutes longer than other ovens tested.
- No accessories included – At this price point, you would like to see a peel included.
3. Best Pellet-Fired Pizza Oven – Grilla Pie-Ro
Read our full Grilla Pie-Ro review.


The Pie-Ro stands out as the first-ever self-monitoring pellet-fueled pizza oven, combining set-and-forget ease with real wood-fired flavor.
Ooni used to offer a pellet-fired oven (the Fyra), but they’ve since moved away from that design. So I was curious to see Grilla go all-in on pellets with the Pie-Ro. But after testing it out, it’s clear that Grilla has brought their deep experience with pellet grills to the table. From the digital controller that self-regulates heat to the pellet efficiency, everything about the Pie-Ro feels like it was designed by a team that truly understands how to cook with pellets.
True to Grilla’s pellet grill roots, the Pie-Ro embraces that “set it and forget it” mentality. The auto-rotating stone means no more awkward peel shuffling. Just press “Rotate” and let the oven handle the spin cycle.
You’ve also got a wider temperature range than most gas ovens, which enables you to cook a variety of different foods from cobblers to steak.
What we like:
- Real wood-fired pizza flavor – Without the hassle
- Rotating pizza stone – For even cooking
- Wide temperature range – 180°F – 800°F allows for versatile cooking
What I don’t like:
- No legs – So it requires dedicated counter space.
- Heavy – Requires two people to move around
4. Best Multi-Fuel Pizza Oven – Ooni Karu 16
Read our full Ooni Karu 16 review.


If you want to cook true “wood-fired” pizzas, you’ll need an oven that can actually cook with wood.
While the Roccbox has a wood-burning attachment you can buy, the Karu can cook with wood and charcoal out of the box.
You can also add a gas-burning attachment if you’re feeling lazy and just want pizza fast without having to manage a fire.
The 16″ size is better suited for multi-fuel use and is generally much easier to use.
You will have to pay up for the versatile Karu 16, though. The oven with the gas attachment will set you back $918 at the time of writing.
That’s a lot more than either the Roccbox or the single-fuel Koda, so you should only go with the Karu if you really want to have the option to cook with wood and gas.
Personally, I find coordinating a pizza night stressful enough without having to babysit a wood fire so I prefer the simplicity of the Koda 16, but I understand for a lot of people, that’s half the fun.
What we like:
- Multi-fuel options – Turn out amazing tasting pizzas using charcoal, wood, or gas with the optional gas attachment.
- Larger opening and interior – Comfortably fit 16” pizzas, and more space makes it easier to maneuver.
- Mounted digital thermometer – Monitor the internal oven temperature so you know when you need to add more fuel
What we don’t like:
- Higher cost – More expensive than the gas-only Ooni Koda or the multi-fuel option from Gozney
- Long Preheating – It takes a while for the surface stones to heat up using charcoal and wood.
5. Best Oven For Cooking Two Pizzas at Once – Ooni Koda 2 Max
Read our full Ooni Koda 2 Max review.


I know what you’re starting to think, and I promise you this article is not sponsored by Ooni!
This is actually a new category that we added after testing the Koda 2 max. This is a dual-burner gas oven, with 24″ cooking area capable of cooking multiple pizzas at once.
Because you can set up multiple zones, it’s also great for cooking side dishes, steaks, and desserts.
We tested this out with a couple of ribeye steaks on one side and Brussels sprouts and onions on the other.

The steak got a great char, as the pizza oven cooks it similar to an infrared broiler that you find in high end steak houses.
One other nice addition is the two wired meat thermometers, and the digital display on the front.
Other than that, the build and design match the smaller Koda ovens.
This is a great option if you want to cook pizza for a large group of people or want to have more flexibility to get creative with your pizza oven.
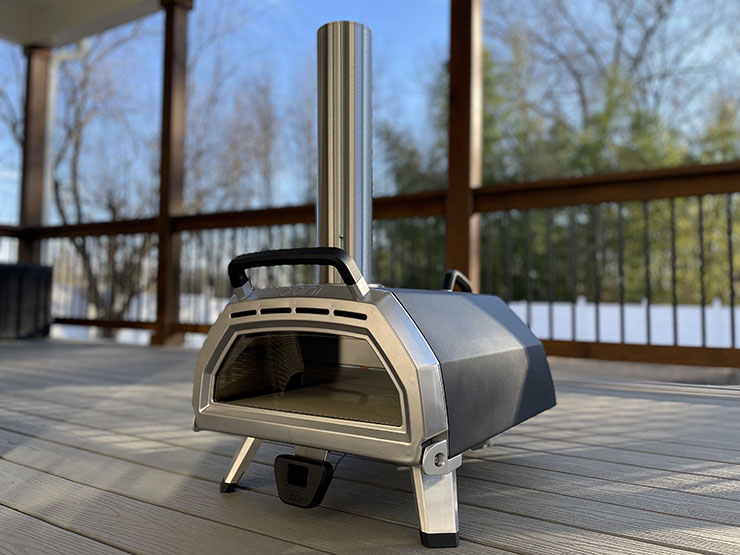
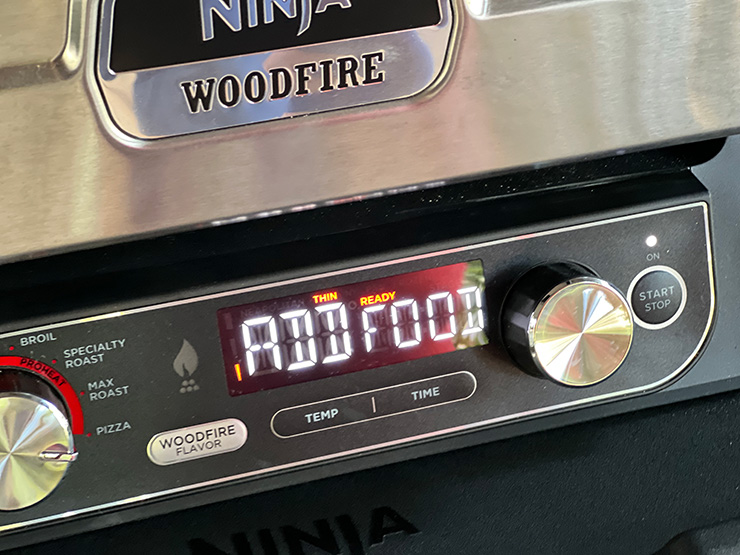
6. If you want to cook more than just pizza – Ninja Woodfire Outdoor Oven
Read our full Ninja Woodfire review.


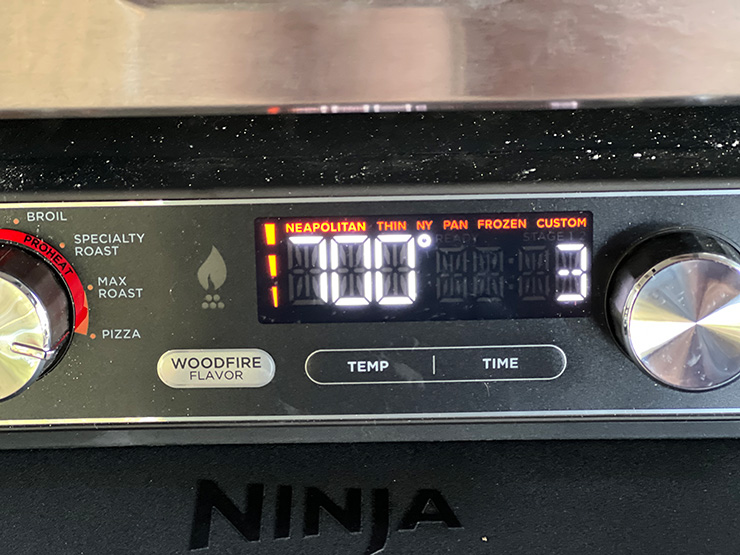


Unlike all of the ovens we’ve covered so far, the Ninja Woodfire doesn’t use gas or wood. Instead, it uses electricity, and you can burn wood pellets to give food a subtle smoke flavor.
As well as pizza, the oven has modes for smoking, baking, roasting, broiling, and even dehydrating.
In our tests we cooked BBQ chicken flatbread, smoked chicken drumsticks and even pepperoni pizza rolls, and they all came out amazing.
You are going to be limited in the size of pizza you can make, but I think the versatility makes up for that.
What we like:
- Sleek and beautiful design – Copper-colored exterior with stainless-steel accents make it a stylish addition to any outdoor setup.
- Versatile cooking options – Can roast, smoke, bake, dehydrate, and cook pizza, offering a wide range of functions.
- Intuitive and easy to use – Simple controls with clear settings and notifications for preheating and cooking completion.
- Woodfire flavor feature – Adds a smoky flavor to food, even at different temperature ranges.
What we don’t like:
- Limited surface area – The cooking surface is small for larger pizzas, restricting its capacity for larger meals.
Other pizza ovens we Tested
Alfa Forni Moderno Portable Pizza Oven
Read our full Alfa Forni Moderno review.


The Alfa Forni Moderno is one of the best-looking ovens we reviewed. This is marketed as a portable oven, but it still weighs in at 77 lbs, which is almost double the Gozney.
That weight may be worth it though, as in our tests the Alfa was able to hit over 900°F in around 30 minutes. Significantly higher than other propane “portable” ovens.
The actual opening is quite small, so you’re limited to cooking smaller pizzas. Not a problem considering how fast you can churn them out.
Pizzas we cooked were done in a few minutes and had a perfect Neapolitan-style crust.
Solo Stove Pi Prime Pizza Oven
Read our full Solo Stove Pi review.


Solo Stove is more well known for its lineup of fire pits, but with the Pi they have got into the lucrative pizza oven market.
The Pi is a propane-only pizza oven. It’s a good-looking oven, made from stainless steel, and is compact and portable. The door measures 13 inches wide, so this oven competes with other 12″ ovens like the Ooni Karu 12.
What I like:
- Fast to heat – I found the oven could get to 650°F within 10 minutes, so you won’t be waiting around for long.
- Safe – The exterior of the oven stayed cool enough to touch even when it was cranked up. to high
What I don’t like:
- Smaller opening – The 13″ opening is on the smaller side, but is similar to the Roccbox
KettlePizza Basic Pizza Oven Kit for 18.5 and 22.5 Inch Kettle Grills
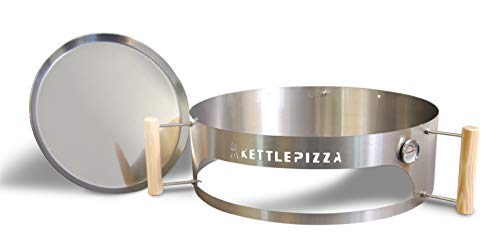
If you already own a Kettle charcoal grill and don’t want to go to all the trouble of getting a freestanding pizza oven, then the KettlePizza Basic Pizza Oven Kit can turn 18.5 or 22.5-inch kettle grills into an outdoor pizza oven.
The set itself consists of a stainless steel riser sleeve that sits between the base of the grill and the lid and creates a pizza oven style opening. Using a combination of charcoal and hardwood, the KettlePizza kit can achieve the high, 900°F, temperatures needed to properly cook a pizza.
The standard kit comes with a peel, and the deluxe version comes with a hand-made cordierite baking stone.
If you’re looking for a way to turn your kettle grill into a pizza cooking machine, the KettlePizza kit is the way to do it.
What we like:
- If you’ve already got a kettle grill, this kit means you don’t have to splash out on a whole new pizza oven.
- The kit comes with everything you need and is quick and easy to install.
- When combined with an additional grill grate, the KettlePizza kit significantly increases the size of your kettle grill’s cooking space.
What we don’t like:
- Because of the lack of venting, the exact temperature of a kettle grill pizza oven can be hard to control and with the pizzas cooking in less than a minute, this can result in a ruined pizza, very quickly!
- Many reviewers have noted that to cook the toppings properly, you need to purchase a grilling steel to sit inside your kettle grill’s lid and reflect the heat, which adds to the cost.
What to consider when buying an outdoor pizza oven
Most considerations when it comes to purchasing an outdoor pizza oven can be slimmed down to five crucial factors: fuel, size, durability and insulation, maximum temperature, and price.
You’ll also want to check if the oven comes with a pizza stone and any other accessories included, or if you need to purchase them separately.
Fuel

When choosing a pizza oven, the fuel type is one of the most significant factors. Each option affects flavor, ease of use, and overall experience:
- Wood gives that classic wood-fired flavor, but requires the most effort to manage and maintain consistent heat. Great if you enjoy the process.
- Pellets burn clean and offer good flavor with less hassle than wood, though the feeding systems can be finicky and require electricity.
- Gas (usually propane) is the most beginner-friendly, fast to light, easy to control, and low-maintenance. You lose some of that smoky flavor, but gain big on convenience.
- Electric – Found on some hybrid models like the Ninja Woodfire. Great for small spaces or multi-function cooking, but can lack the high heat and crust quality of flame-based ovens.
Some models, like the Roccbox or Ooni Karu 16, offer multi-fuel capability, giving you the flexibility to switch between gas and wood as needed.
Size
A few years ago, most outdoor pizza ovens were more compact, designed to cook smaller 12″ pizzas. Companies like Ooni have been adding 16″ options, which make them a little less portable, and the Koda 2 Max is a whopping 24″ oven.
If you’re looking for a portable outdoor pizza oven, you’ll want to consider something more along the lines of the Ooni Koda or the Roccbox.
The Roccbox weighs 44 lbs, while the Koda 2 Max tops the scales at 95lb.
Durability and insulation
Much like buying a grill, the materials your outdoor pizza oven is made out of can make a real difference.
If you’re looking for something portable, you’ll also want it to be durable, so it can take a few knocks on the road.
The Roccbox, for instance, has a high-grade 304 stainless steel body. Giving it durability, lined with calcium silicate installation, and is covered with heat-resistant silicone from extra durability and safety.
We have a guide on the difference between brick and stainless steel for pizza ovens if you want to learn more about how the material can impact your pizza.
Maximum temperature
As we’ve mentioned before, cooking a proper Neapolitan-style pizza takes a very high, 900ºF, and above, temperature. If the oven you’re considering has a max temperature below that, it’s probably not worth buying.

Price
A lot of countertop pizza ovens are expensive, and while there is nothing wrong with paying for quality, you’ll want to make sure you’re getting your money’s worth.
We chose the Gozney Roccbox to be our best oven overall because, despite its not-insignificant price tag, it has the build quality, utility, and functionality to justify the cost you’re being asked to pay.
Ease of cleaning
Cleaning pizza ovens is pretty easy. Just like a self-cleaning oven works in your kitchen, you can increase the temperature of your pizza oven for 20-30 minutes and basically incinerate any little bits and pieces left inside. Most of it will turn to ash, and you can vacuum it out with a shop vac.

Some ovens, like the Grilla Pie-Ro make cleaning even easier with the lid that opens up.
If you need to remove the pizza stone, wait until the oven and stone have cooled down, then scrub with a sponge or a wire brush. If you need to add a little water to rinse things off, that’s okay. I would avoid using soap

About Your Pitmaster
Joe Clements is the founder and editor-in-chief of Smoked BBQ Source, a leading barbecue resource that has helped tens of millions master grilling and smoking. Growing up in a vegetarian household, his love for barbecue was unexpected. Determined to master the craft, he launched Smoked BBQ Source in 2016 to document his journey from amateur to pitmaster.
Joe leads a team of expert barbecue creators and oversees the largest collection of in-depth grill reviews and a library of tested, foolproof recipes. Whether he’s firing up a pellet grill or charcoal kettle, he’s passionate about making barbecue approachable and enjoyable for all.
I did not see the halo pizza oven with rotating platform!